What is Version Control
Overview
Teaching: 5 min
Exercises: 0 minQuestions
What is version control and why should I use it?
Objectives
Understand the benefits of an automated version control system.
Understand the basics of how automated version control systems work.
What is Version Control?


Also called revision control or source control. At their simplest these are tools which track changes to files.
Why should I use it? - Three reasons
1. A More Efficient Backup
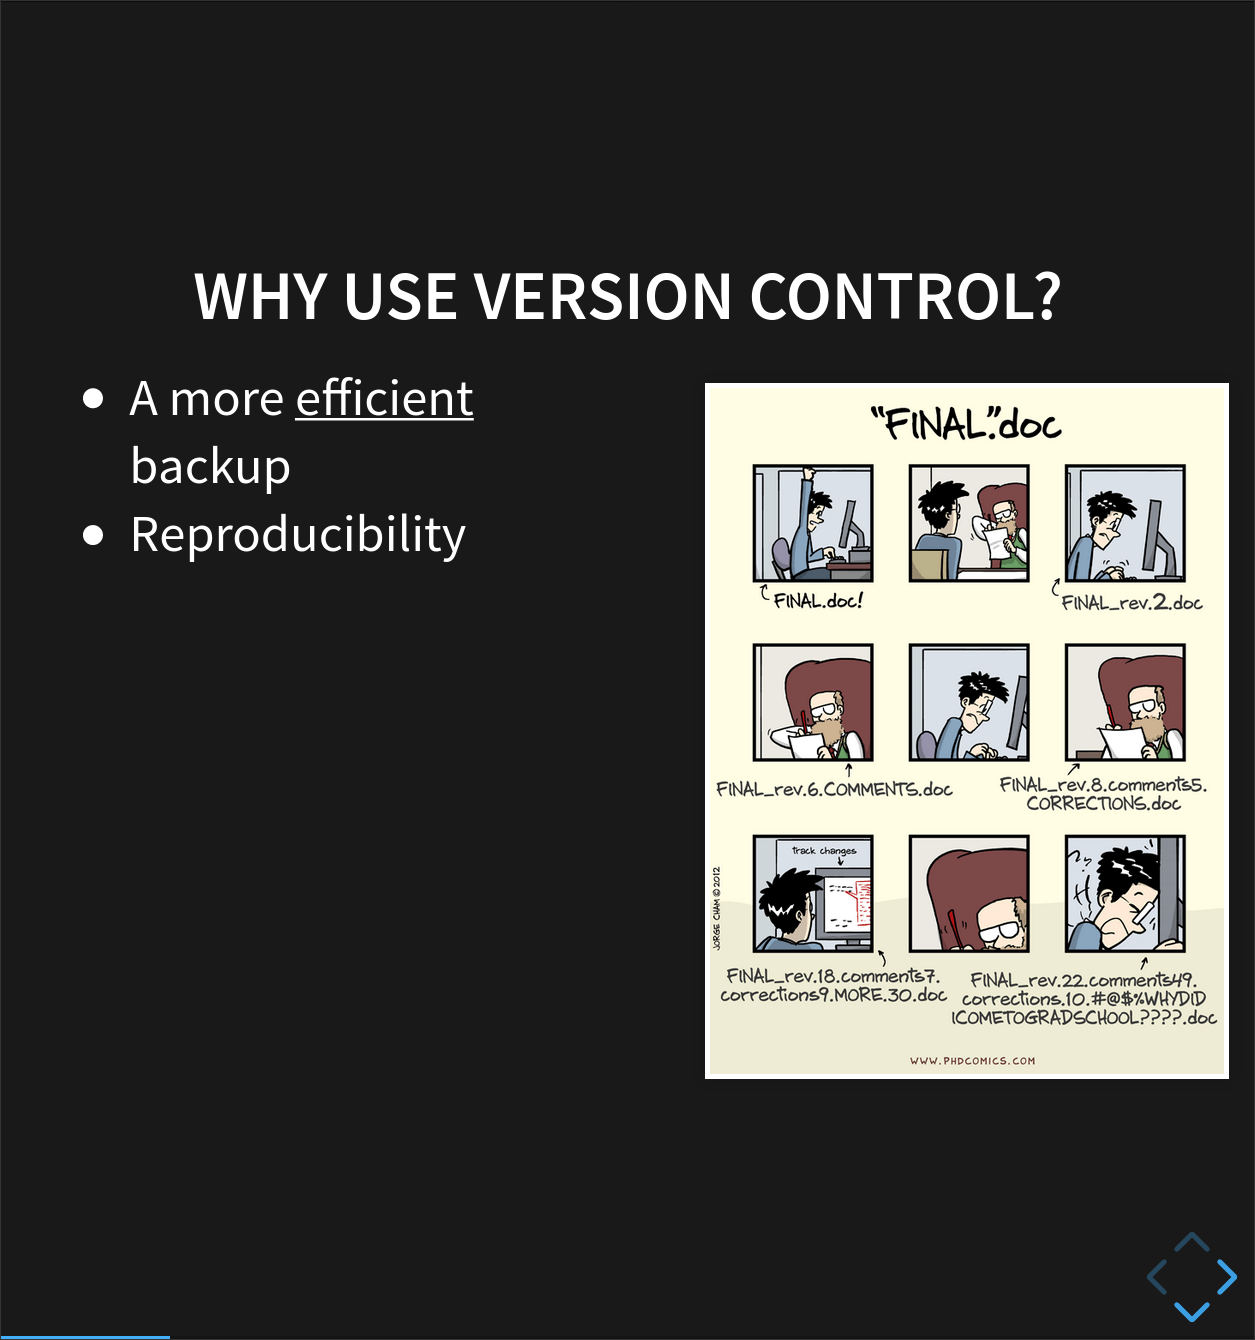
We’ve all been in this situation before - multiple nearly-identical versions of the same file with no meaningful explanation of what the differences are.
If we’re just dealing with Docs, some word processors let us deal with this a little better, like Microsoft Word (“Track Changes”) or Google Docs version history. BUT research isn’t just Words docs, it’s code and data and diagrams too.
Using version control means we don’t keep dozens of different versions of our files hanging about taking up space, and when we store a revision, we store an explanation of what changed.
2. Reproducibility
When you use version control, at any point in the future, you can retrieve the correct versions of your documents, scripts or code. So, for example, a year after publication, you can get hold of the precise combination of scripts and data that you used to assemble a paper.
Version control makes reproducibility simpler. Without using version control it’s very hard to say that your research is truly reproducible…
3. To Aid Collaboration
As well as maintaining a revison history, VC tools also help multiple authors collaborate on the same file or set of files.
Professional software developers use VC work in large teams and to keep track of what they’ve done. They know who has changed what and when. And who to blame when things break!
Every large software development project relies on VC, and most programmers use it for their small jobs as well.
VC is not just for software: papers, small data sets - anything that changes over time, or needs to be shared can, and probably should be stored in a version control system.
We’ll look at both the backup and collaboration scenarios, but first it’s useful to understand what going on under the hood.
How do Version Control Tools Work?
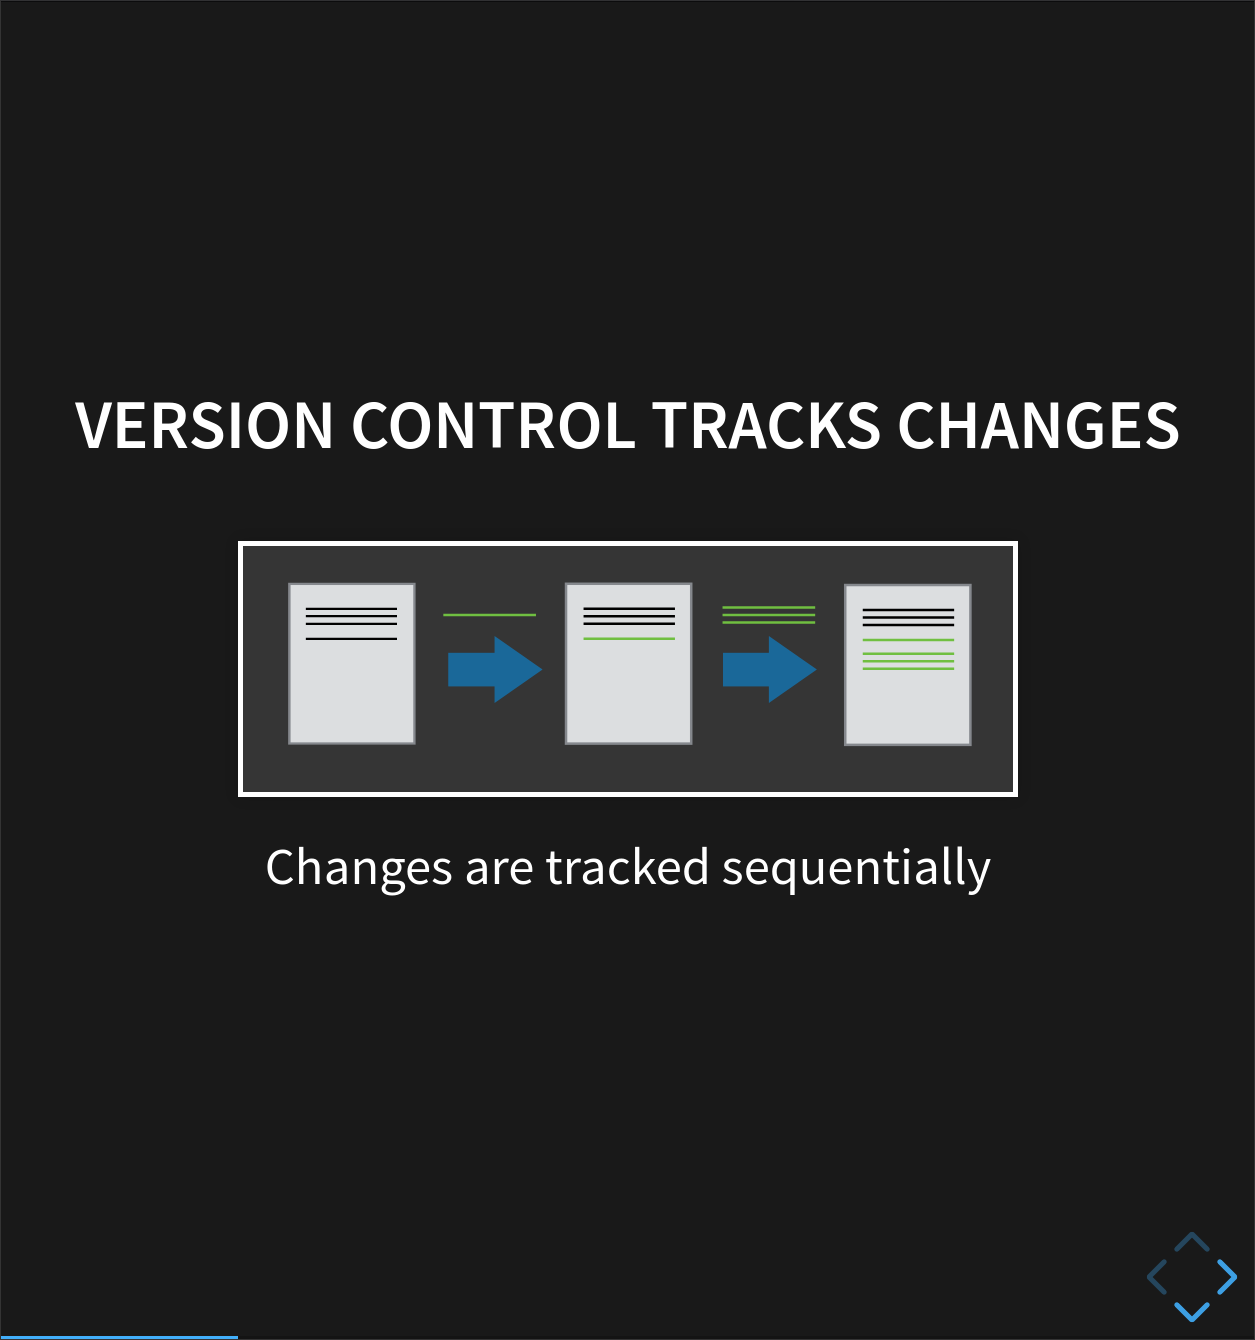
Version control systems start by storing the base version of the file that you save and then store just the changes you made at each step on the way. You can think of it as a tape: if you rewind the tape and start at the base document, then you can play back each change and end up with your latest version.
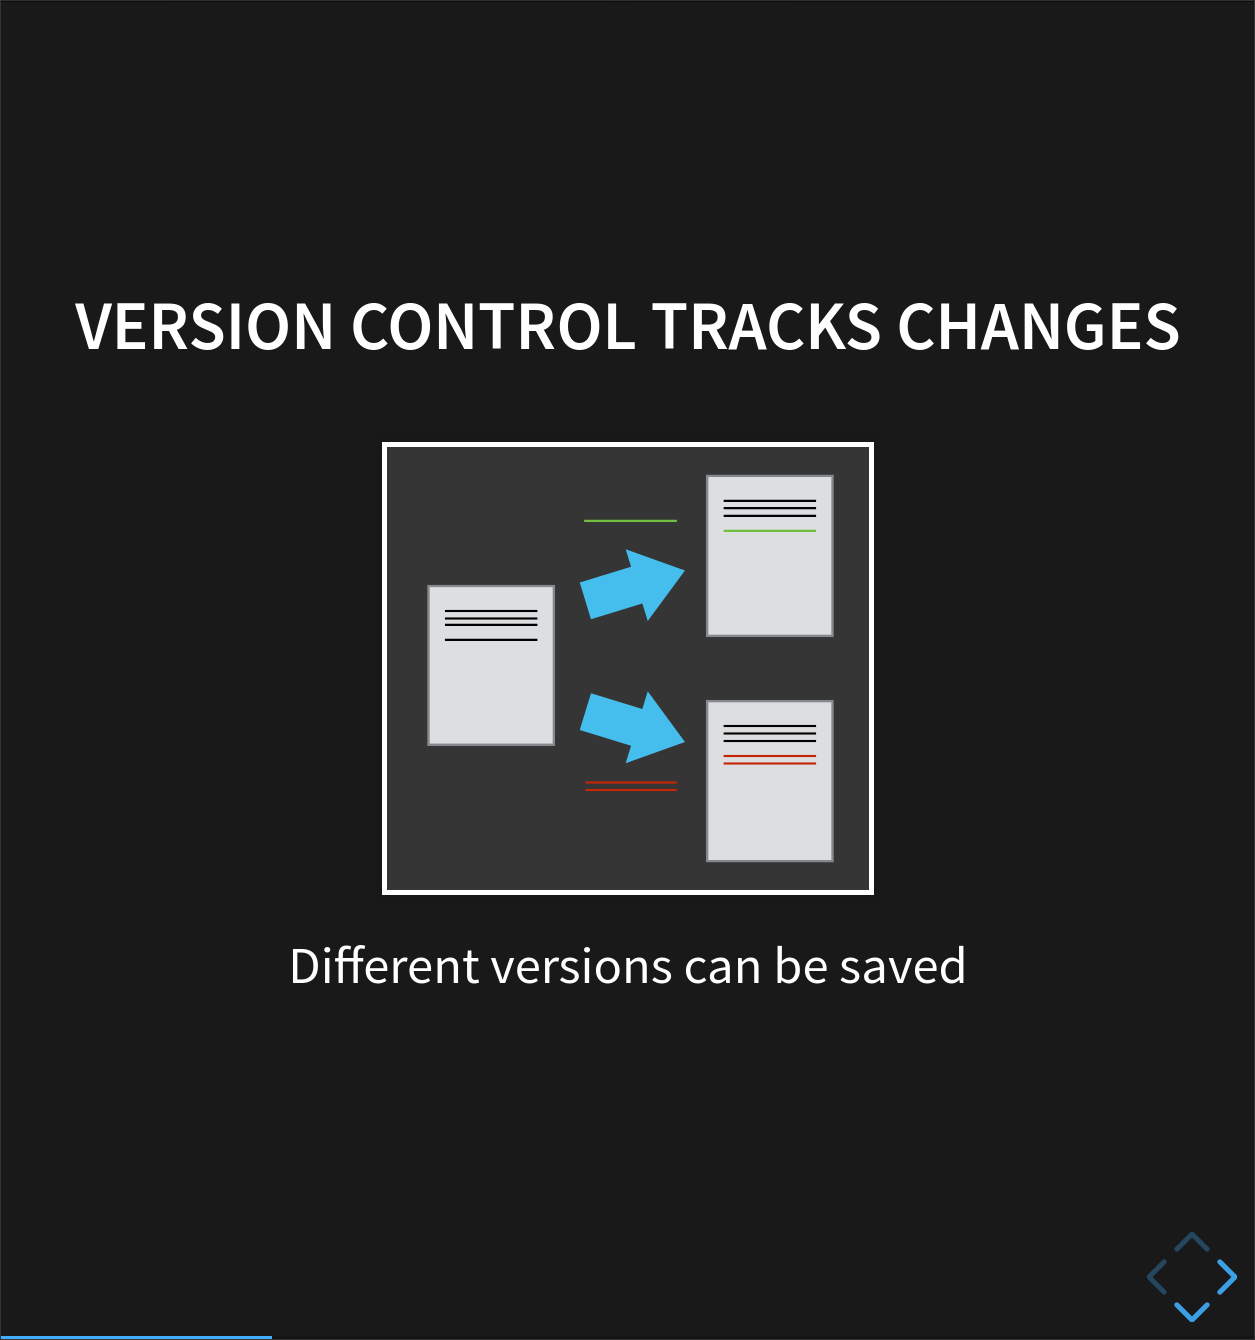
Once you think of changes as separate from the document itself, you can then think about “playing back” different sets of changes onto the base document and getting different versions of the document. For example, two users can make independent sets of changes based on the same document.
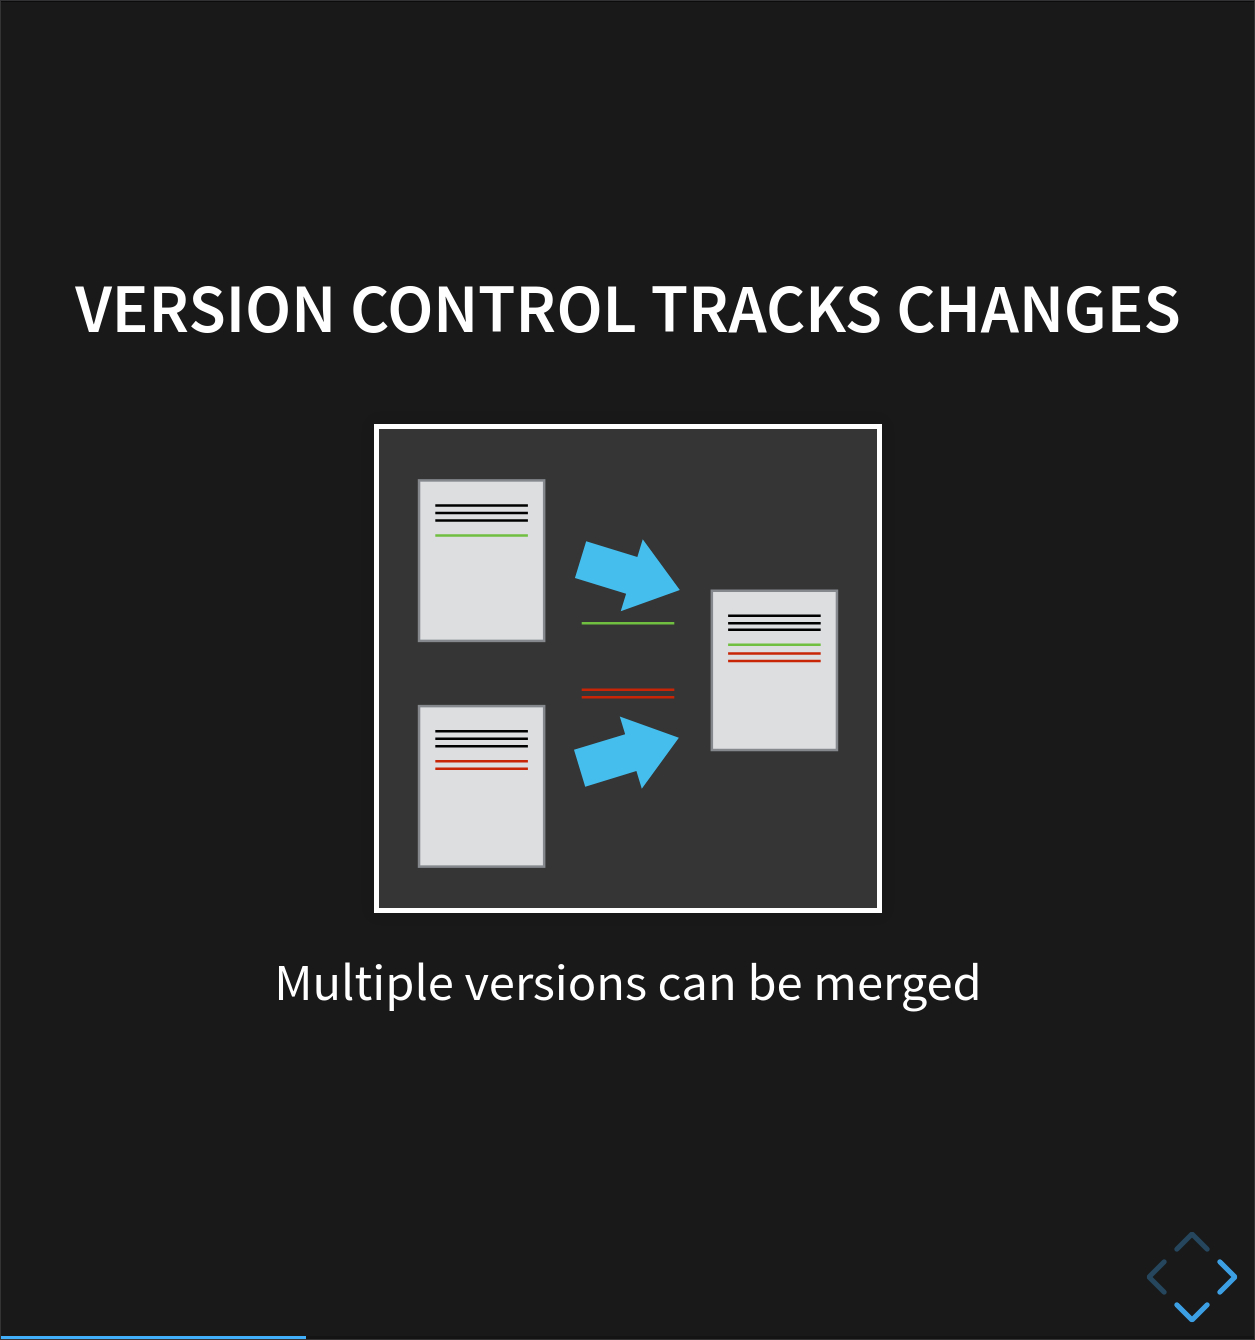
If there aren’t conflicts, you can even try to play two sets of changes onto the same base document. A process call merging.
Version Control Alternatives
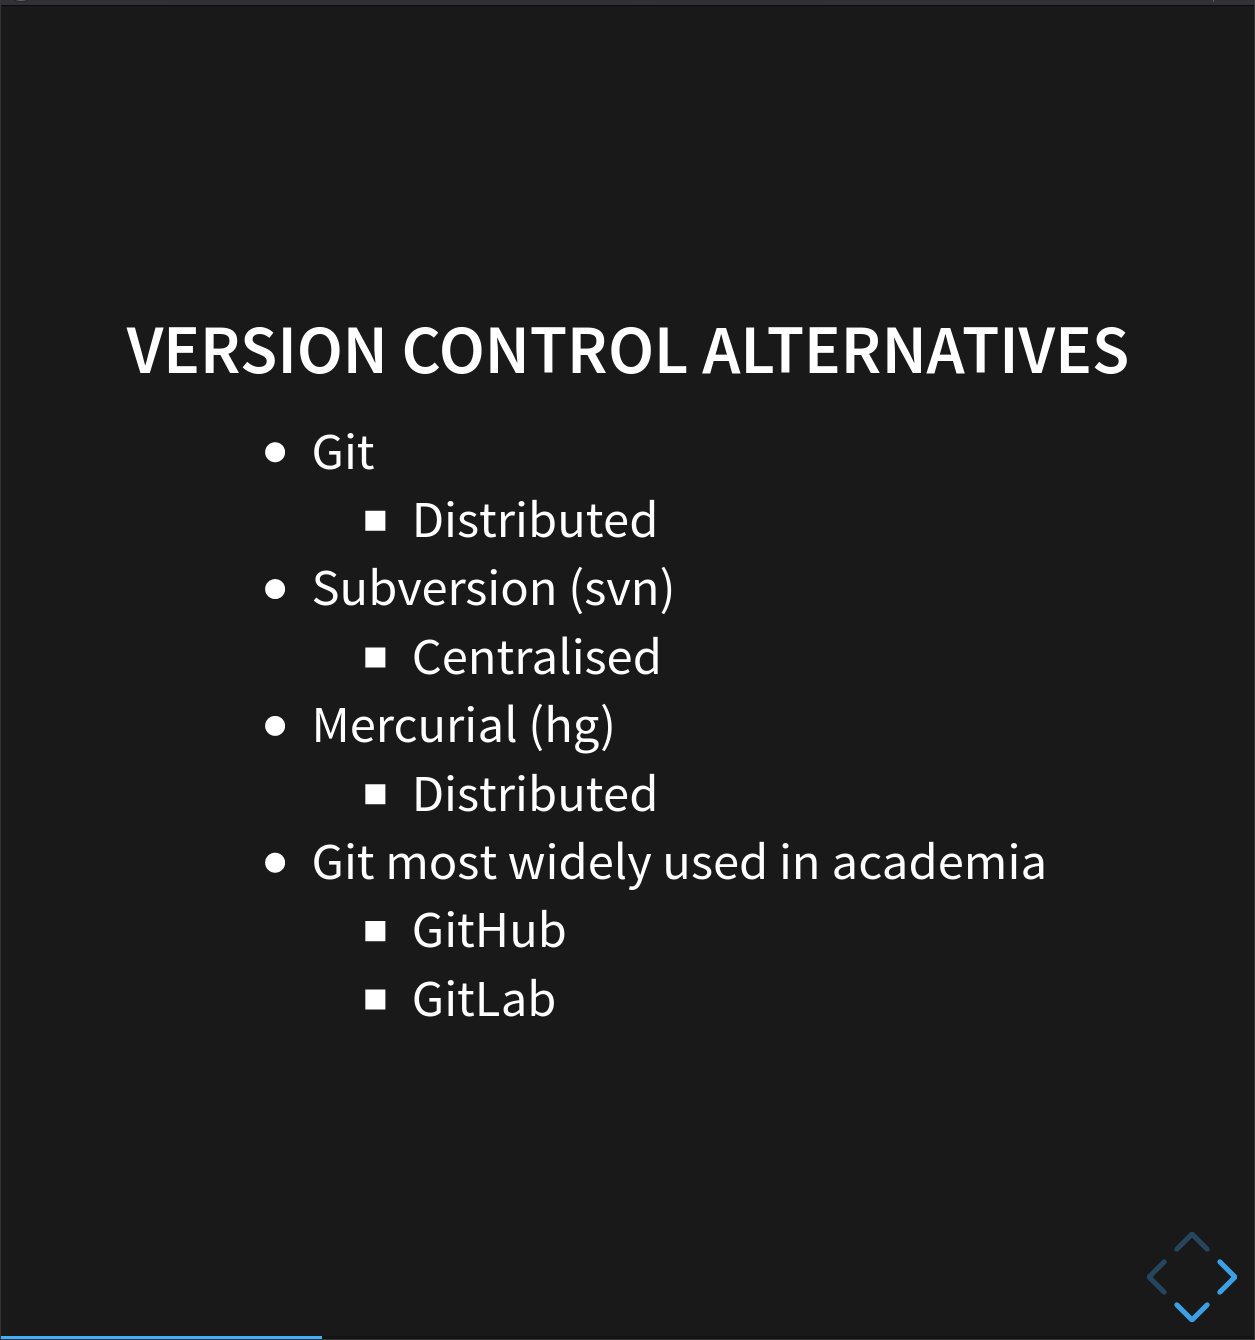
These are the most popular current Version Control systems:
Git is overwhelmingly the most popular version control system in academia, and beyond. It’s a distributed version control system, where every developer in a team has their own full copy of a repository, and can synchronise between them.
It’s partly become such a success thanks to sites like GitHub and GitLab, which make it easy to collaborate on a Git repository, and provide all kinds of extra tools to manage software projects. Plus, GitHub offers free upgraded membership to academics, students and educators- you can apply here.
If you’re working on old projects, or ones with very specific needs, you might use Mercurial, another distributed system, or possibly Subversion, a centralised system where there’s a single copy of the repository that everyone connects to.
Because Git is so popular, and making a GitHub account is so easy, we’re going to teach you how to use them.
Graphical User Interfaces
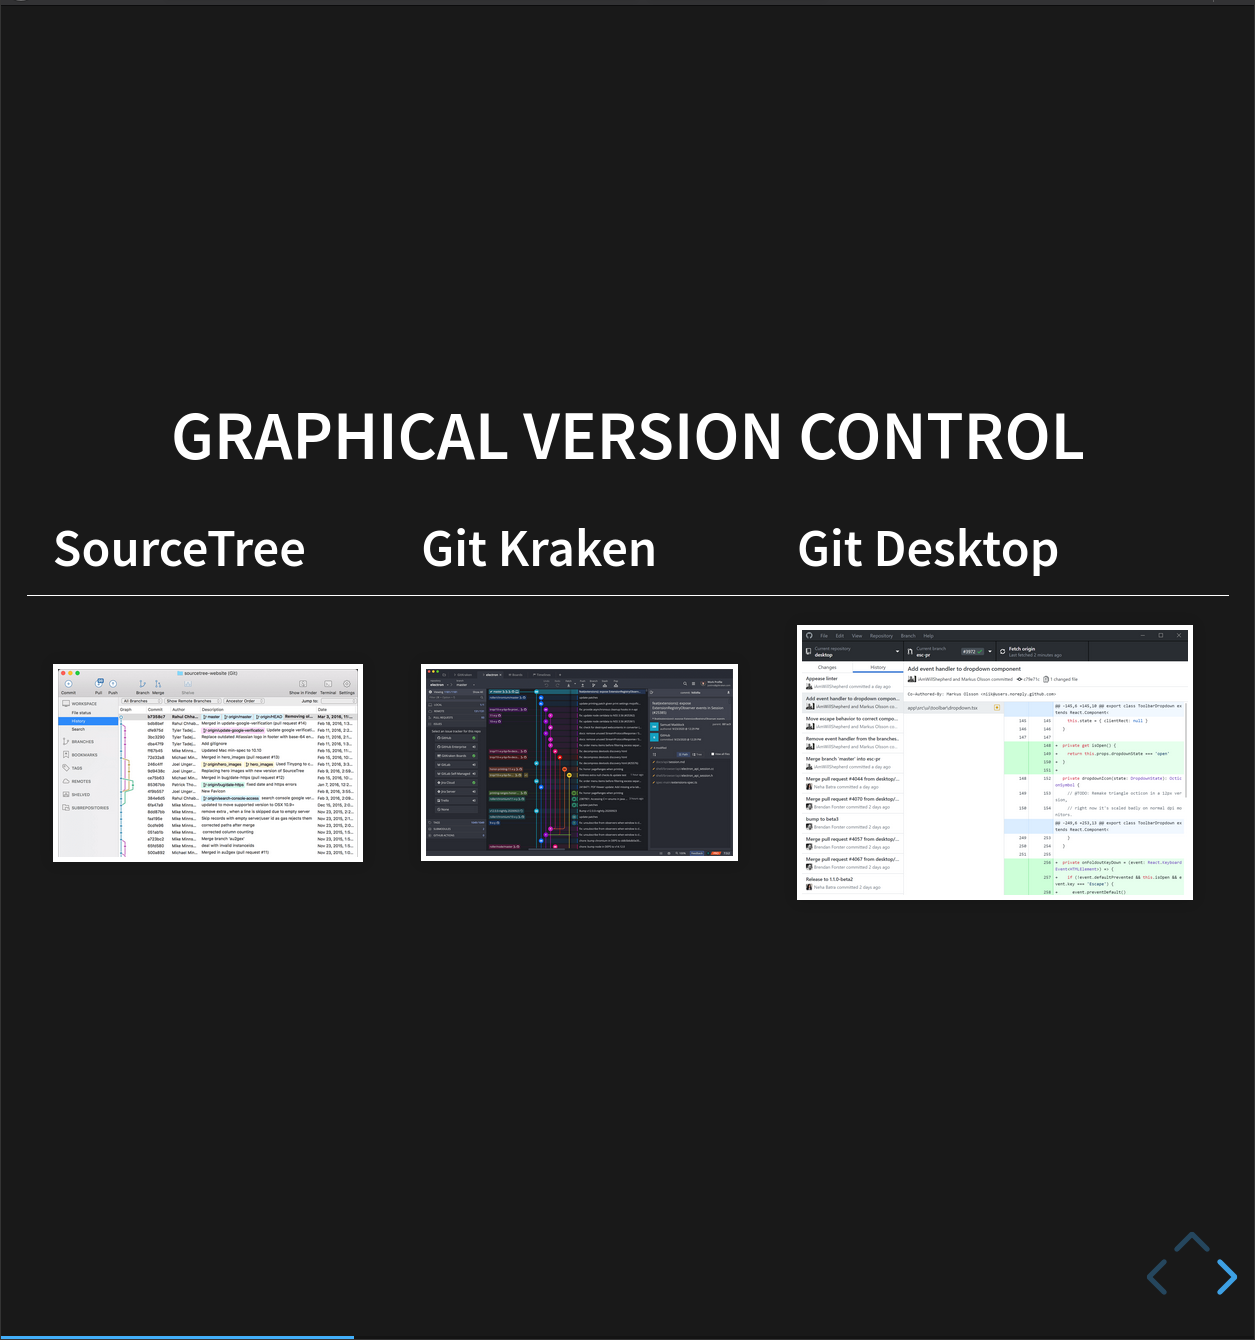
We’re going to teach you how to use Git on the command line. This isn’t the only way to use it, however- there are many different graphical user interfaces for Git, like:
Fundamentally, though, these are all just ‘wrappers’ around the command line version of Git. If you understand what they’re doing under the hood, you can easily switch between versions.
Key Points
Version control is like an unlimited ‘undo’.
Version control also allows many people to work in parallel.
Setting Up Git
Overview
Teaching: 5 min
Exercises: 0 minQuestions
How do I get set up to use Git?
Objectives
Configure
gitthe first time it is used on a computerUnderstand the meaning of the
--globalconfiguration flag
Prerequisites
In this lesson we use Git from the Bash Shell. Some previous experience with the shell is expected, but isn’t mandatory.
Get Started
Linux and Mac users should open a terminal, Windows users to should go to the Start Menu open GitBash from the Git group.
[Post-Its Reminder] / [Switch out of fullscreen]
[Open Terminal] / [Use other projector]
Follow along with the slides located here.

Working individually, we’ll start by exploring how version control can be used to keep track of what one person did and when.
Setting Up
The first time we use Git on a new machine, we need to configure a few things.
Make sure you’re in your home directory (not another repository).
$ cd
Now we’re going to set some global options, so when Git starts tracking changes to files it records who made them and how to contact them.
$ git config --global user.name "Norbert Nodinkle"
$ git config --global user.email "norbert@nodinkle.com"
(Please use your own name and email address instead of Norbert’s.)
You can set your favourite text editor, following this table:
| Editor | Configuration command |
|---|---|
| nano | $ git config --global core.editor "nano -w" |
| Notepad++ (Win) | $ git config --global core.editor "'c:/program files (x86)/Notepad++/notepad++.exe' -multiInst -notabbar -nosession -noPlugin" |
Git commands are written git action,
where action is what we actually want it to do.
In this case,
we’re telling Git:
- our name and email address,
- what our favorite text editor is, and
- that we want to use these settings globally (i.e., for every project),
The three commands above only need to be run once:
the flag --global tells Git to use the settings for every project on this machine.
You can check your settings at any time:
$ git config --list
Git Help and Manual
If you forget a
gitcommand, you can access the list of commands by using-hand access the Git manual by using--help:$ git config -h $ git config --helpWhile viewing the manual, remember the
:is a prompt waiting for commands and you can press Q to exit the manual.
Key Points
Use
git configwith the--globaloption to configure a user name, email address, editor, and other preferences once per machine.
Creating a Repository
Overview
Teaching: 10 min
Exercises: 0 minQuestions
Where does Git store information?
Objectives
Create a local Git repository.
Describe the purpose of the
.gitdirectory.

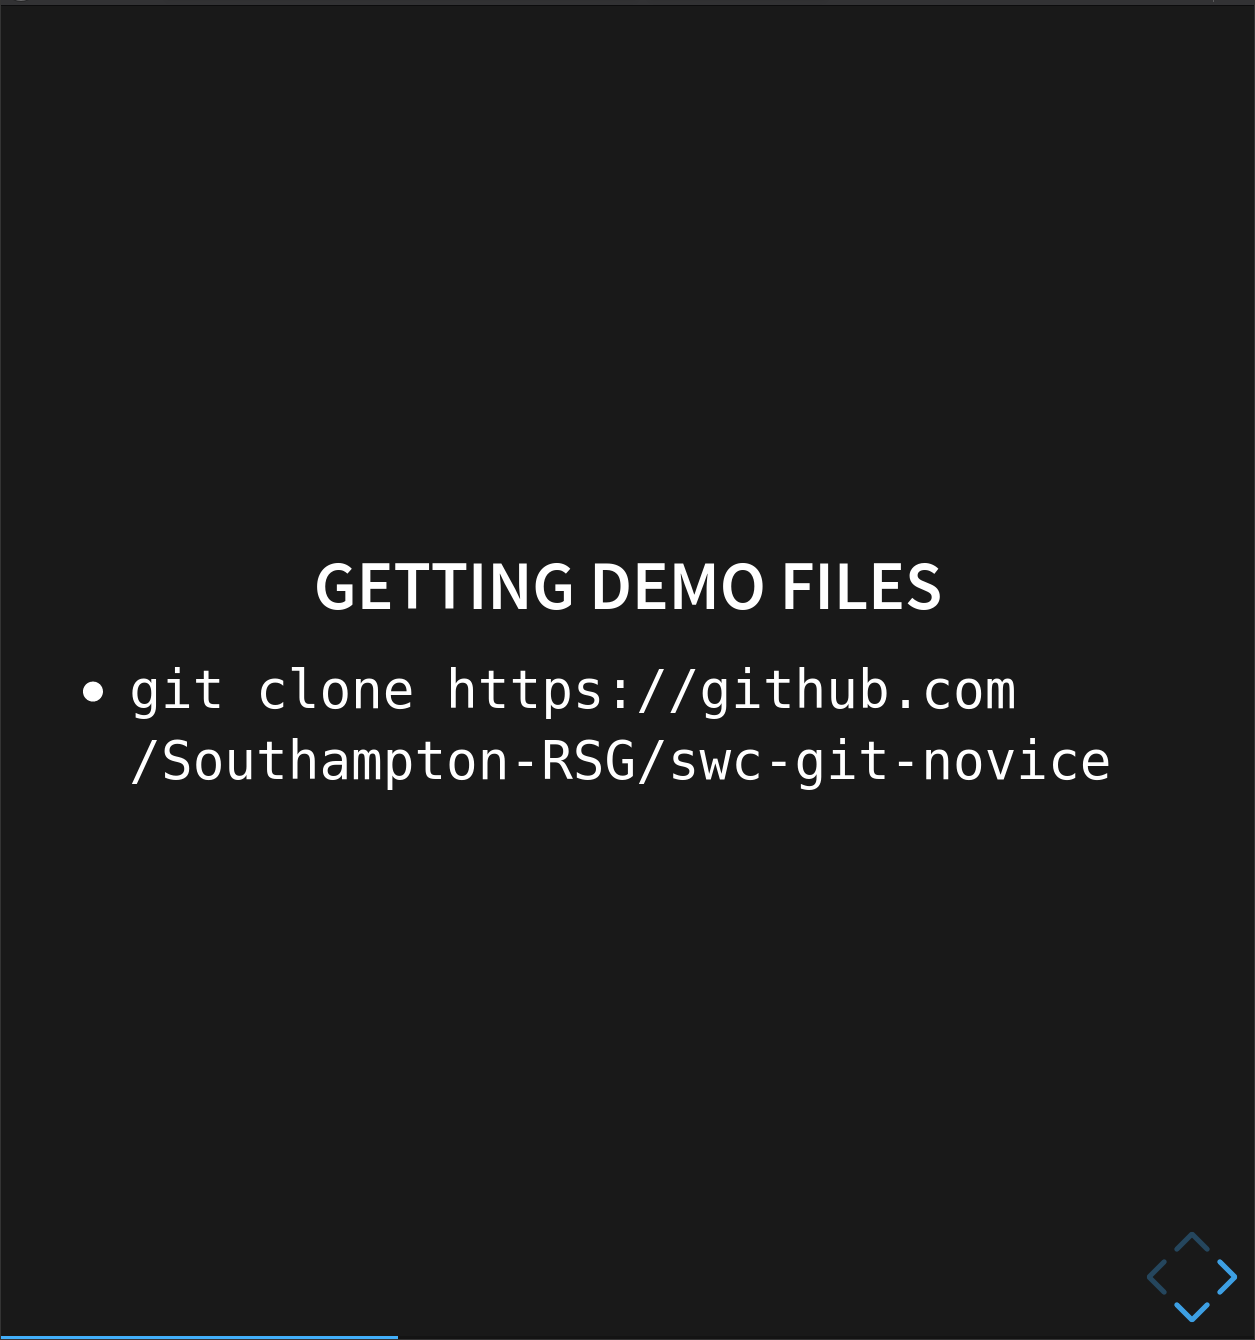
First, if we haven’t already we need to download the demonstration code to our computer. It’s stored in git, so we do it as:
$ git clone http://github.com/Southampton-RSG/swc-git-novice
This will download all our test files to our computer. Don’t worry, we’ll explain this bit later!
Now, let’s change to our code directory.
$ cd ~/swc-git-novice/code
$ ls
climate_analysis.py temp_conversion.py
These are some Python files for analysing climate data- you’ll recognise them if you’ve done some of our earlier lessons. Don’t worry, you don’t need to know Python to follow along.
Now, lets tell Git to create a repository— A storage area where git records the full history of commits of a project and information about who changed what and when.
$ git init
If we use ls to show the directory’s contents,
it appears that nothing has changed:
$ ls
But, if we add the -a flag to show everything,
we can see that Git has created a hidden directory called .git:
$ ls -a
. .. climate_analysis.py .git temp_conversion.py
Git stores information about the project in here. If we ever delete it, we will lose the project’s history.
Check Status
We can check that everything is set up correctly by asking Git to tell us the status of our project with the status command:
$ git status
On branch master

Initial commit

Untracked files:
  (use "git add <file>..." to include in what will be committed)

	climate_analysis.py
	temp_conversion.py

nothing added to commit but untracked files present (use "git add" to track)
A branch is an independent line of development. We have only one, and the default name is master.
The untracked files message means that there are files in the directory that Git isn’t keeping track of.
Key Points
git initinitializes a repository.Git stores all of its repository data in the
.gitdirectory.
Tracking Changes
Overview
Teaching: 20 min
Exercises: 0 minQuestions
How do I track the changes I make to files using Git?
Objectives
Go through the modify-add-commit cycle for one or more files.
Describe where changes are stored at each stage in the modify-add-commit cycle.

Add to Version Control
We can tell Git to track a file using git add:
$ git add climate_analysis.py temp_conversion.py
and then check that the right thing happened:
$ git status
On branch master

Initial commit

Changes to be committed:
  (use "git rm --cached <file>..." to unstage)

        new file:   climate_analysis.py
        new file:   temp_conversion.py
Git now knows that it’s supposed to keep track of climate_analysis.py and temp_conversion.py,
but it hasn’t recorded these changes as a commit yet:
Initial Commit
To get it to do that, we need to run one more command:
$ git commit -m "Initial commit of climate analysis code"
We use the -m flag (for “message”)
to record a short, descriptive comment that will help us remember later on what we did and why.
If we just run git commit without the -m option,
Git will launch nano (or whatever other editor we configured at the start)
so that we can write a longer message.
Good commit messages start with a brief (<50 characters) summary of changes made in the commit.
NOT “Bug Fixes” or “Changes”!
If you want to go into more detail, add a blank line between the summary line and your additional notes.
[master (root-commit) a10bd8f] Initial commit of climate analysis code
 2 files changed, 50 insertions(+)
 create mode 100644 climate_analysis.py
 create mode 100644 temp_conversion.py
When we run git commit,
Git takes everything we have told it to save by using git add
and stores a copy permanently inside the special .git directory.
This permanent copy is called a revision
and its short identifier is a10bd8f.
(Your revision will have different identifier.)
If we run git status now:
$ git status
# On branch master
nothing to commit, working directory clean
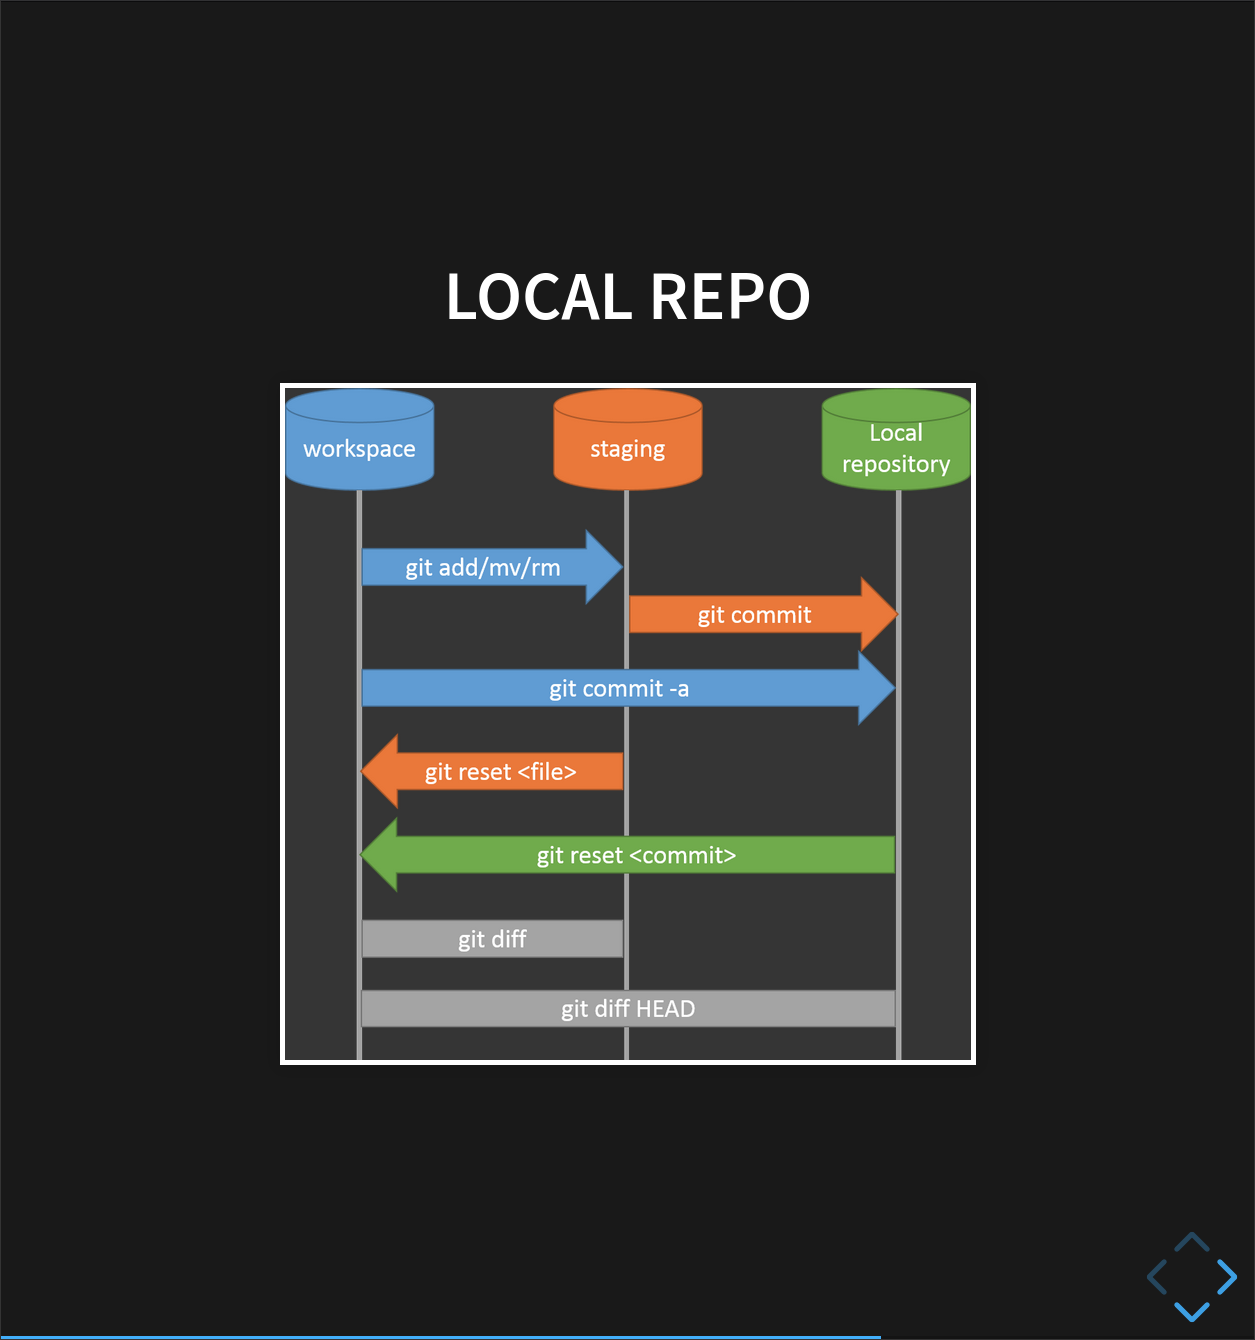
it tells us everything is up to date.
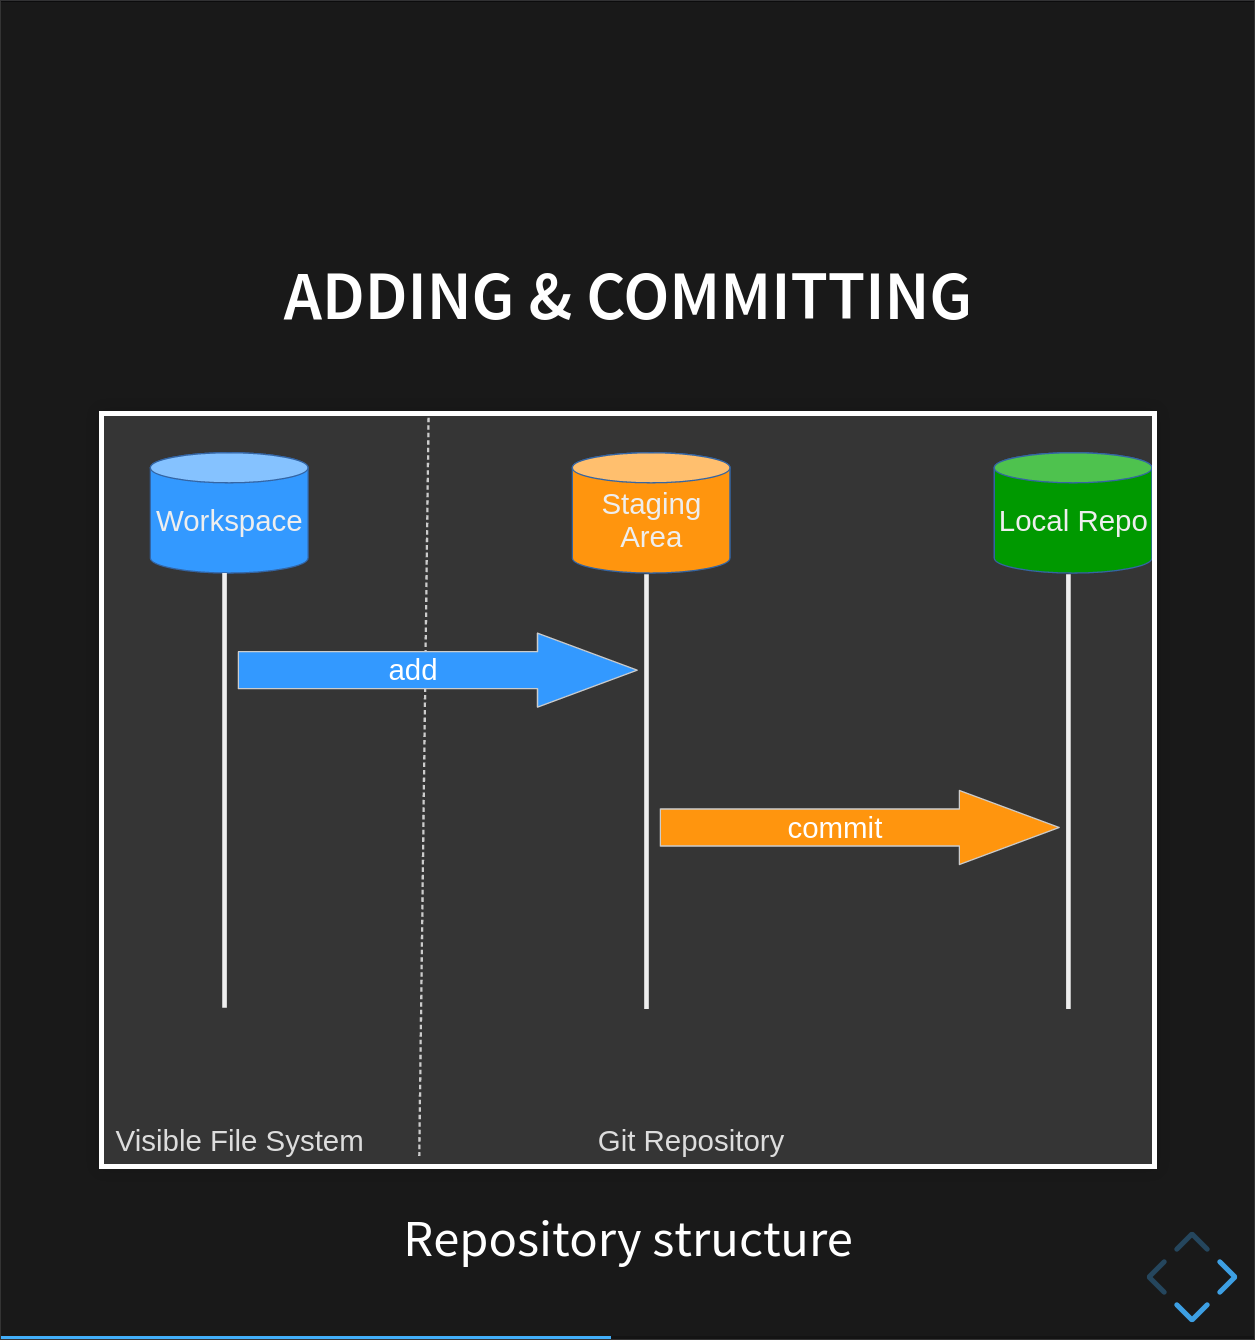
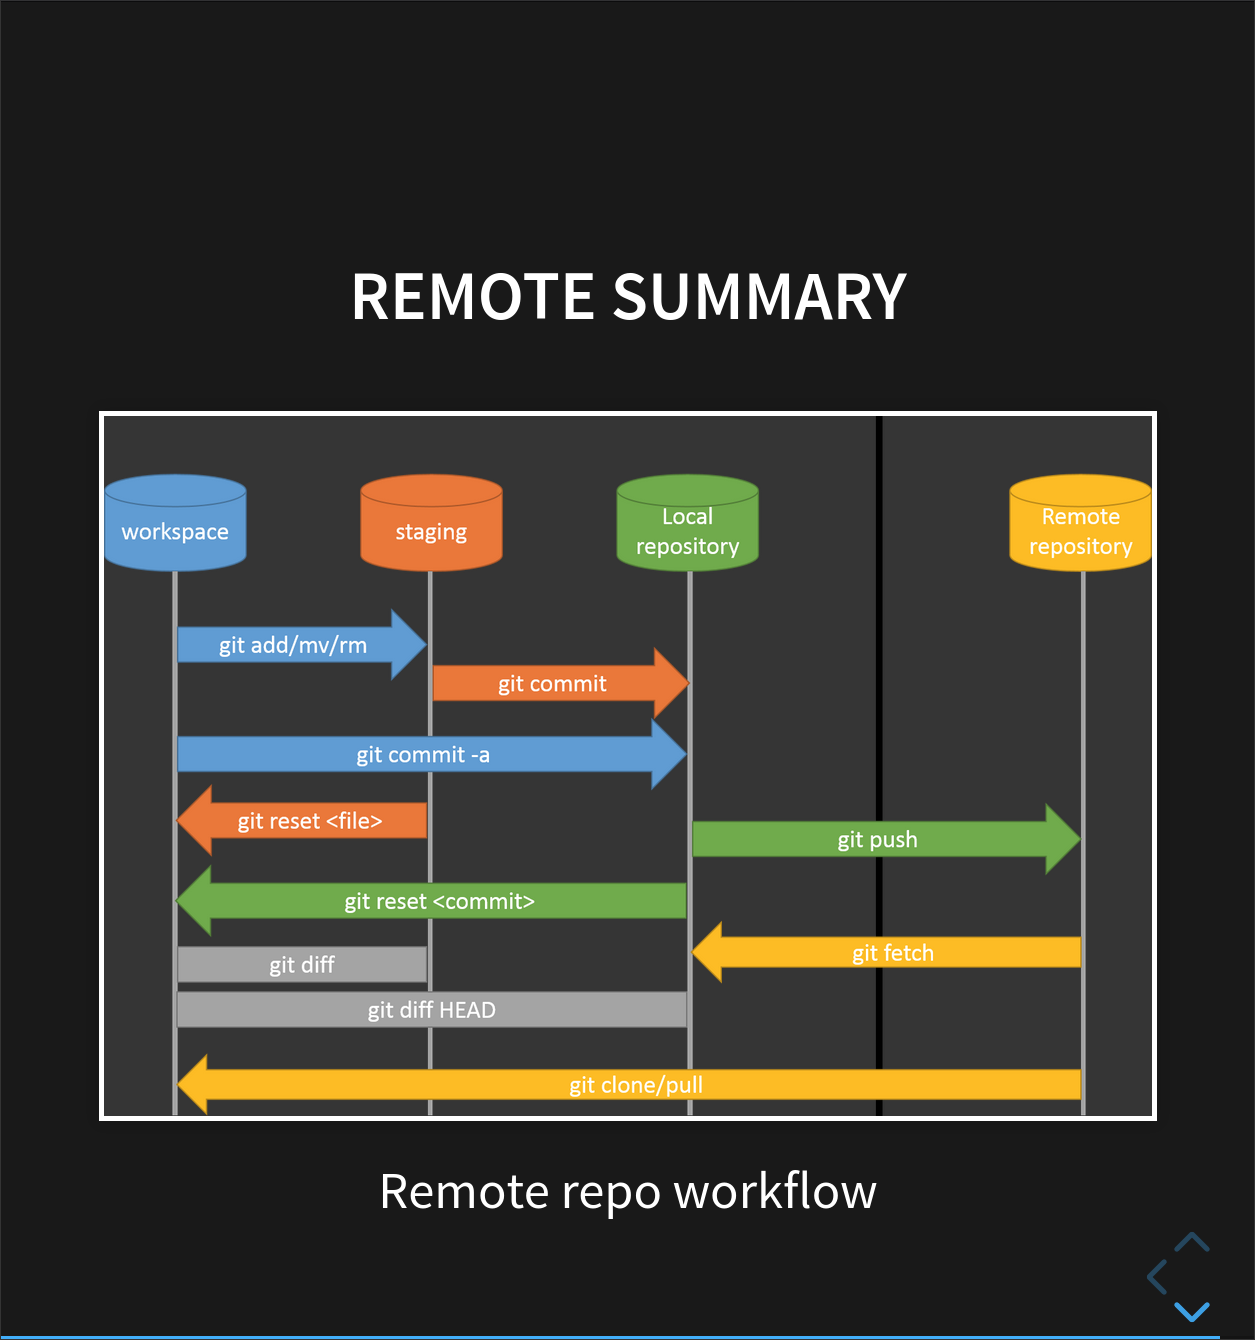
Git has a special staging area
where it keeps track of things that have been added to
the current change set
but not yet committed.
git add puts things in this area,
and git commit then copies them to long-term storage (as a commit)
Review the Log
If we want to know what we’ve done recently,
we can ask Git to show us the project’s history using git log:
$ git log
commit a10bd8f6192f9ab29b1821d7d7929fbf6484686a
Author: John R <j.robinson@software.ac.uk>
Date:   Mon Dec 7 14:13:32 2015 +0000

    Initial commit of climate analysis code
git log lists all revisions committed to a repository in reverse chronological order (most recent at the top).
The listing for each revision includes
- the revision’s full identifier (which starts with the same characters as the short identifier printed by the
git commitcommand earlier), - the revision’s author,
- when it was created,
- the log message Git was given when the revision was committed.
Where Are My Changes?
If we run
lsat this point, we will still see just our original files calledclimate_analysis.pyandtemp_conversion.py. That’s because Git saves information about files’ history in the special.gitdirectory mentioned earlier so that our filesystem doesn’t become cluttered (and so that we can’t accidentally edit or delete an old version).
Modify a file (1)
Now suppose we add more information, a Docstring, to the top of one of the files:
$ nano climate_analysis.py
""" Climate Analysis Tools """
When we run git status now,
it tells us that a file it already knows about has been modified:
$ git status
On branch master
Changes not staged for commit:
  (use "git add <file>..." to update what will be committed)
  (use "git checkout -- <file>..." to discard changes in working directory)

		modified:   climate_analysis.py

no changes added to commit (use "git add" and/or "git commit -a")
The last line is the key phrase: “no changes added to commit”.
So, while we have changed this file,
but we haven’t told Git we will want to save those changes
(which we do with git add)
much less actually saved them (which we do with git commit).
It’s important to remember that git only stores changes when you make a commit
Review Changes and Commit
It is good practice to always review
our changes before saving them. We do this using git diff.
This shows us the differences between the current state
of the file and the most recently commited version:
$ git diff
diff --git a/climate_analysis.py b/climate_analysis.py
index 277d6c7..d5b442d 100644
--- a/climate_analysis.py
+++ b/climate_analysis.py
@@ -1,3 +1,4 @@
+""" Climate Analysis Tools """
import sys
import temp_conversion
import signal
Windows users note
No newline at end of file This message is displayed because otherwise there is no way to tell the difference between a file where there is a newline at the end and one where is not. Diff has to output a newline anyway, or the result would be harder to read or process automatically. This can safely be ignored, but you can avoid seeing it by leaving a blank line at the end of your file.
The output is cryptic because
it is actually a series of commands for tools like editors and patch
telling them how to reconstruct one file given the other.
The key things to note are:
- Line 1: The files that are being compared (a/ and b/ are labels, not paths)
- Line 2: The two hex strings on the second line which parts of the hashes of the files being compares
- Line 5: The lines that have changed. (It’s complex)
- Below that, the changes - note the ‘+’ marker which shows an addtion
After reviewing our change, it’s time to commit it:
$ git commit -m "Add Docstring"
On branch master
Changes not staged for commit:
        modified:   climate_analysis.py

no changes added to commit
Whoops:
Git won’t commit because we didn’t use git add first.
Let’s fix that:
$ git add climate_analysis.py
$ git commit -m "Add Docstring"
[master 6077ba7] Add Docstring
 1 file changed, 1 insertion(+)
** Recapping add / commit**
Git insists that we add files to the set we want to commit before actually committing anything because we may not want to commit everything at once.
For example, suppose we might have fixed a bug in some existing code, but we might have added new code that’s not ready to share
One more addition
Let’s add another line to the end of the file:
$ nano climate_analysis.py
# TODO(js-robinson): Add call to process rainfall
Check what’s changed with diff:
$ git diff
diff --git a/climate_analysis.py b/climate_analysis.py
index d5b442d..c463f71 100644
--- a/climate_analysis.py
+++ b/climate_analysis.py
@@ -26,3 +26,5 @@ for line in climate_data:
             kelvin = temp_conversion.fahr_to_kelvin(fahr)

             print(str(celsius)+", "+str(kelvin))
+
+# TODO(js-robinson): Add call to process rainfall
So far, so good:
we’ve added one line to the end of the file
(shown with a + in the first column).
Now let’s put that change in the staging area (or add it to the change set)
and see what git diff reports:
$ git add climate_analysis.py
$ git diff
There is no output:
git diff shows us the differences between the working copy and what’s been added to the change set in staging area.
However, if we do this:
$ git diff --staged
diff --git a/climate_analysis.py b/climate_analysis.py
index d5b442d..c463f71 100644
--- a/climate_analysis.py
+++ b/climate_analysis.py
@@ -26,3 +26,5 @@ for line in climate_data:
             kelvin = temp_conversion.fahr_to_kelvin(fahr)

             print(str(celsius)+", "+str(kelvin))
+
+# TODO(me): Add call to process rainfall
it shows us the difference between the last committed change and what’s in the staging area.
Let’s commit our changes:
$ git commit -m "Add rainfall processing placeholder"
[master dab17a9] Add rainfall processing placeholder
 1 file changed, 2 insertions(+)
check our status:
$ git status
# On branch master
nothing to commit, working directory clean
and now look at the history of what we’ve done so far:
$ git log
commit dab17a9f0d2e8e598522a1c06dcaf396084f60e6
Author: John R <j.robinson@software.ac.uk>
Date:   Mon Dec 7 14:57:39 2015 +0000

    Add rainfall processing placeholder

commit 6077ba7b614de65fa28cc58c6cb8a4c55735a9d8
Author: John R <j.robinson@software.ac.uk>
Date:   Mon Dec 7 14:40:02 2015 +0000

    Add Docstring

commit a10bd8f6192f9ab29b1821d7d7929fbf6484686a
Author: John R <j.robinson@software.ac.uk>
Date:   Mon Dec 7 14:13:32 2015 +0000

    Initial commit of climate analysis code
To recap, when we want to add changes to our repository,
we first need to add the changed files to the staging area
(git add) and then commit the staged changes to the
repository (git commit).
Key Points
git statusshows the status of a repository.Files can be stored in a project’s working directory (which users see), the staging area (where the next commit is being built up) and the local repository (where commits are permanently recorded).
git addputs files in the staging area.
git commitsaves the staged content as a new commit in the local repository.Write commit messages that accurately describe your changes.
git loglists the commits made to the local repository.
Exploring History
Overview
Teaching: 10 min
Exercises: 0 minQuestions
How can I review my changes?
How can I recover old versions of files?
Objectives
Identify and use Git revision numbers.
Compare files with previous versions of themselves.
Restore old versions of files.

Relative History
Let’s look a bit deeper at how we can see what we changed when
HEAD is the conventional name used to refer to the most recent end of the chain of revisions.
We use git diff again,
but refer to old versions
using the notation HEAD~1, HEAD~2, and so on.
We can refer to previous revisions using the ~ notation,
so HEAD~1 (pronounced “head minus one”)
means “the previous revision”,
while HEAD~123 goes back 123 revisions from where we are now.
$ git diff HEAD~1 climate_analysis.py
diff --git a/climate_analysis.py b/climate_analysis.py
index d5b442d..c463f71 100644
--- a/climate_analysis.py
+++ b/climate_analysis.py
@@ -26,3 +26,5 @@ for line in climate_data:
             kelvin = temp_conversion.fahr_to_kelvin(fahr)

             print(str(celsius)+", "+str(kelvin))
+
+# TODO(me): Add call to process rainfall
So we see the difference between the file as it is now, and as it was before the last commit
$ git diff HEAD~2 climate_analysis.py
diff --git a/climate_analysis.py b/climate_analysis.py
index 277d6c7..c463f71 100644
--- a/climate_analysis.py
+++ b/climate_analysis.py
@@ -1,3 +1,4 @@
+""" Climate Analysis Tools """
 import sys
 import temp_conversion
 import signal
@@ -25,3 +26,5 @@ for line in climate_data:
             kelvin = temp_conversion.fahr_to_kelvin(fahr)

             print(str(celsius)+", "+str(kelvin))
+
+# TODO(me): Add call to process rainfall
And here we see the state before the last two commits, HEAD minus 2.
Absolute History
So, that’s useful as far as it goes, but we can also refer to specific revisions using
those long strings of digits and letters
that git log displays.
These are unique IDs for the changes, and “unique” really does mean unique: every change to any set of files on any machine has a unique 40-character identifier. (A SHA-1 hash of the new, post-commit state of the repository).
Our first commit was given the ID: [bottom ID from git log]
a10bd8f6192f9ab29b1821d7d7929fbf6484686a, so let’s try this:
$ git diff a10bd8f6192f9ab29b1821d7d7929fbf6484686a climate_analysis.py
diff --git a/climate_analysis.py b/climate_analysis.py
index 277d6c7..c463f71 100644
--- a/climate_analysis.py
+++ b/climate_analysis.py
@@ -1,3 +1,4 @@
+""" Climate Analysis Tools """
 import sys
 import temp_conversion
 import signal
@@ -25,3 +26,5 @@ for line in climate_data:
             kelvin = temp_conversion.fahr_to_kelvin(fahr)

             print(str(celsius)+", "+str(kelvin))
+
+# TODO(me): Add call to process rainfall
So that’s all the changes since our first commit. That’s the right answer,but typing random 40-character strings is annoying, so Git lets us use just the first seven:
$ git diff a10bd8f climate_analysis.py
diff --git a/climate_analysis.py b/climate_analysis.py
index 277d6c7..c463f71 100644
--- a/climate_analysis.py
+++ b/climate_analysis.py
@@ -1,3 +1,4 @@
+""" Climate Analysis Tools """
 import sys
 import temp_conversion
 import signal
@@ -25,3 +26,5 @@ for line in climate_data:
             kelvin = temp_conversion.fahr_to_kelvin(fahr)

             print(str(celsius)+", "+str(kelvin))
+
+# TODO(me): Add call to process rainfall
Other Ways To Reference Commits
Git has some more advanced ways of referencing past commits. In place of
HEAD~1you can useHEAD~orHEAD@{1}, or you can even use text to ask more advanced questions, likegit diff HEAD@{"yesterday"}orgit diff HEAD@{"3 months ago"}!
Restoring Files
All right: we can save changes to files and see what we’ve changed — suppose we need to restore older versions of things?
Let’s suppose we accidentally overwrite or delete our file:
$ rm climate_analysis.py
$ ls
temp_conversion.py
Whoops!
git status now tells us that the file has been changed,
but those changes haven’t been staged:
$ git status
On branch master
Changes not staged for commit:
  (use "git add/rm <file>..." to update what will be committed)
  (use "git checkout -- <file>..." to discard changes in working directory)

        deleted:    climate_analysis.py

no changes added to commit (use "git add" and/or "git commit -a")
Following the helpful hint in that output, we can put things back the way they were
by using git checkout:
$ git checkout HEAD climate_analysis.py
$ cat climate_analysis.py
[SNIPPED - but changes rolled back]
As you might guess from its name,
git checkout checks out (i.e., restores) an old version of a file.
In this case,
we’re telling Git that we want to recover the version of the file recorded in HEAD,
which is the last saved revision.
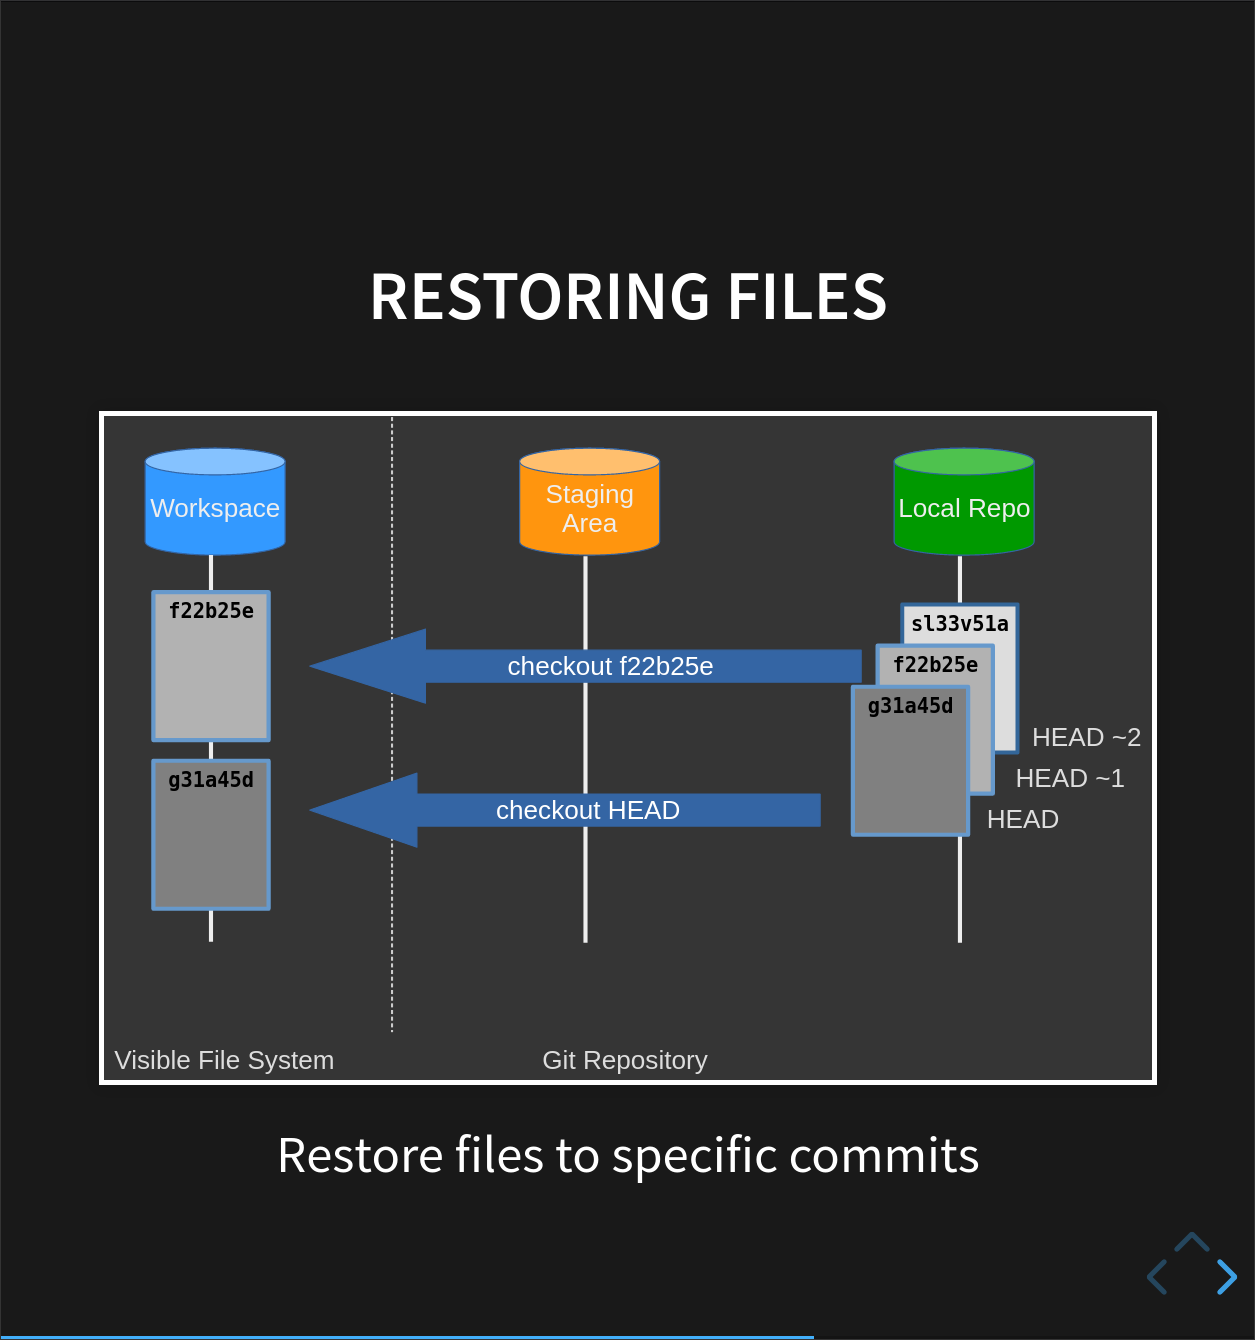
Git Restore
Newer versions of
githave addedgit restorethat work the same way asgit checkoutfor recovering files. We teachgit checkout, as some systems (for example, high-performance computing clusters) will only have older versions of Git.
If we want to go back even further, we could use a revision identifier instead:
$ git checkout <last but one rev> climate_analysis.py
The fact that files can be reverted one by one tends to change the way people organize their work.
If everything is in one large document, it’s hard (but not impossible) to undo changes to the introduction without also undoing changes made later to the conclusion.
If the introduction and conclusion are stored in separate files, on the other hand, moving backward and forward in time becomes much easier.
Key Points
git diffdisplays differences between commits.
git checkoutrecovers old versions of files.
Collaborating
Overview
Teaching: 55 min
Exercises: 0 minQuestions
How can I use version control to collaborate with other people?
Objectives
Explain what remote repositories are and why they are useful.
Explain what branches are and how they are used.
Show how to work collaboratively on a remote repository using branches.

So far, we’ve seen how Version control can help us track the changes we make to our files, and to revisit any point in their history.
(there are a few extra commands we haven’t covered today for you to look at).
But, version control really comes into its own when we begin to collaborate with other people.
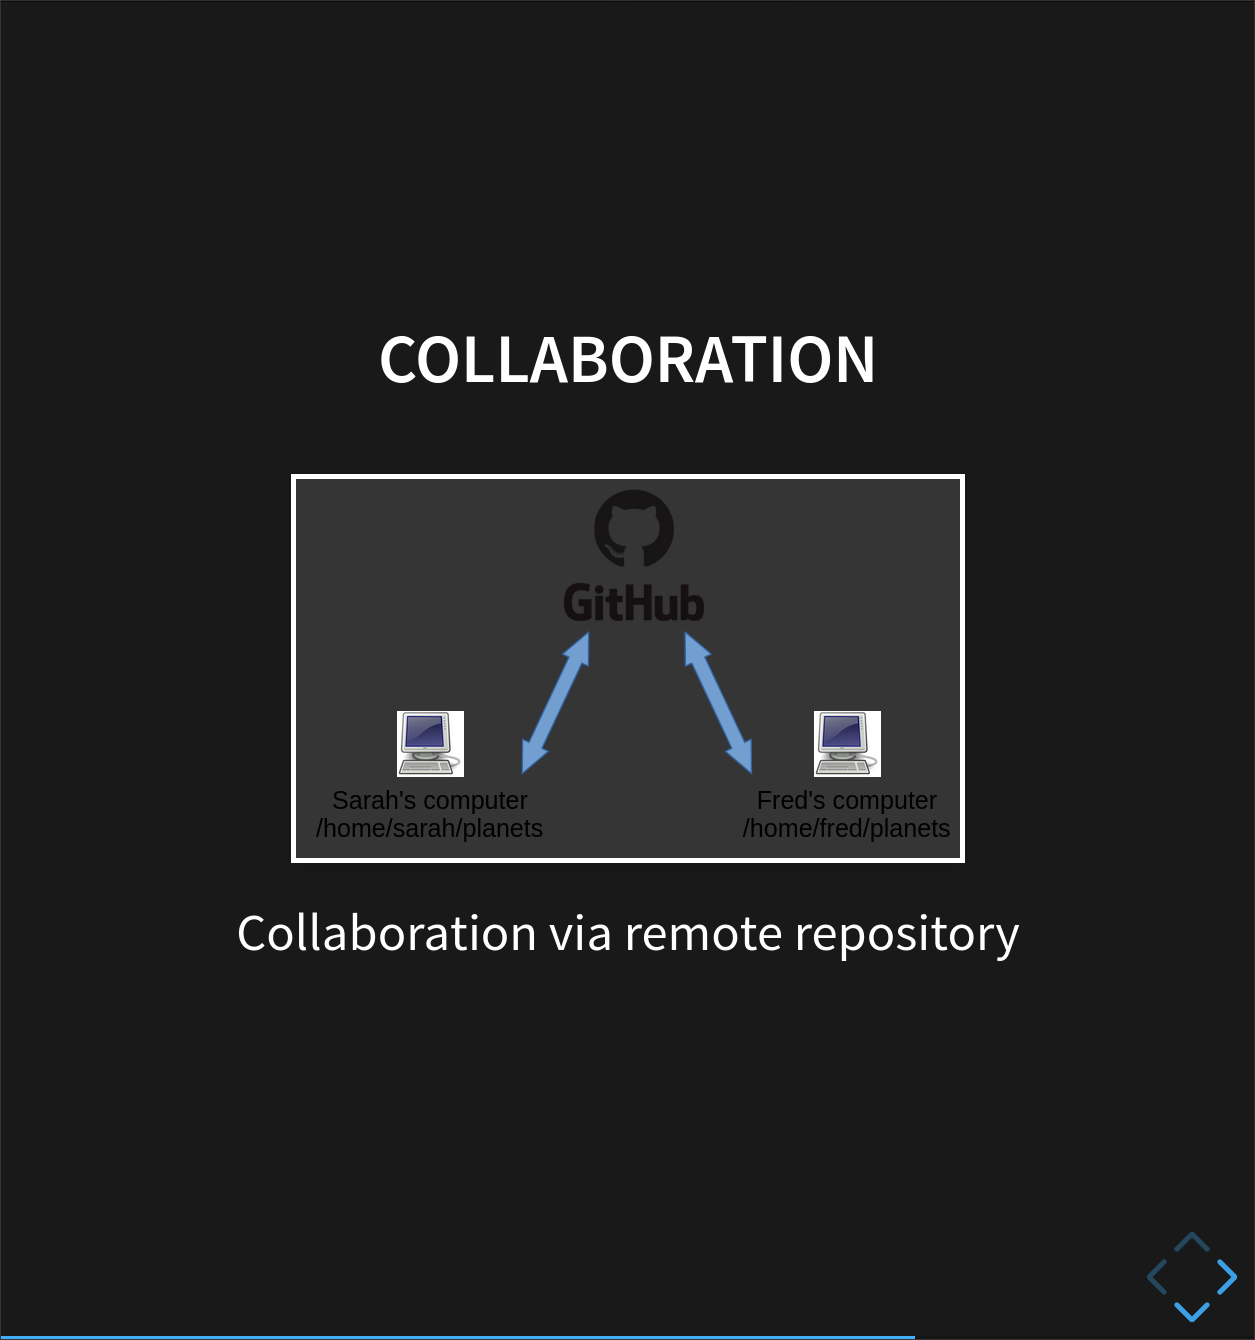
The missing link
We already have most of the machinery we need to do this; the only thing missing is to copy changes from one repository to another.
Systems like Git allow us to synchronise work between any two repositories.
In practice, though, it’s easiest to use one copy as a central hub, and to keep it on the web rather than on someone’s laptop.
Many programmers use hosting services like GitHub or GitLab to hold those master copies. In this example, we’ll use GitHub, but GitLab has all the same functionality.
Exploring the collaborative process
But first let’s explore the collaborative process.
So far we have been working in isolation. We’re going to use GitHub to set up a remote repository, so we can share our work or collaborate with others.
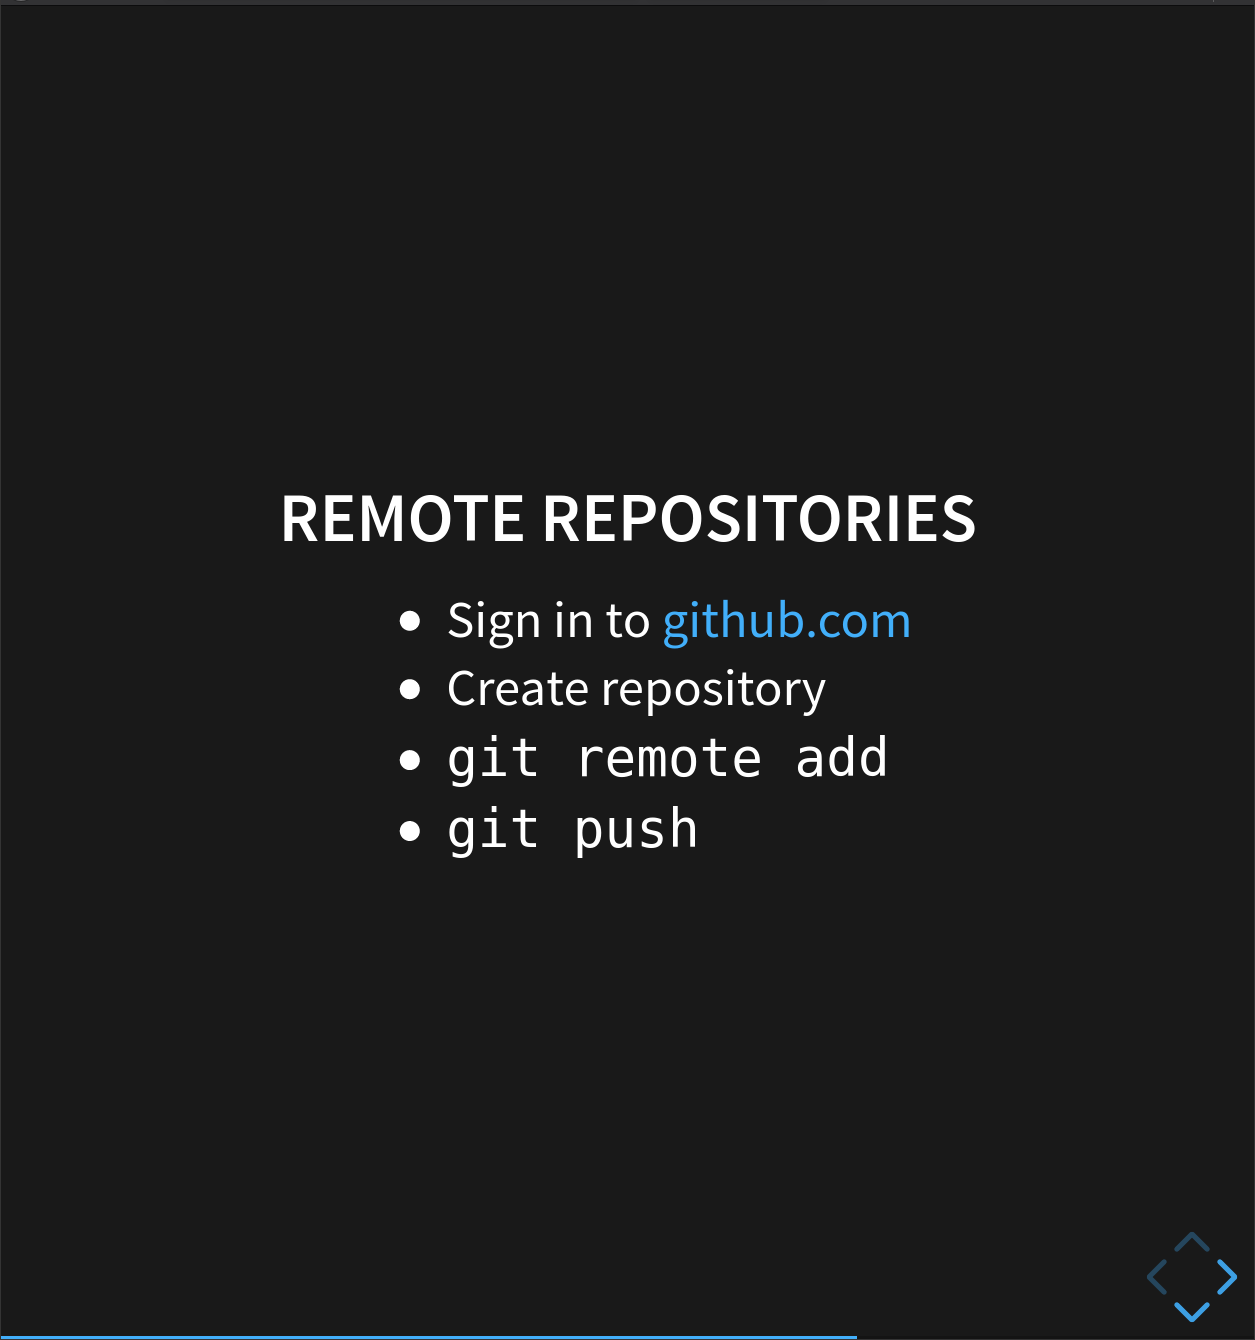
To GitHub!
Let’s start by sharing the changes we’ve made to our current project with the world.
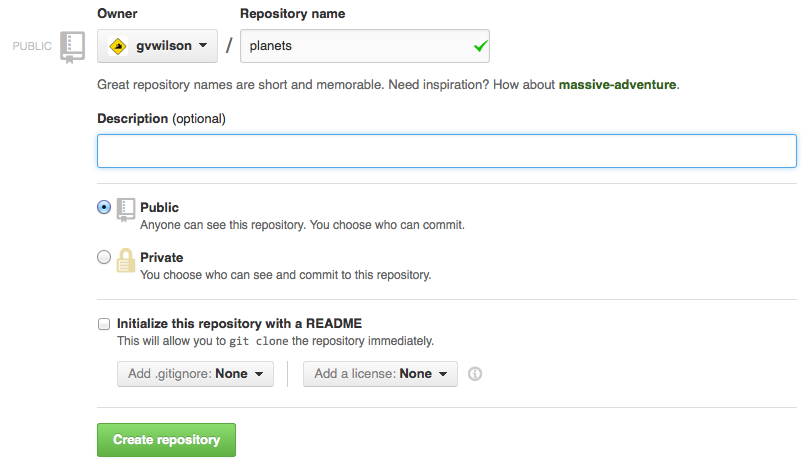
Log in to GitHub,
then click on the icon in the top right corner to create a new repository called climate-analysis:
(You can also click on the ‘plus’ icon in the top-right and select New repository too)
Name your repository “climate-analysis” You can optionally give it a friendly description and prove a README.md which is rendered on the front page of the web interface.
GitHub will host Publicly accessible repositories free of charge, but makes a charge for Private ones. However, researchers can apply for a free GitHub Pro upgrade via GitHub Education, which will allow you free unlimited private repositories. Your institute may also run a GitLab instance, allowing you to create your own private repositories.
You need to be sure that you really want to make your code publicly accessible, think about licensing, and that you’re not breaching the terms of any license of shared code by making it publicly available.
and then click “Create Repository”:
Connecting the remote repository
Our local repository still contains our earlier work on climate-analysis.py and temp_conversion.py,
but the remote repository on GitHub doesn’t contain any files yet:
The next step is to connect the two repositories.
We do this by making the GitHub repository a remote for the local repository. A remote is a repository conected to another in such way that both can be kept in sync exchanging commits.
The home page of the repository on GitHub includes the string we need to identify it:
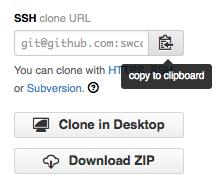
Copy that URL from the browser, go back to your local repository, and run this command using your repository name not mine:
$ git remote add origin git@github.com:js-robinson/climate-analysis.git
The name origin is a local nickname for your remote repository:
we could use something else if we wanted to,
but origin is conventional, and will come in useful later.
The only difference should be your username instead of js-robinson.
We can check that the command has worked by running git remote --verbose:
$ git remote --verbose
origin  git@github.com:js-robinson/climate-analysis.git (fetch)
origin  git@github.com:js-robinson/climate-analysis.git (push)
Push commits from local to remote
Once the remote is set up, we can push the changes from our local repository to the repository on GitHub:
$ git push origin master
Counting objects: 10, done.
Delta compression using up to 8 threads.
Compressing objects: 100% (10/10), done.
Writing objects: 100% (10/10), 1.47 KiB | 0 bytes/s, done.
Total 10 (delta 2), reused 0 (delta 0)
To github.com:js-robinson/climate-analysis.git
 * [new branch]      master -> master
The push command takes two arguments, the remote name (‘origin’) and a branch name (‘master’).
We’ll get to branches in a moment!
So, now our local and remote repositories are now in sync! You can check in your browser that the files have reached your GitHub repository.
Authentication options
Earlier, we cloned a repository using
https://to download it. You used to be able to push to a repository viahttps://too by entering a password, but last year that was disabled for security reasons. You might find some old tutorials still instruct you to use thehttps://format, but you can switch them togit@github.comwithout any problems.
Master and Main
GitHub is currently recommending users name their ‘core’ branch
maininstead ofmaster. Git defaults to creating amasterbranch when you make a new repo from the command line. We teachmasteras most existing repositories and examples use it, but you can follow GitHub’s instructions for how to rename your branch tomainif you would prefer.
Introducing branches
Now we’ve shared our code with the world, and other people can download a copy of it- just like you downloaded a copy of the repository these lessons are in.
However, what happens if you want to keep working on it, adding new features to the code?
At the moment, there’s only one version of the code available online. If keep making changes and pushing them to GitHub, then anyone who downloads from there will get all of our work in progress- whether or not it’s ready to use!
Equally, we can’t wait until we’ve finished all our work before pushing it to GitHub either. We could lose weeks or months of work if our computer breaks!
We can avoid this by using the branches we mentioned earlier.
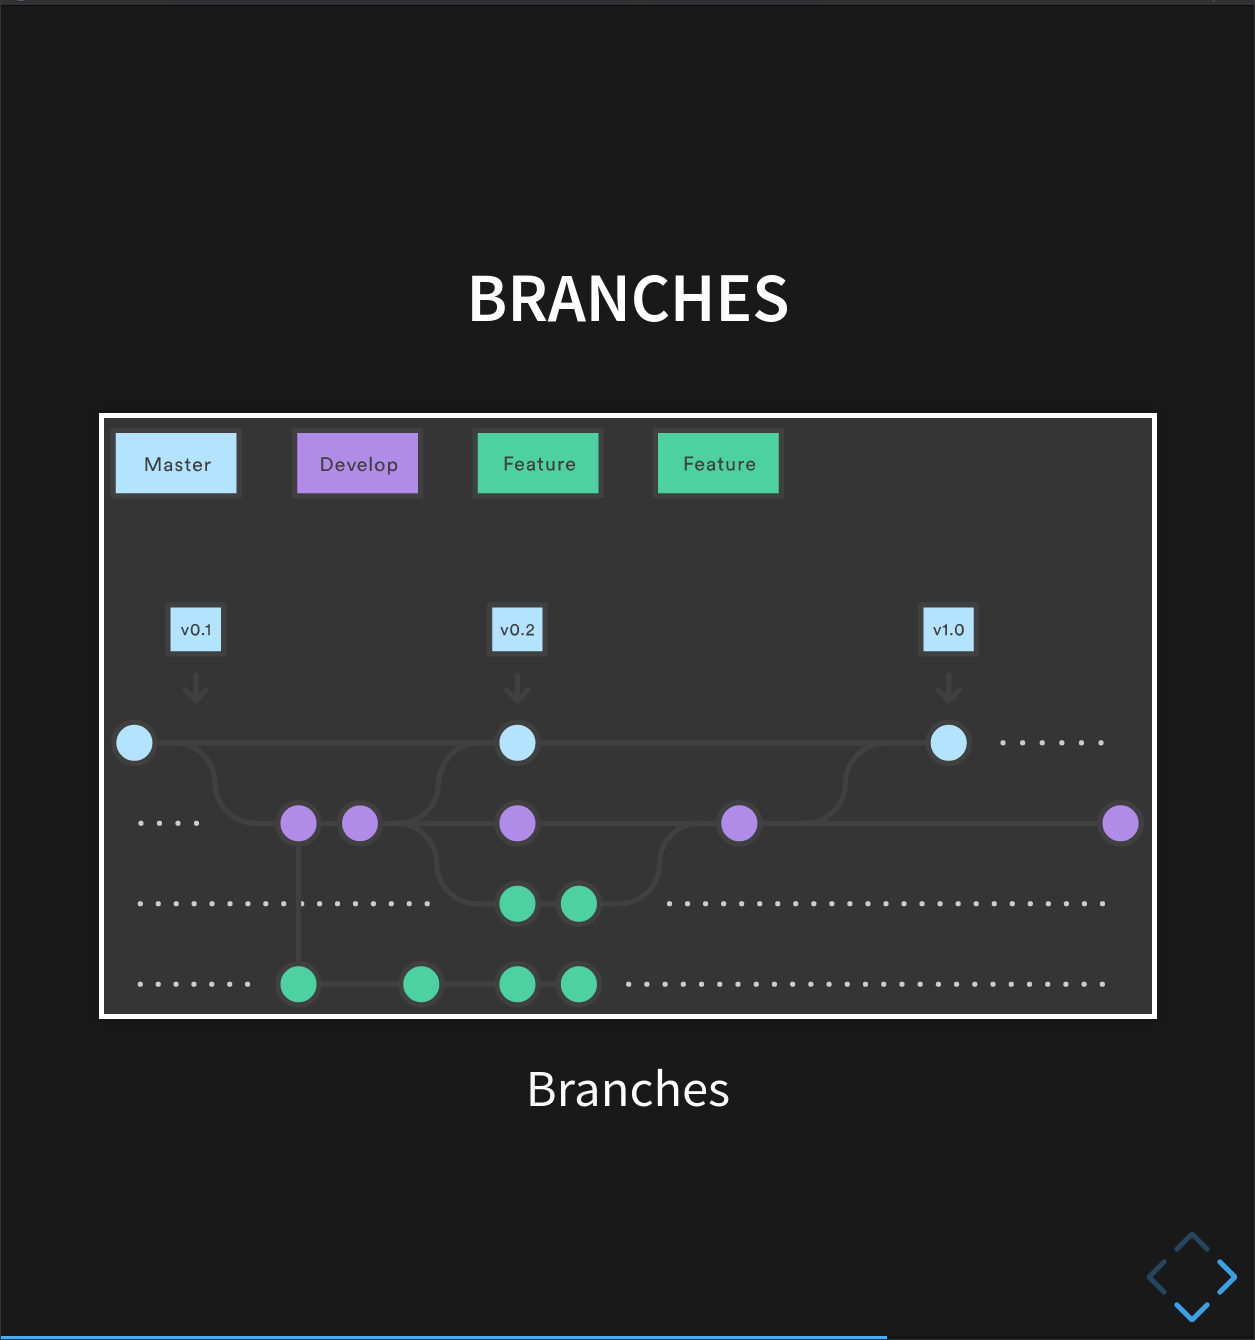
A branch is a different version of the files in your repository, that can contain its own set of commits. We can create a new branch, make changes to the code that we commit to the branch, and when we’re happy with those changes, merge them back to the main (‘master’) branch. Branches are commonly used as part of a feature-branch workflow:

In this workflow, we have a main (‘master’) branch which is the version of our code that’s test and reliable, and want to share- for example, the version of the code we used in a paper. When sharing code used in a paper, you can mention the specific commit that you used!
Then, we have a development (‘dev’) branch that we use for work-in-progress code. As we work on adding new features to the code, we commit the changes to our development branch.
(We’ll talk about feature branches later!)
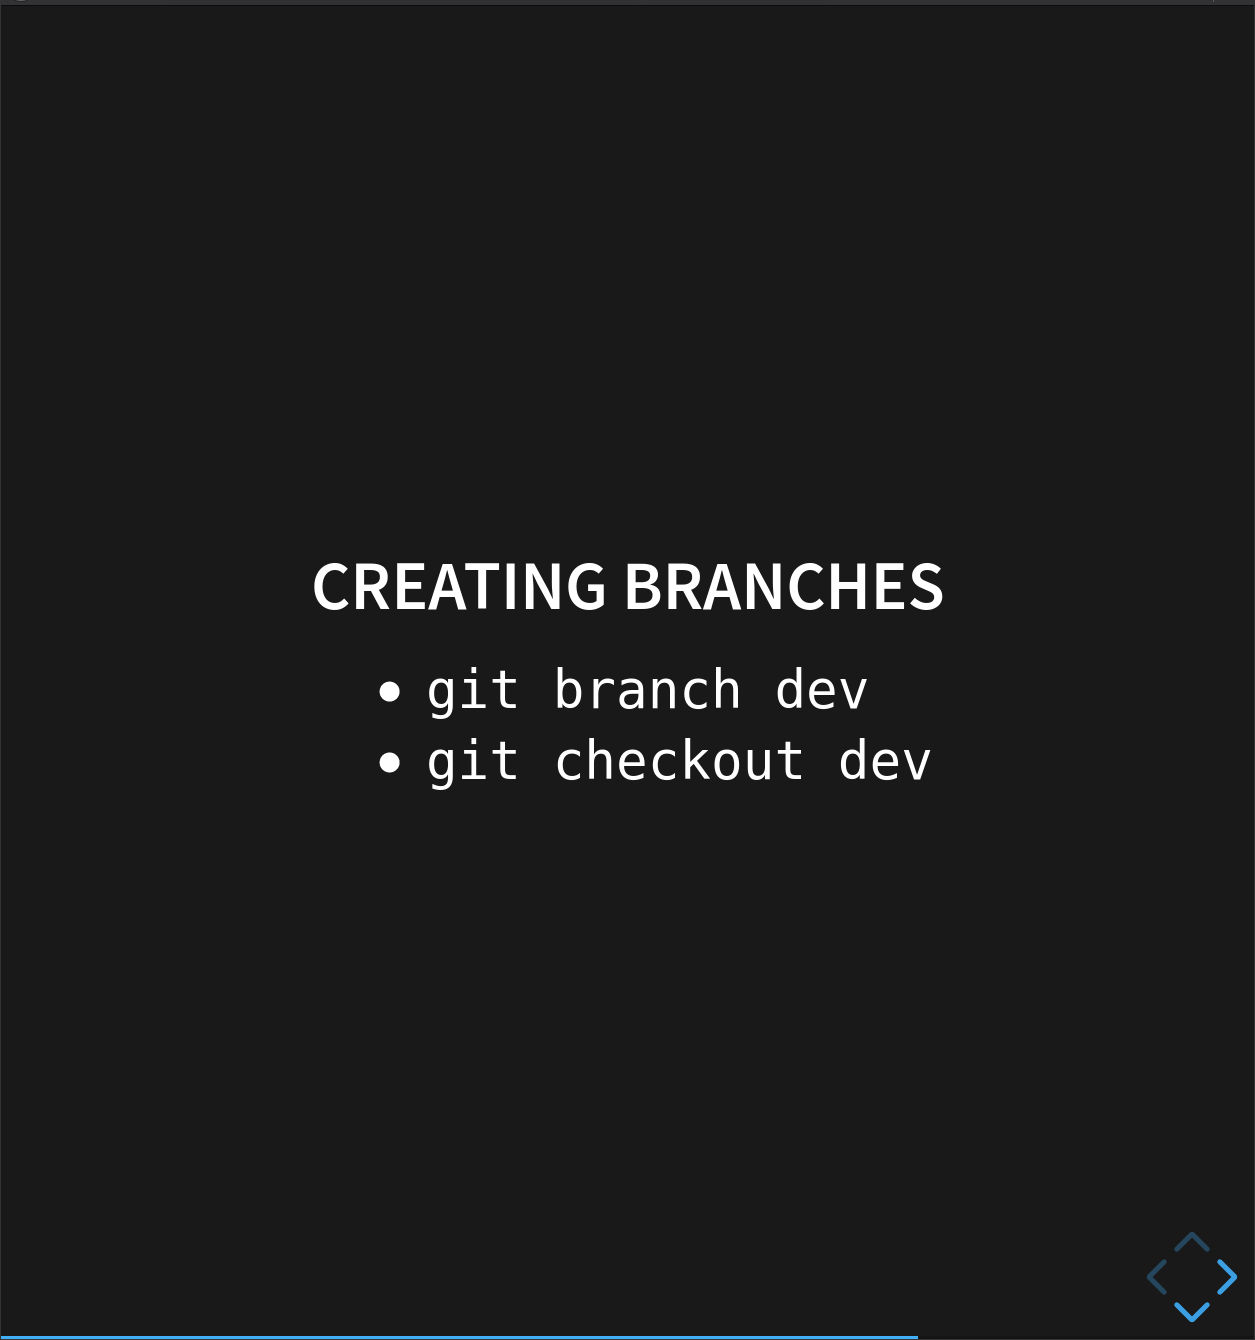
Creating branches
Let’s create a development branch to work on:
$ git branch dev
This command doesn’t give any output, but if we run git branch again, without giving it a new branch name, we can see the list of branches we have- including the new one we just made.
$ git branch
    dev
  * master
So how do we switch to this new branch? We use git checkout again, but this time with the name of the branch instead of the name of a file:
$ git checkout dev
Switched to branch 'dev'
Uncommitted changes & branches
If we try and check out a new branch whilst we have changed but not committed any tracked files, then we’ll get an error message!
To fix this, make sure you commit your work before trying to check out a new branch. Make sure to give it a descriptive commit message for when you go back to it!
Committing to branches
Now we’ve created a ‘dev’ branch, we can start working on it without affecting our ‘master’ branch.
Lets expand our library of climate analysis functions by adding a new file:
$ nano rainfall_conversion.py
$ cat rainfall_conversion.py
"""A library to perform rainfall unit conversions"""

def inches_to_mm(inches):
    """
    Convert inches to milimetres.

    Arguments:
    inches -- the rainfall inches
    """
    mm = inches * 25.4
    return mm
$ git add rainfall_conversion.py
$ git commit -m "Add rainfall module"
[dev 29f4a55] Add rainfall module
 1 file changed, 10 insertions(+)
 create mode 100644 rainfall_conversion.py
You might have noticed a change already. The commit message now reminds us we’re committing to the ‘dev’ branch.
Now, if we check the history, we can see this commit was added:
$ git log
commit 29f4a552f33bc4f26810c86b7cf7fafd2173034d (HEAD -> dev)
Author: Sam Mangham
Date:   Tue Apr 28 13:42:23 2020 +0100

    Add rainfall module

commit 5a1a72a418b4b13f7f783d2feae755de7a24580c (origin/master, master)
Author: Sam Mangham
Date:   Tue Apr 28 13:22:17 2020 +0100

    Add rainfall processing placeholder

commit 86bca165b4a1fb7028efbd88bd143deaced3ef9a
Author: Sam Mangham
Date:   Tue Apr 28 13:21:30 2020 +0100

    Add Docstring

commit 736c5eaf3219ae81b126534424bfd27604d2406b
Author: Sam Mangham
Date:   Tue Apr 28 13:17:43 2020 +0100

    Initial commit of climate analysis code
We can see the new commit to the dev branch in the log. Helpfully, the history also shows the point at which our new ‘dev’ branch broke away from the ‘master’ branch.
Let’s switch back to the ‘master’ branch and look at the directory again:
$ git checkout master
Switched to branch 'master'
$ ls
climate_analysis.py temp_conversion.py
We can see that the rainfall_conversion.py file we created on the ‘dev’ branch has disappeared. However, if you check out ‘dev’ again, it’ll reappear:
$ git checkout dev
Switched to branch 'dev'
$ ls
climate_analysis.py rainfall_conversion.py temp_conversion.py
Pushing & updating branches
Now we have a commit to our ‘dev’ branch, how do we get the changes from it into our ‘master’ branch? There’s a couple of ways of doing this, but first we’re going to do it using a pull request on GitHub.
First, we’ll push the contents of the ‘dev’ branch to GitHub the same way as we pushed the ‘master’ branch:
$ git push origin dev
Counting objects: 3, done.
Delta compression using up to 4 threads.
Compressing objects: 100% (3/3), done.
Writing objects: 100% (3/3), 467 bytes | 233.00 KiB/s, done.
Total 3 (delta 0), reused 0 (delta 0)
remote:
remote: Create a pull request for 'dev' on GitHub by visiting:
remote:      https://github.com/smangham/climate-analysis/pull/new/dev
remote:
To github.com:smangham/climate-analysis
 * [new branch]      dev -> dev
Now our ‘dev’ branch is on GitHub! Let’s go and check it out. Just above the list of files on the left-hand side is a dropdown labelled ‘branches’. Select ‘dev’, and you should see the list of files change. Then, let’s click the “Compare & pull request” button.
A pull request is a formal way to request to merge the changes from one branch into another, providing a message letting people know what your changes do. GitHub provides you with a range of tools to help manage pull requests.
If you’re part of a team, you can suggest reviewers for your code, just as you’d recommend reviewers for a paper. Getting extra eyes on your code can help spot any bugs or mistakes early on.
In addition, you can assign the pull request to someone. They’ll be notified that they’ve been assigned. This is useful if you’re in part of a team, and want to assign the pull request to someone else to handle any potential merge conflicts (we’ll get to those later).
Below this section of the pull request, you can see a list of changes this pull request would make. These is useful when reviewing code:
In this case, we can see one new file has been created.
Now, let’s click Create pull request:
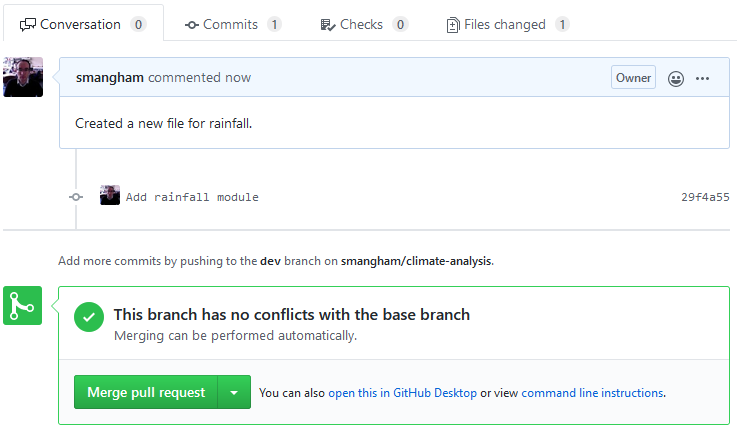
Fortunately, this branch can be automatically merged. Not all branches can be automatically merged. For example, if you had made more commits straight to ‘master’, if they edited the same lines in the same files as commits in ‘dev’ there would be a merge conflict.
It is possible to resolve merge conflicts on the command-line git, and we’ll cover it later.
Now we can click Merge pull request, and then add a commit message and click Confirm merge to update ‘master’!
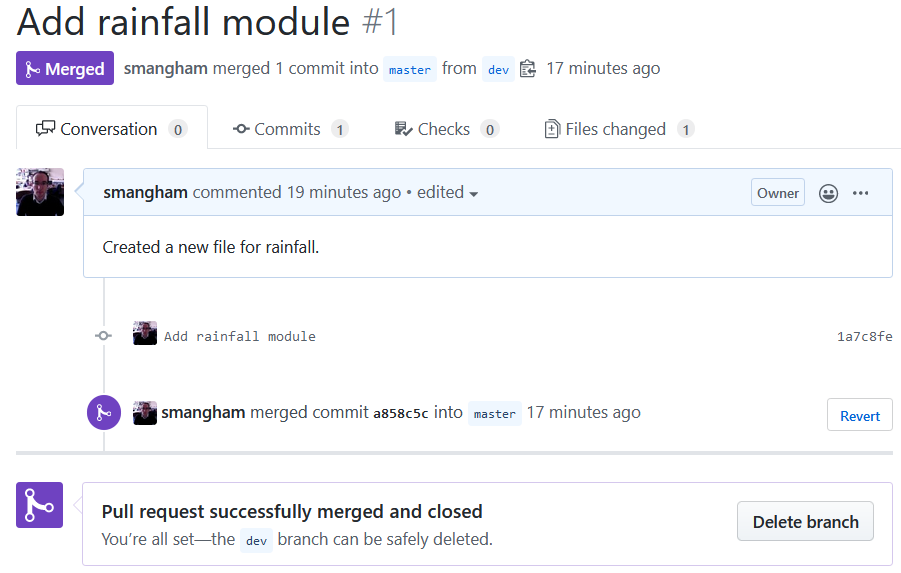
Now we’ve updated the ‘master’ branch on GitHub with our new work from the ‘dev’ branch! All we need to do is to update our local version. Let’s go back to our command line and check out the master branch, then pull our changes from GitHub to our computer:
$ git checkout master
Switched to branch 'master'
$ git pull origin master
remote: Enumerating objects: 1, done.
  remote: Counting objects: 100% (1/1), done.
remote: Total 1 (delta 0), reused 0 (delta 0), pack-reused 0
Unpacking objects: 100% (1/1), done.
From github.com:smangham/climate-analysis
* branch            master     -> FETCH_HEAD
  5a1a72a..32fa979  master     -> origin/master
Updating 5a1a72a..32fa979
Fast-forward
  rainfall_conversion.py | 10 ++++++++++
  1 file changed, 10 insertions(+)
  create mode 100644 rainfall_conversion.py
Now we know how to create branches, remote repositories, and sync our local and remote branches up.

Feature-branch workflows
Now we know how to keep a seperate working copy of our code, and use it to update the version we want other people to use. But what if, whilst we’re working on adding a new feature in our development branch, someone finds a bug in our code? We don’t want to have to complete the new feature in ‘dev’ before we can start fixing the bug!
Plus, what if multiple people want to work on the code at once, each working on a new feature? If they’re all using ‘dev’, there’ll be plenty of merge conflicts. Plus, it makes testing the effect of the new features much harder - we only want to change one thing at a time!
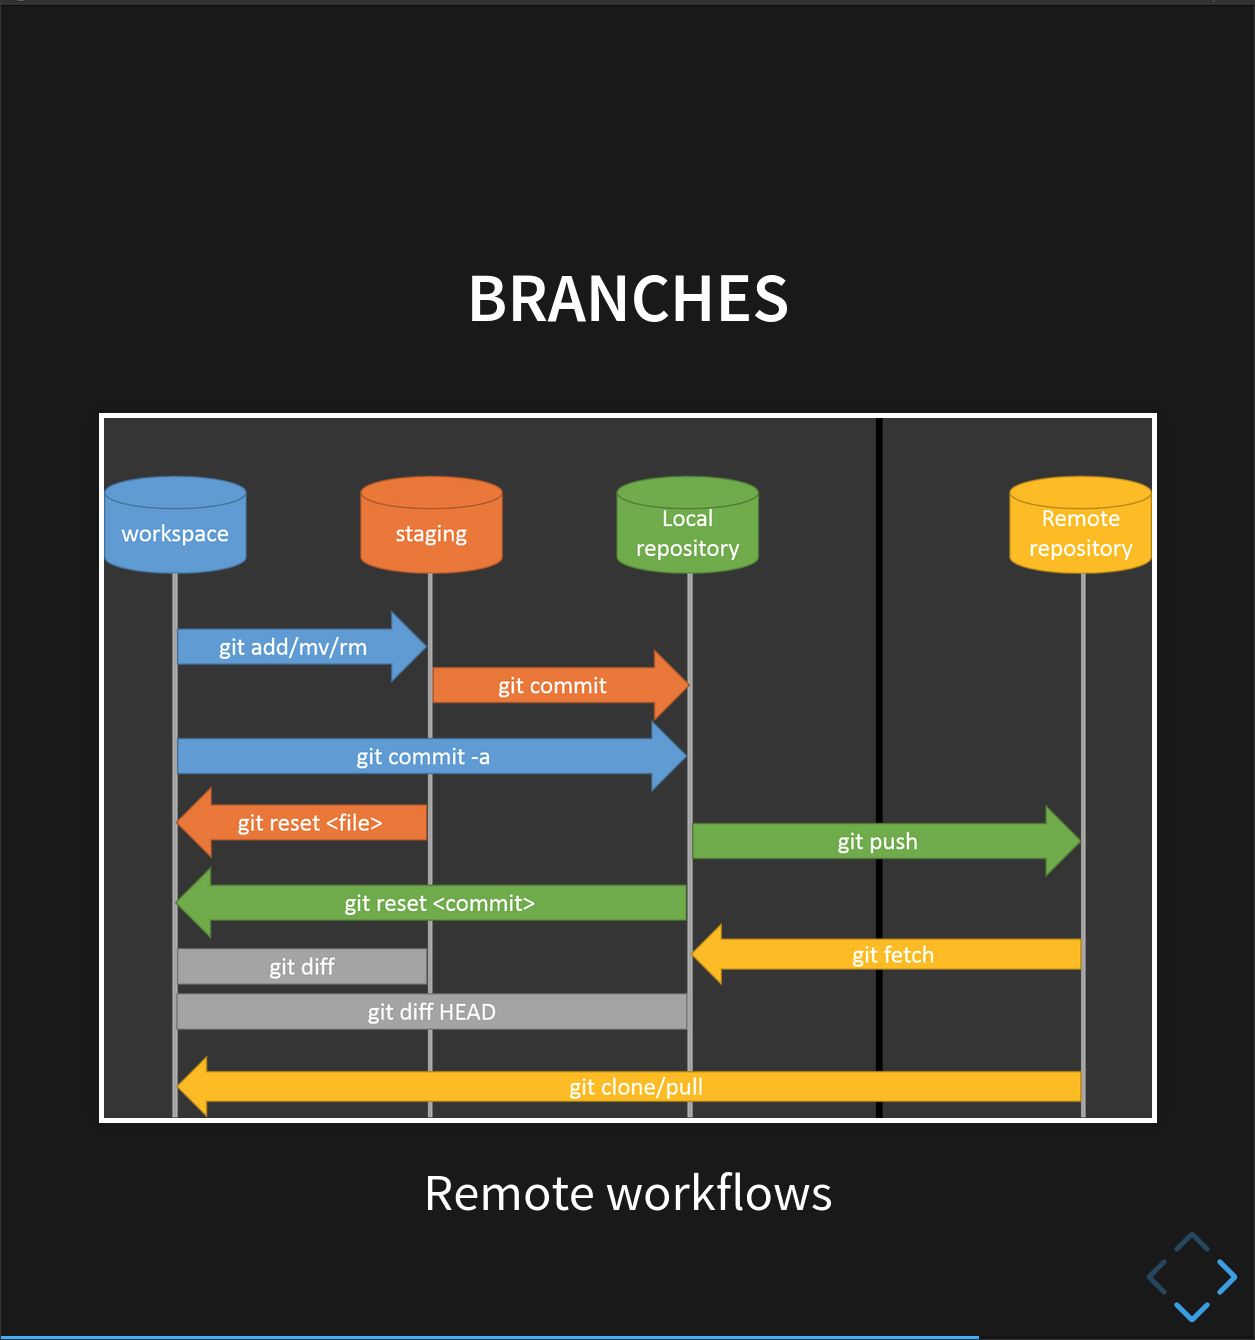
This is where the feature-branch workflow we mentioned comes in! Remember the figure from earlier?
There’s a ‘master’ branch, a ‘dev’ branch, but also several feature branches.
When you want to make some changes to the code, like adding new features (or even fixing a complicated bug), you create a new feature branch. Then, you can work on your feature branch without worrying about conflicts or confusing others with work-in-progress files.
Once you’ve finished and tested your new work, then you can submit a pull request from your feature branch back to the ‘dev’ branch.
In some collaborations, only some people have permission to merge pull requests to the ‘dev’ and ‘master’ branches. This makes sure that nothing gets into the shared versions of the code without it being properly reviewed and tested by others.
When To Branch
The feature-branch workflow is incredibly helpful, but does add a bit of overhead. If you’re developing a new code from scratch, whilst you can create new branches for each sub-component of the code (and should if you’re collaborating with others), if you’re the only developer on a relatively small project you only need to start branching once you’ve got your first, working version of the code.
Whilst committing directly to the development branch can cause problems (e.g. other people branching off of unfinished work), if you’re working on something that takes less than a day or so and you can test fully (e.g. updating some documentation), it’s normally OK to do it as a single commit directly on ‘dev‘.
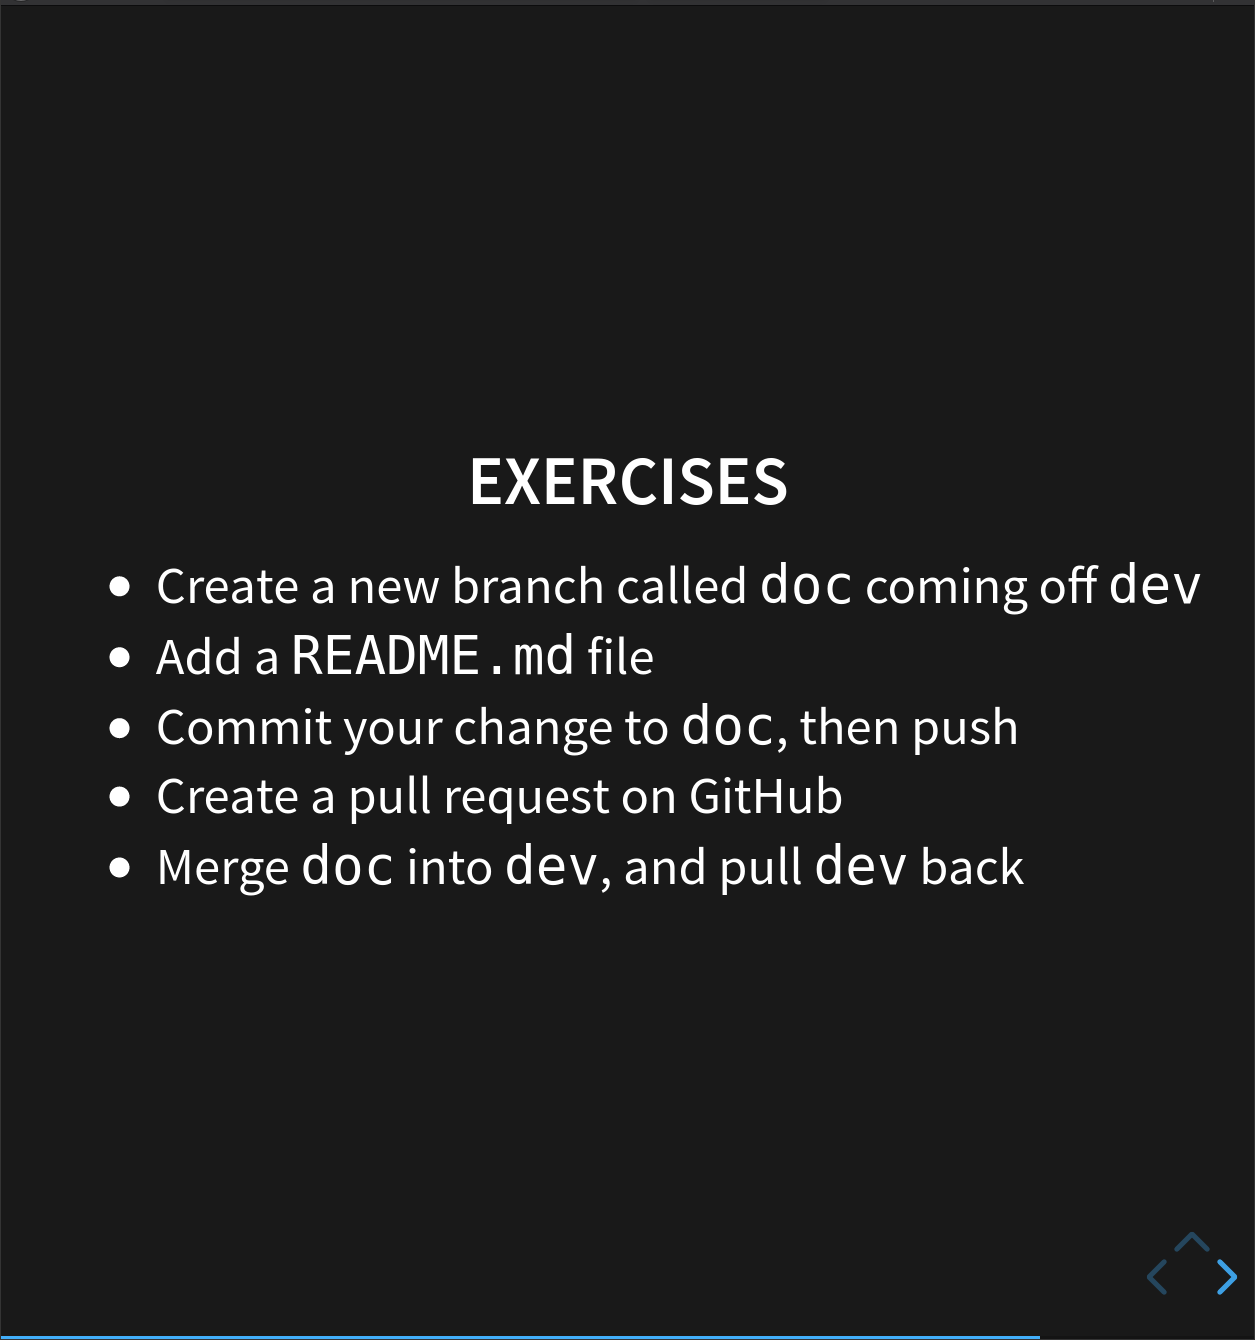
Exercise: Feature branches
Now let’s put the feature-branch workflow into practise!
The code needs some documentation so people know what it does.
Try creating a new branch coming off ‘dev’ called ‘doc’, then add a new file called
README.mdcontaining the text “Tools to parse and convert climate data from CSV”.Once you’ve done that, add and commit the file to your local repository, then push your changes up to GitHub. Then once they’re on GitHub, create a pull request, merge your new feature branch back into your development branch, and pull the changes to ‘dev’ back to your local repository.
Solution
$ git checkout dev
$ git branch doc
$ git checkout doc
$ nano README.md
$ git add README.md
$ git commit -m "Added a readme file."
$ git push origin doc
Then go to GitHub to do the pull request. Once that’s done:
$ git checkout dev
$ git pull origin dev
Key Points
git remote add originlinks a local repository to a remote one and names it ‘origin’.
git pushcopies changes from a local repository to a remote repository.
git pullcopies changes from a remote repository to a local repository.Branches are versions of a repository that can contain different commits.
Pull requests on GitHub can be used to merge different branches together.
git clonecopies a remote repository to create a local repository with a remote called origin automatically set up.
Conflicts
Overview
Teaching: 20 min
Exercises: 0 minQuestions
What do I do when my changes conflict with someone else’s?
Objectives
Identify what conflicts are and when they can occur.
Resolve conflicts resulting from a merge.

As soon as people can work in parallel, someone is going to step on someone else’s toes.
This will even happen with a single person: if we are working on a piece of software on both our laptop and a server in the lab, we could make different changes to each copy.
These situations are called conflicts Version control helps us manage these conflicts by giving us tools to resolve overlapping changes.
To see how we can resolve conflicts,
we must first create one.
The file rainfall_conversion.py currently looks like this
on the dev branch of our climate-analysis repository:
$ cat rainfall_conversion.py
"""A library to perform rainfall unit conversions"""

def inches_to_mm(inches):
    """Convert inches to milimetres.

    Arguments:
    inches -- the rainfall inches
    """
    mm = inches * 25.4
    return mm
Feature branch 1
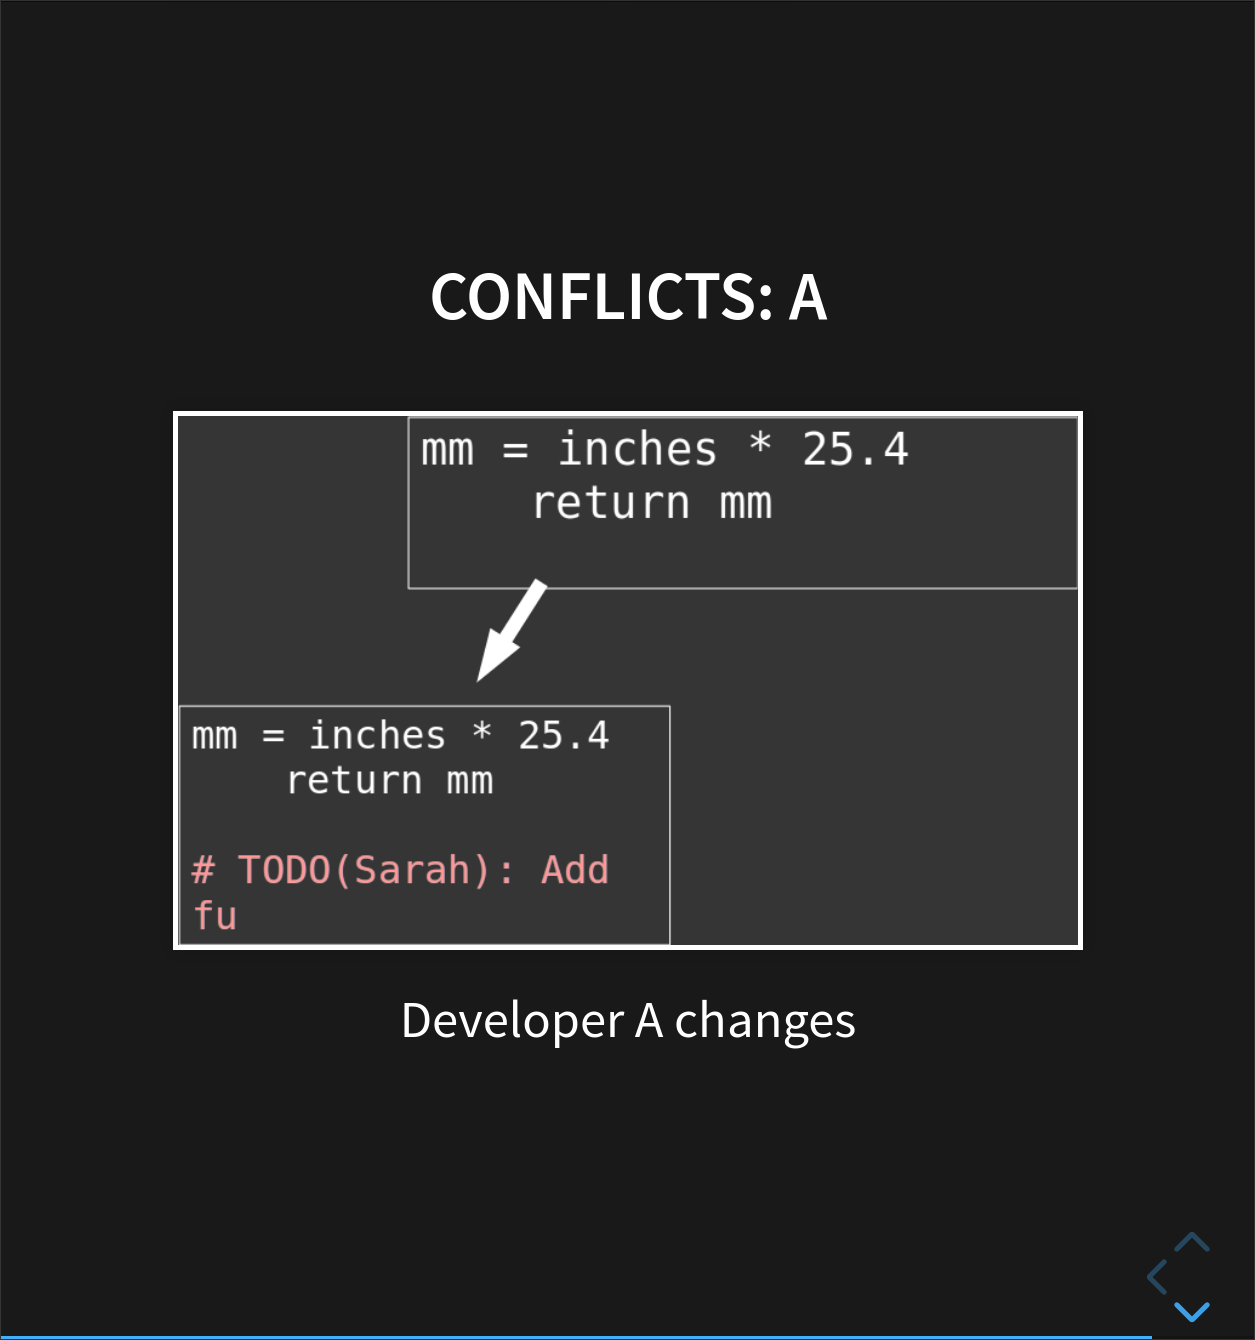
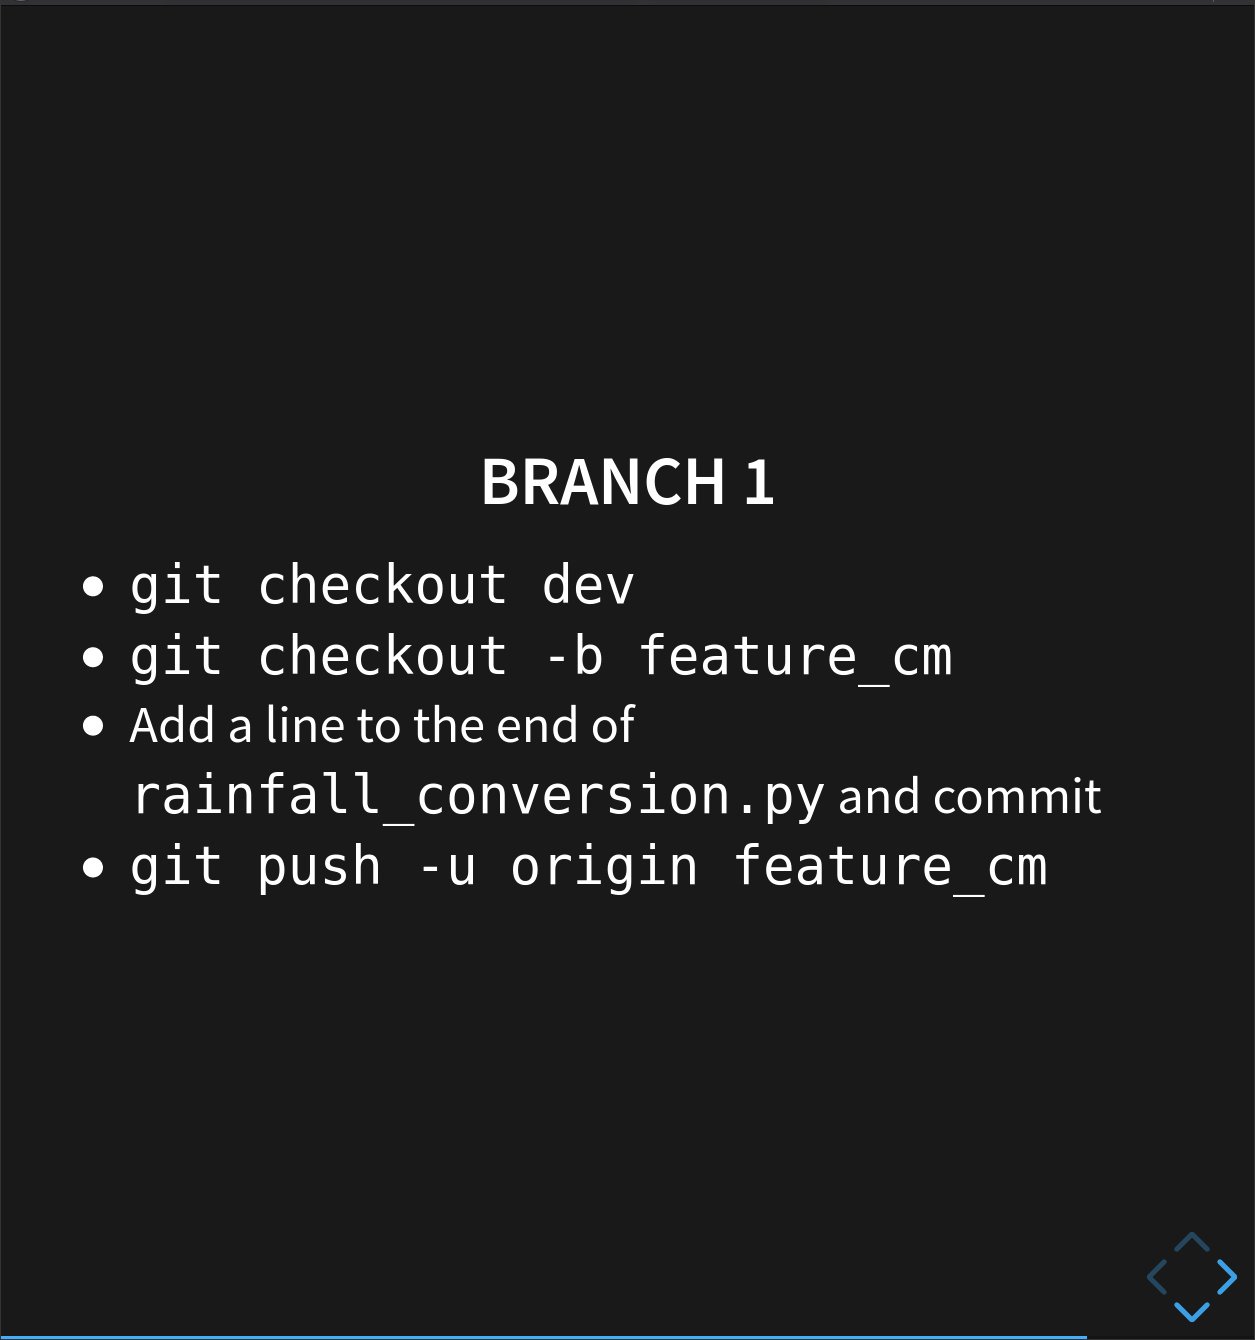
Let’s say we want to add a new function to convert from inches to centimeters. We’ll create a new branch, feature_cm, and add a placeholder there.
First we’ll make sure we’re branching out from our development branch, then we can create and switch to a new branch using one command- git checkout -b:
$ git checkout dev
Switched to branch 'dev'
$ git checkout -b feature_cm
Switched to a new branch 'feature_cm'
Now, let’s add a small placeholder to the end of our rainfall file:
$ nano rainfall_conversion.py
$ cat rainfall_conversion.py
"""A library to perform rainfall unit conversions"""

def inches_to_mm(inches):
    """Convert inches to milimetres.

    Arguments:
    inches -- the rainfall inches
    """
    mm = inches * 25.4
    return mm

# TODO: Add function inches_to_cm
and then push the change to GitHub:
$ git add rainfall_conversion.py
$ git commit -m "Added cm placeholder"
[feature_cm 6288bd3] Added cm placeholder
 1 file changed, 2 insertions(+)
Now we’ll push the feature branch up to GitHub. If we add the -u flag, then we set a default ‘upstream’ for that branch. After this, when we want to push any changes on this branch, we can just use git push- we don’t have to specify where we’re pushing to!
$ git push -u origin feature_cm
Enumerating objects: 5, done.
Counting objects: 100% (5/5), done.
Delta compression using up to 12 threads
Compressing objects: 100% (3/3), done.
Writing objects: 100% (3/3), 323 bytes | 323.00 KiB/s, done.
Total 3 (delta 2), reused 0 (delta 0)
remote: Resolving deltas: 100% (2/2), completed with 2 local objects.
remote:
remote: Create a pull request for 'feature_cm' on GitHub by visiting:
remote:      https://github.com/smangham/climate-analysis/pull/new/feature_cm
remote:
To github.com:smangham/climate-analysis.git
 * [new branch]      feature_cm -> feature_cm
Branch 'feature_cm' set up to track remote branch 'feature_cm' from 'origin'.
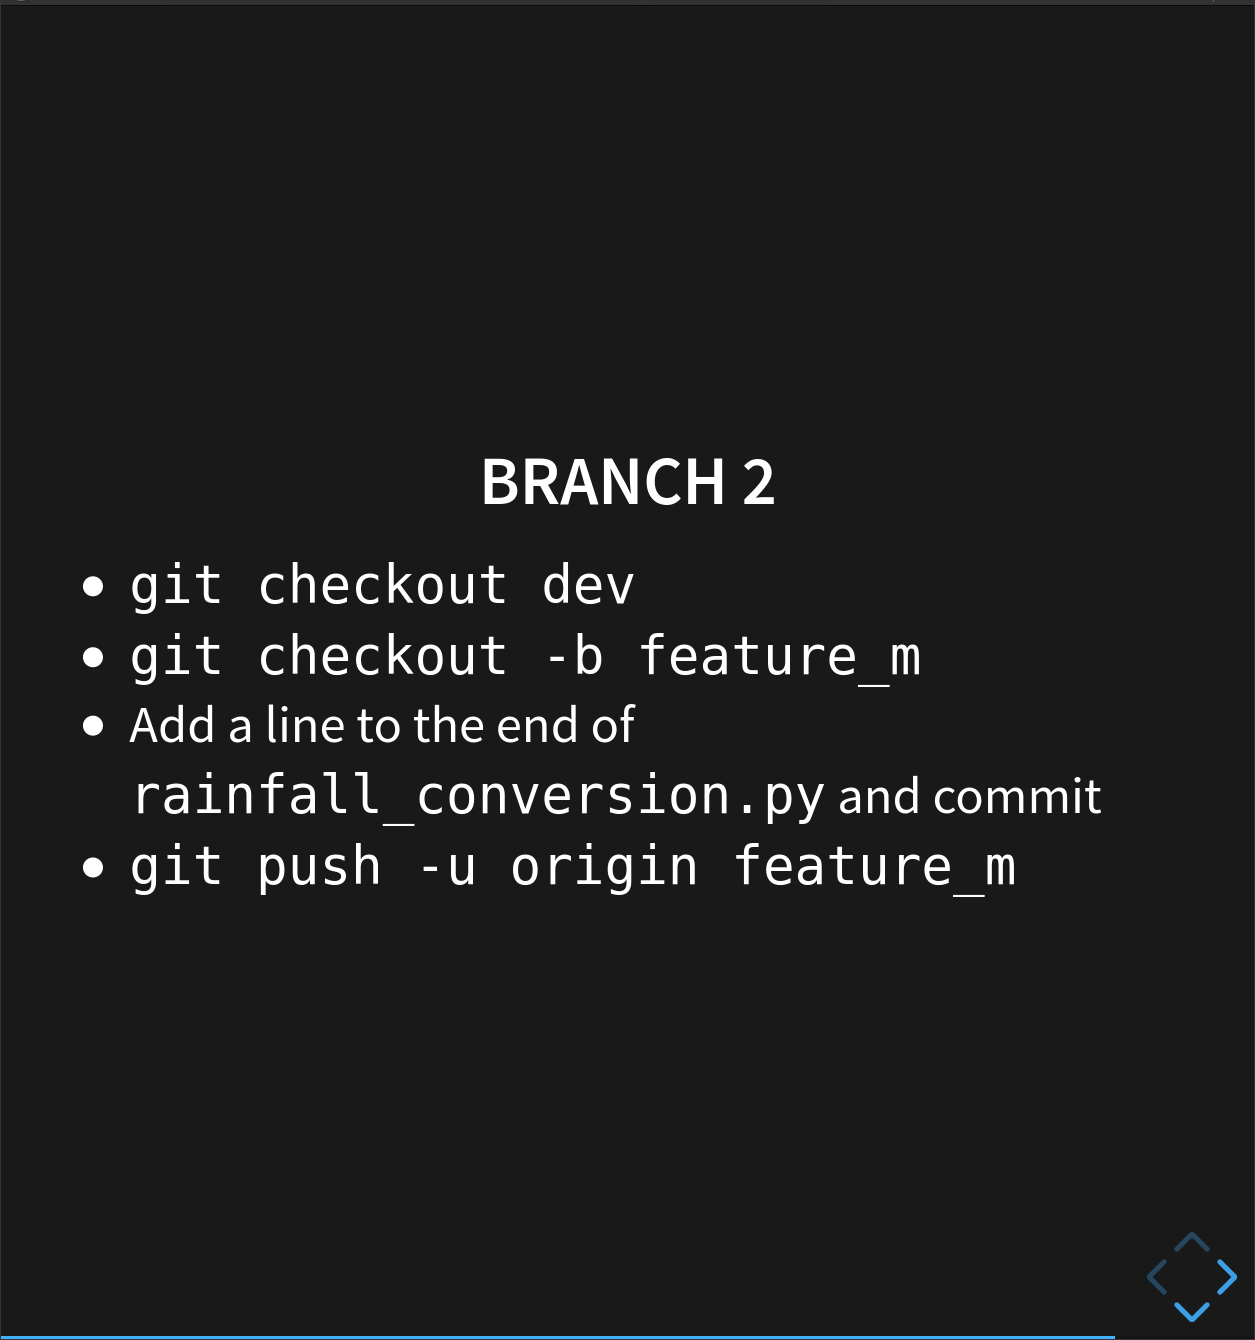
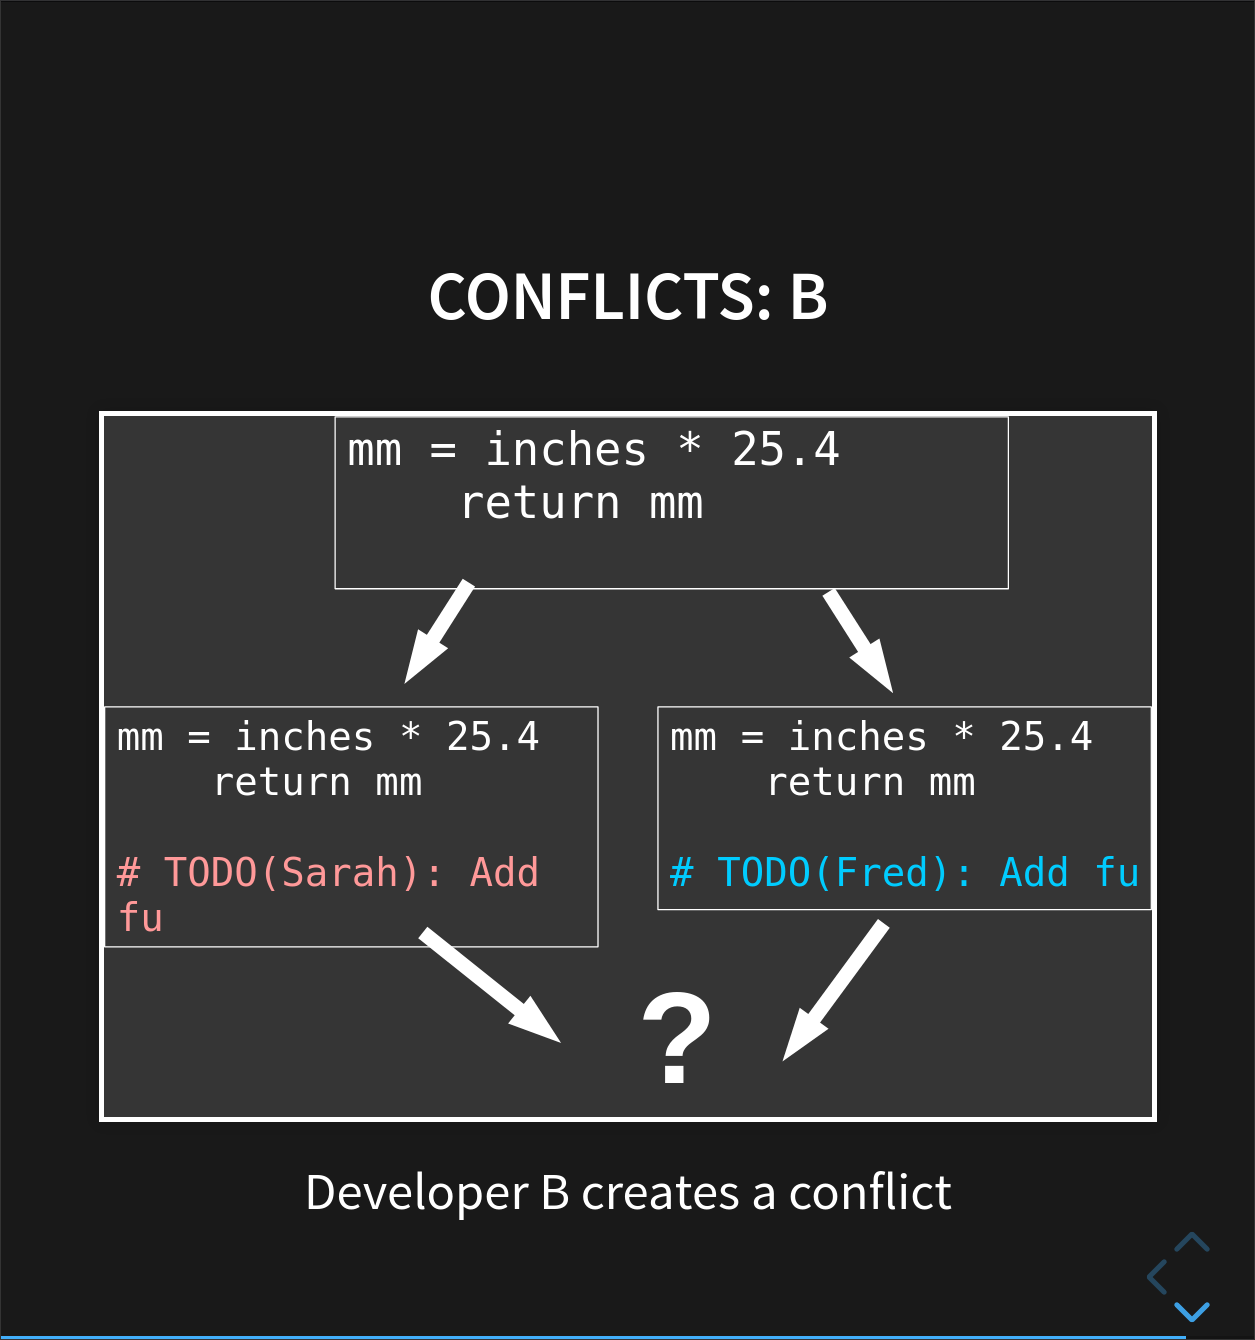
Feature branch 2
Now, we’re going to introduce a conflict. Let’s switch back to dev, and create another branch. We also want a function that converts inches to meters. So we go back to dev, and create a new branch.
$ git checkout dev
Switched to branch 'dev'
$ git checkout -b feature_m
Switched to a new branch 'feature_m'
We’re going to add another placeholder:
$ nano rainfall_conversion.py
$ cat rainfall_conversion.py
"""A library to perform rainfall unit conversions"""

def inches_to_mm(inches):
    """Convert inches to milimetres.

    Arguments:
    inches -- the rainfall inches
    """
    mm = inches * 25.4
    return mm

# TODO: Add function inches_to_m
And again we commit and push the changes:
$ git add rainfall_conversion.py
$ git commit -m "Added m placeholder"
[feature_m 2bc1789] Added m placeholder
 1 file changed, 2 insertions(+)
$ git push -u origin feature_m
Enumerating objects: 5, done.
Counting objects: 100% (5/5), done.
Delta compression using up to 12 threads
Compressing objects: 100% (3/3), done.
Writing objects: 100% (3/3), 322 bytes | 322.00 KiB/s, done.
Total 3 (delta 2), reused 0 (delta 0)
remote: Resolving deltas: 100% (2/2), completed with 2 local objects.
remote:
remote: Create a pull request for 'feature_m' on GitHub by visiting:
remote:      https://github.com/smangham/climate-analysis/pull/new/feature_m
remote:
To github.com:smangham/climate-analysis.git
 * [new branch]      feature_m -> feature_m
Branch 'feature_m' set up to track remote branch 'feature_m' from 'origin'.
Pull requests and conflicts
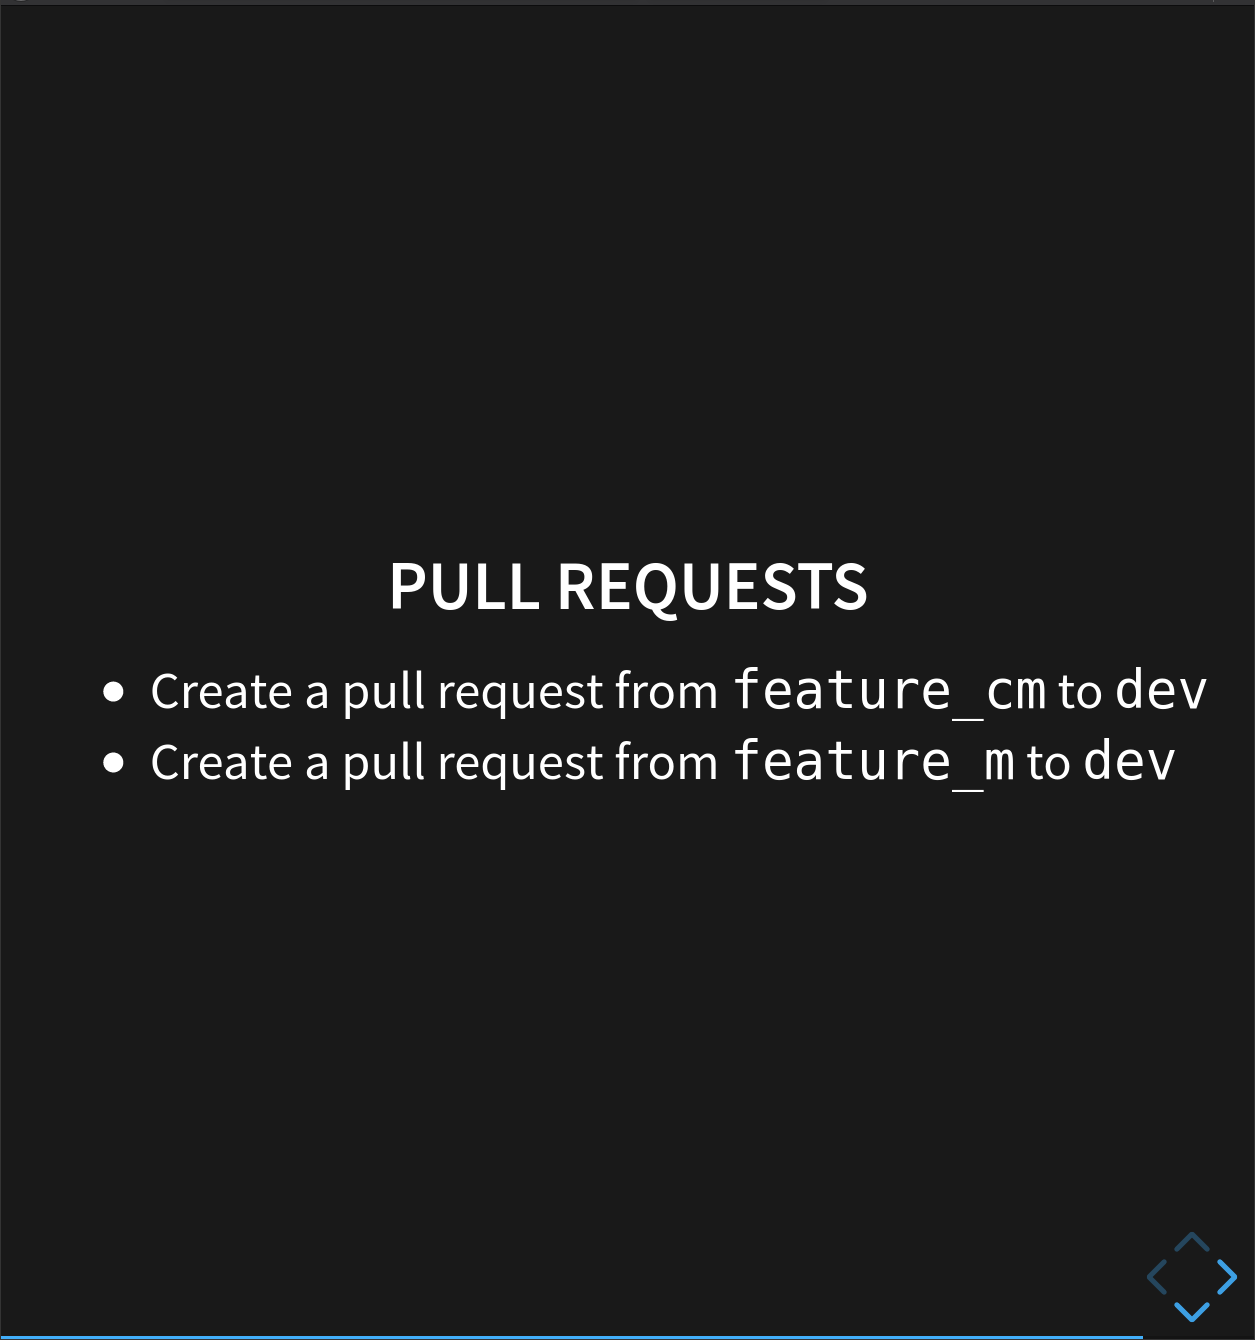
We’ve now created both our placeholders, so let’s merge them into our dev branch. First, we go onto GitHub and create a pull request for feature_cm to dev- this should go fine!
Secondly, we try and create one for feature_m to dev. This time, we should see something new:
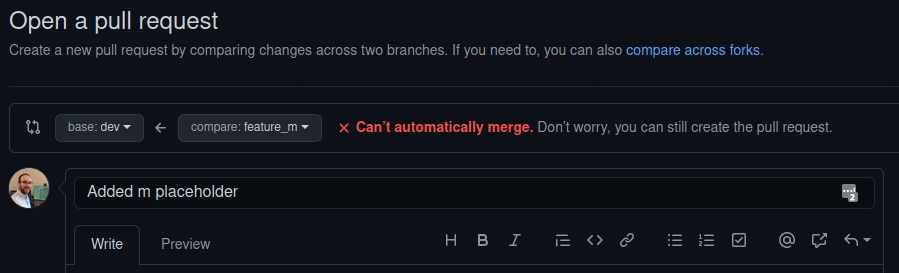
We can’t automatically merge these branches! Let’s create the pull request anyway. It will show us which files are conflicting:
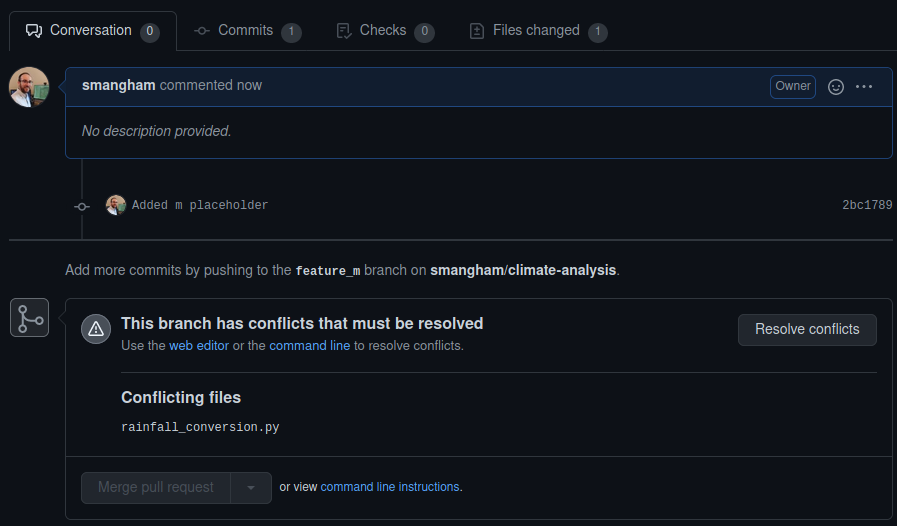
If you click Resolve conflicts, GitHub offers a nice interface to show which files are modified, and how they clash (GitLab also offers this functionality!). In our case, you can see both branches have edited the last line of the same file.
A ======= splits the two sets of changes, and each side lets you know which branch the changes belong to. You can resolve the conflict here, but we’re going to do it on the command line. Some conflicts can be too large or complicated to resolve through a web interface, so it’s important to understand how to do it locally.

Resolving conflicts
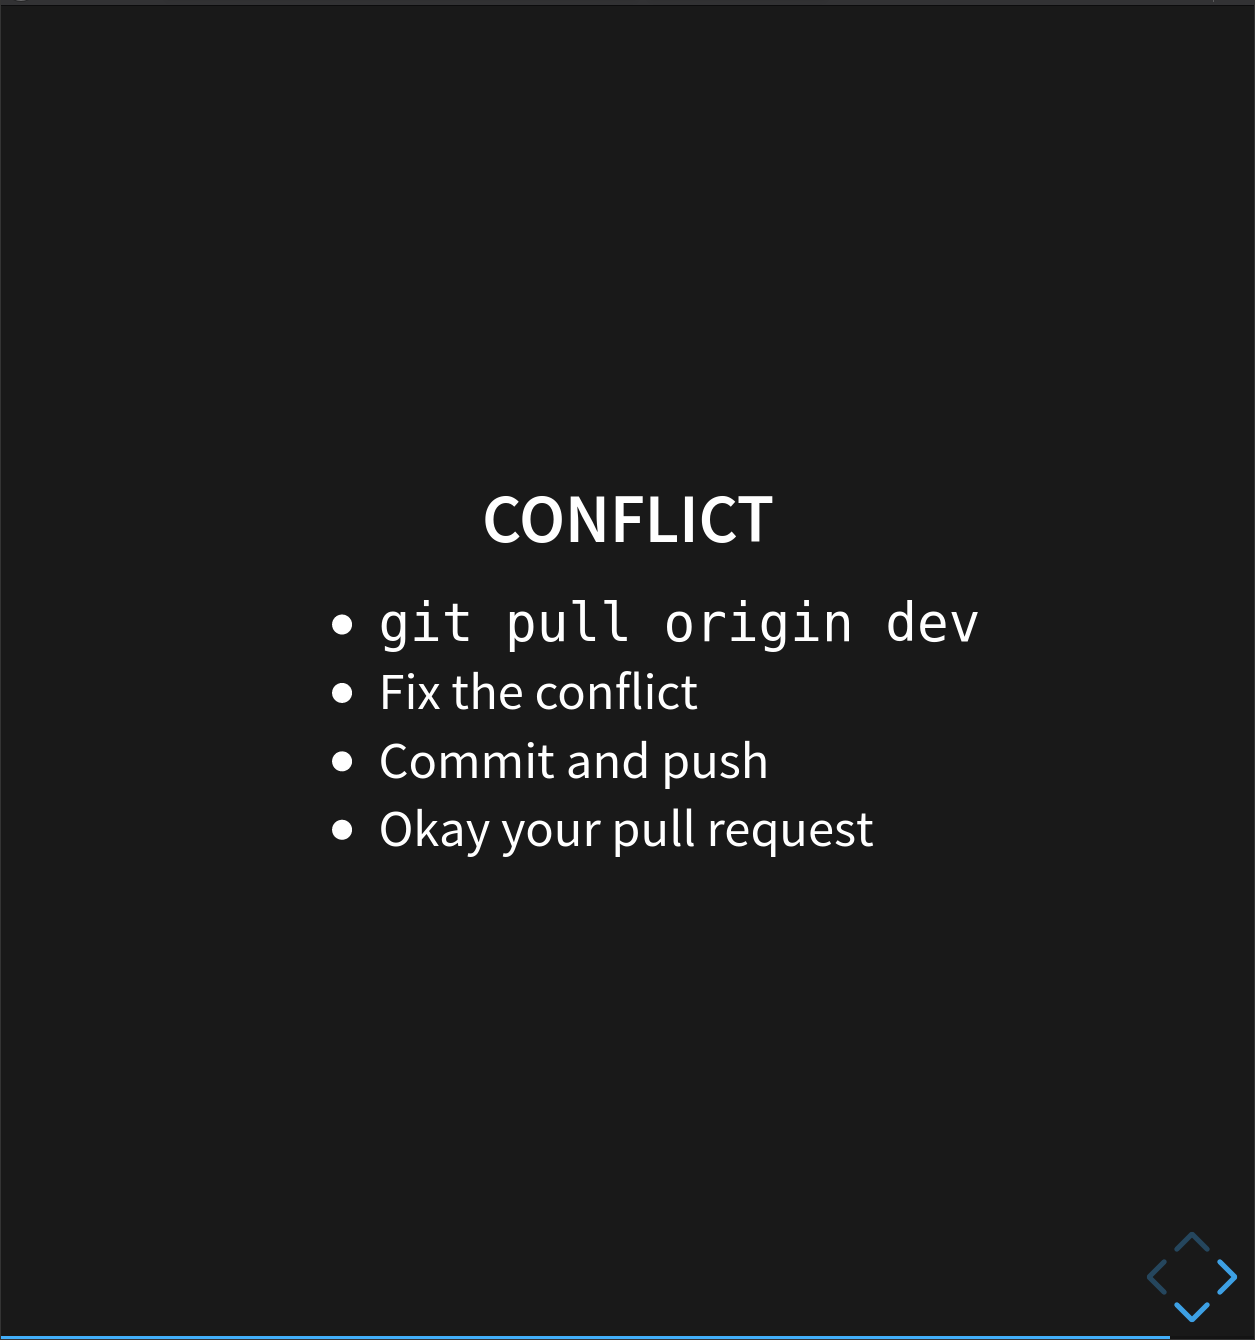
Conflicts happen when one branch contains commits that another branch doesn’t. So in order to merge our feature_m branch in, we need to get it up to date with dev.
We can do this by pulling the commits from dev into our current branch (feature_m).
$ git pull origin dev
remote: Enumerating objects: 1, done.
remote: Counting objects: 100% (1/1), done.
remote: Total 1 (delta 0), reused 0 (delta 0), pack-reused 0
Unpacking objects: 100% (1/1), 631 bytes | 631.00 KiB/s, done.
From github.com:smangham/climate-analysis
 * branch            dev        -> FETCH_HEAD
   311e67e..35fd1b5  dev        -> origin/dev
Auto-merging rainfall_conversion.py
CONFLICT (content): Merge conflict in rainfall_conversion.py
Automatic merge failed; fix conflicts and then commit the result.
As we can see, this gives us a conflict, and it’s one that we can fix. If we look inside the rainfall_conversion.py file, we’ll see the same problems we saw on GitHub, though this time the labels will be slightly different. Instead of labelling branches, they label specific commits, where HEAD means the latest commit on this branch and the other one will be the ID of the latest commit on the dev branch:
$ cat rainfall_conversion.py
"""A library to perform rainfall unit conversions"""

def inches_to_mm(inches):
    """Convert inches to milimetres.

    Arguments:
    inches -- the rainfall inches
    """
    mm = inches * 25.4
    return mm

<<<<<<< HEAD
#TODO: Add function inches_to_m
=======
# TODO: Add function inches_to_cm
>>>>>>> 35fd1b5cb0223d9e63b539854ba7317ac6ede614
In this case, we don’t want to select only one change or the other- we want to keep both placeholders. So let’s edit the file to remove the conflict markers:
$ nano rainfall_conversion.py
$ cat rainfall_conversion.py
"""A library to perform rainfall unit conversions"""

def inches_to_mm(inches):
    """Convert inches to milimetres.

    Arguments:
    inches -- the rainfall inches
    """
    mm = inches * 25.4
    return mm

# TODO: Add function inches_to_m
# TODO: Add function inches_to_cm
We can add our fix, then commit and push it up to our remote repository:
$ git add rainfall_conversion.py
$ git commit -m "Fixed the conflict in rainfall module"
[feature_m 7e1c7a6] Fixed the conflict in rainfall module
$ git push
Enumerating objects: 7, done.
Counting objects: 100% (7/7), done.
Delta compression using up to 12 threads
Compressing objects: 100% (3/3), done.
Writing objects: 100% (3/3), 333 bytes | 333.00 KiB/s, done.
Total 3 (delta 2), reused 0 (delta 0)
remote: Resolving deltas: 100% (2/2), completed with 2 local objects.
To github.com:smangham/climate-analysis.git
   2bc1789..7e1c7a6  feature_m -> feature_m
Remember, because we used git push -u earlier we didn’t have to specify where we were pushing to. Now let’s go back to GitHub, and look at the pull request there (you may need to refresh the page):
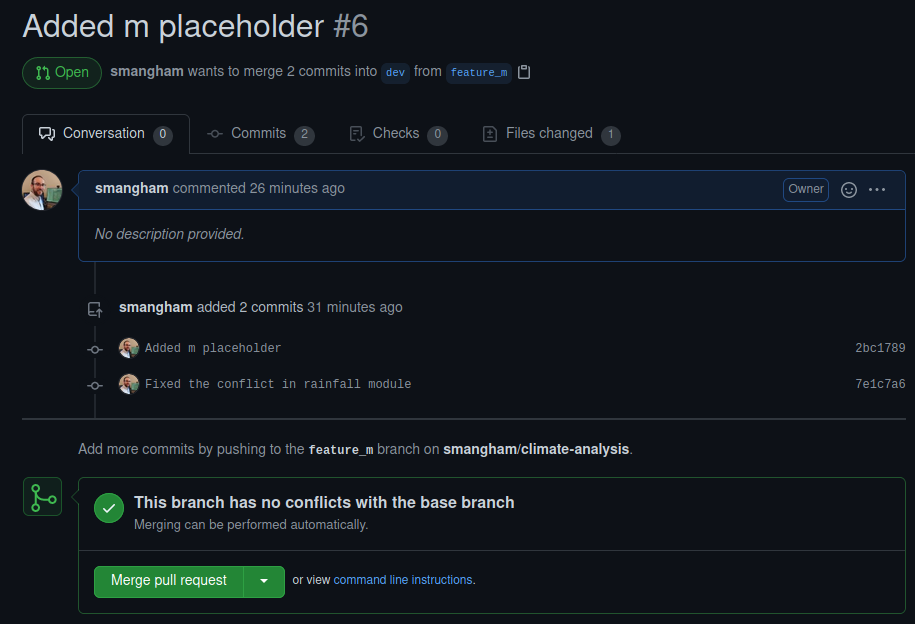
We can see the new commit we added that fixes the problem, and now the commits can be merged. Our conflict is sorted.
If you want, you can always merge branches directly into dev, without going through a pull request, but this isn’t a great habit to get into. If the conflict is large, complicated, or otherwise takes a long time to resolve, you won’t be able to merge in any other branches until you’ve finished. This can mean essential bug fixes end up waiting for you to finish adding new bells and whistles!
Version control’s ability to merge conflicting changes is another reason users tend to divide their programs and papers into multiple files instead of storing everything in one large file. There’s another benefit too: whenever there are repeated conflicts in a particular file, the version control system is essentially trying to tell its users that they ought to clarify who’s responsible for what, or find a way to divide the work up differently.
Conflicts on Non-textual files
What does Git do when there is a conflict in an image or some other non-textual file that is stored in version control?
Key Points
Conflicts occur when different commits change the same lines of the same file.
The version control system does not allow changes to overwrite each other, but highlights conflicts so that they can be resolved.
git checkout -bcreates a new branch and checks it out at the same time.
git push -ulinks a local branch with an ‘upstream’ branch on a remote repository.
git pullcan pull changes from one branch into another locally.
Ignoring Things
Overview
Teaching: 5 min
Exercises: 0 minQuestions
How can I tell Git to ignore files I don’t want to track?
Objectives
Use a
.gitignorefile to ignore specific files and explain why this is useful.

What if we have files that we do not want Git to track for us, like backup files created by our editor or intermediate files created during data analysis. Let’s create a few dummy files:
$ mkdir results
$ touch a.dat b.dat c.dat results/a.out results/b.out
and see what Git says:
$ git status
# On branch master
# Untracked files:
#   (use "git add <file>..." to include in what will be committed)
#
#	a.dat
#	b.dat
#	c.dat
#	results/
nothing added to commit but untracked files present (use "git add" to track)
Putting these files under version control would be a waste of disk space. What’s worse, having them all listed could distract us from changes that actually matter, so let’s tell Git to ignore them.
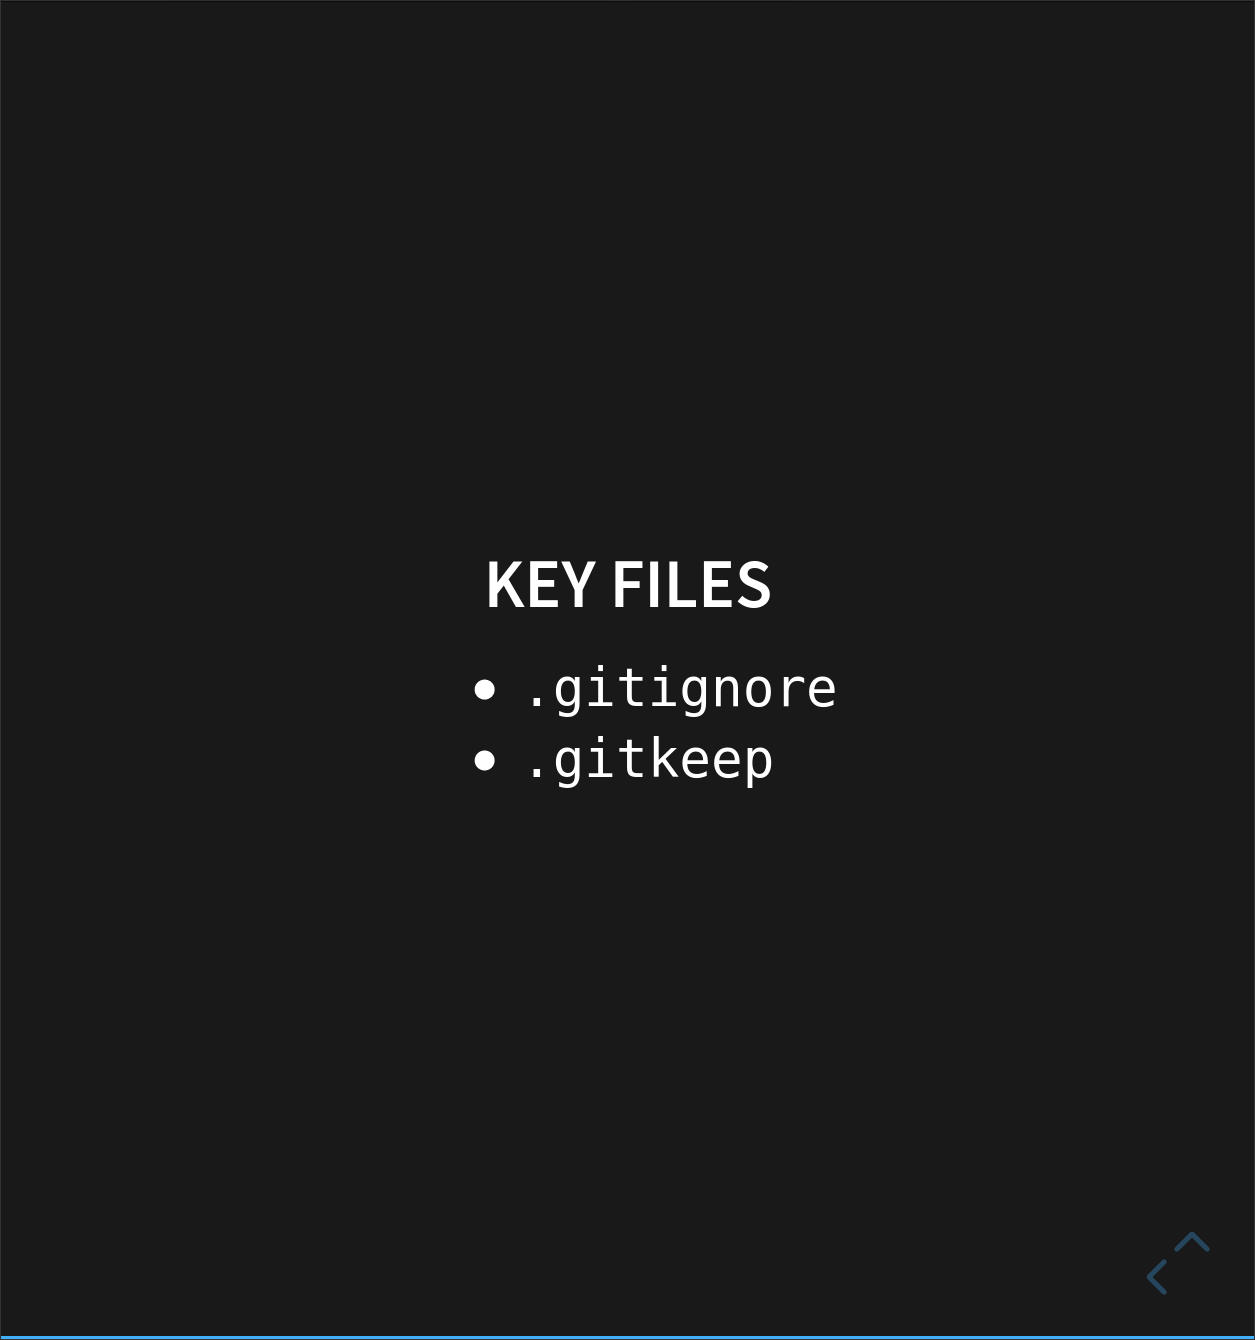
We do this by creating a file in the root directory of our project called .gitignore.
$ nano .gitignore
$ cat .gitignore
*.dat
results/
These patterns tell Git to ignore any file whose name ends in .dat
and everything in the results directory.
(If any of these files were already being tracked,
Git would continue to track them.)
Once we have created this file,
the output of git status is much cleaner:
$ git status
# On branch master
# Untracked files:
#   (use "git add <file>..." to include in what will be committed)
#
#	.gitignore
nothing added to commit but untracked files present (use "git add" to track)
The only thing Git notices now is the newly-created .gitignore file.
You might think we wouldn’t want to track it,
but everyone we’re sharing our repository with will probably want to ignore
the same things that we’re ignoring.
Let’s add and commit .gitignore:
$ git add .gitignore
$ git commit -m "Add the ignore file"
$ git status
# On branch master
nothing to commit, working directory clean
As a bonus,
using .gitignore helps us avoid accidentally adding files to the repository that we don’t want.
$ git add a.dat
The following paths are ignored by one of your .gitignore files:
a.dat
Use -f if you really want to add them.
fatal: no files added
If we really want to override our ignore settings,
we can use git add -f to force Git to add something.
We can also always see the status of ignored files if we want:
$ git status --ignored
# On branch master
# Ignored files:
#  (use "git add -f <file>..." to include in what will be committed)
#
#        a.dat
#        b.dat
#        c.dat
#        results/

nothing to commit, working directory clean
Force adding can be useful for adding a .gitkeep file. You can’t add empty directories to a repository- they have to have some files within them. But if your code expects there to be a results/ directory to output to, for example, this can be a problem. Users will run your code, and have it error out at a missing directory and have to create it themselves.
Instead, we can create an empty .gitkeep file using touch in the results/ directory, and force-add it. As it starts with a ., it’s a special file and won’t appear in ls (only ls -a), but it will ensure that the directory structure is kept as part of your repository.
Key Points
The
.gitignorefile tells Git what files to ignore.