Organising data in spreadsheets
Overview
Teaching: 10 min
Exercises: 15 minQuestions
How do we organise and format data in spreadsheets for effective data use?
Objectives
Describe best practices for data entry and formatting in spreadsheets.
Apply best practices to arrange variables and observations in a spreadsheet.
A common mistake is use a spreadsheet like a lab notebook. In other words, to convey information not just with the data, but with notes in the margin and the spatial layout of the data. We humans can (usually) interpret these things, but computers cannot. They are incredibly literal, so unless we explain every single nuance of meaning that we intended, the computer will misinterpret our data - and that causes problems. This is why it is extremely important to start with well-formatted tables from the outset - before you even start entering data from your first preliminary experiment.
Data organisation is the foundation of your research project. It can make it easier or more difficult to work with your data throughout your analysis. You should start thinking about data organisation before you start collecting data. There’s a lot of flexibility, but some of the choices you make now will limit your ability to work with the data in the future.
Best data formats may differ
The best layout for data entry might change dependent on the specific use case. Do not stick to a format just because you have used it previously. Choose the best format on a case-by-case basis. (And if you need to convert between formats, ideally you would automate the conversion with a script in, say, Python or R.
Structuring data in spreadsheets
The cardinal rule of using spreadsheet programs for data is to keep it “tidy”:
- Put all your variables (i.e. the thing you are measuring, like ‘weight’ or ‘temperature’) in its own column
- Put each observation in its own row
- Do not combine multiple variables in one cell
- Leave the raw data raw - do not change it!
- Export the cleaned data to a text-based format like CSV (comma-separated values). This ensures that anyone can use the data, and is required by most data repositories. We will cover this later in the lesson.
To see some of these rules in action, let’s look at the following data from a survey of small mammals in a desert ecosystem. Different people have gone to the field and entered data into a spreadsheet. They kept track of variables like species, plot, weight, sex and date collected.
Here’s a poor example of data collection:
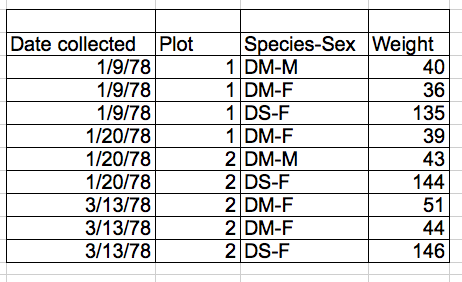
There are problems like the species and sex variables being in the same field. This data format would make it difficult to easily look at all of one species, or look at different weight distributions by sex. If, instead, we put sex and species in different columns, it would be much easier to perform such analyses.
The data could be better organised as:
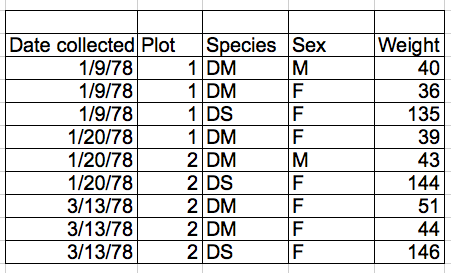
Columns for variables and rows for observations
The rule of thumb, when setting up data in a table is: columns = variables, rows = observations, cells = data values.
Including metadata in the spreadsheet
“Metadata” is the data you record about your data (such as the date the experiment was conducted, who conducted it, etc). It is essential to understanding the circumstances under which your data was collected. You may be on intimate terms with your dataset while you are collecting and analysing it, but this will change over time. After six months, you are unlikely to remember the exact algorithm you used to transform a variable, or that “sglmemgp” means “single member of group”. You don’t need a photographic memory if you collect good metadata.
Your data is important, which means there will be many people who will want to examine it. They will need good metadata if they are to understand your findings, review your submitted publication, replicate your results, design a similar study, or even just want to archive your data. While digital data by definition are machine-readable, understanding their meaning is a job for human beings - and they need the help that metadata provides. The importance of documenting your data during the collection and analysis phase of your research cannot be overstated - it is fundamental.
Metadata should not be contained in the data file itself, because it can disrupt how programs interpret your data file.
Rather, metadata should be stored as a separate file in the same directory as your data file, preferably in plain text
format (i.e. .txt) with a name that clearly associates it with your data file. Because metadata files are free text format,
they allow you to encode comments, units, information about how null values are encoded and related information.
Additionally, file or database level metadata describes how files that make up the dataset relate to each other; what format are they are
in; and whether they supersede or are superseded by previous files. A folder-level README.txt file is the classic way of accounting for
all the files and folders in a project.
Credit: MANTRA
The above text on metadata was adapted from the online course Research Data MANTRA by EDINA and Data Library, University of Edinburgh. MANTRA is licensed under a Creative Commons Attribution 4.0 International License.
Keeping track of your analyses
When you are working with data in spreadsheets, the spreadsheet you end up with will often look very different to the one you started with. With each change, you are losing information about the history of the data. How many times have you needed to roll back an analysis, only to become completely lost when retracing your steps? There are ways of mitigating this problem:
- Before starting your analysis, create a new copy of the original data file to keep alongside your analysed data. This way, you will always be able to check changes against your original dataset and, if the worst comes to the worst, it will be easy to start the analysis again!
- Record the steps you take as you conduct your analysis. You should record these steps as you would any step in an experiment. We recommend that you do this in a plain text file stored in the same folder as the data file.
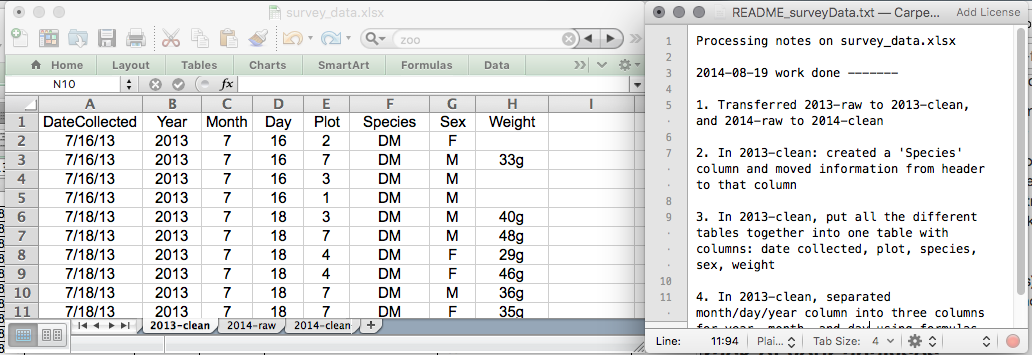
The the following example, the spreadsheet has ‘raw’ tabs in which to store the original, untouched data and ‘clean’ tabs in which the processed data is stored. It is accompanied with a text file that describes the steps that have been taken.
Version controlling your data
Although out of scope for this lesson, you can learn about version control in a separate course, which can be used to record the transformation of your data over time, and provides tools to roll back to any previous version of the data.
Fixing mistakes in data organisation
Let’s put this theory into practice! If you have not already done so, download the messy survey data (as outlined in Setup section). We will now clean this data and learn some best practices in the process.
Take the messy version of the survey data and open it in a spreadsheet program. There are four tabs:
- Two field assistants conducted the surveys, one in 2013 and one in 2014, and they both kept track of the data in their own way in the tabs ‘2013’ and ‘2014’, respectively.
- Ignore the ‘dates’ tab for now, we will come back to it later in the lesson.
- The ‘semi-cleaned-combined’ tab contains combined data from tabs ‘2013’ and ‘2014’. Reproducing this tab is what the exercise is all about. However, we will revisit this tab in episode on quality assurance and control and you will see why it is ‘semi-clean’.
Exercise
The goal of this exercise is to create a cleaned data set in a new tab by combining the data from tabs ‘2013’ and ‘2014’. You will need to identify what is wrong with the way the data is arranged in these two tabs, and then make steps to clean the data before combining it.
Whilst completing this exercise, you might like to contemplate how much time could be have been saved if the researchers had agreed on a data format before the collection took place, and how long it would take to clean real-world research data that could contain many millions of records.
Keep your raw data - raw
Do not forget to create a new file or a new tab for the cleaned data; never modify your original (raw) data.
Solution
All the mistakes in this messy dataset are addressed in the next episode. You can refer to it to check if you spotted them all and go back and fix your spreadsheet.
Full & clean dataset
If you want to have a look at the full, clean dataset - have a look atsome of the other files you downloaded. surveys.csv combines data from all the surveys and combined.csv includes the cleaned data from surveys.csv, plots.csv and species.csv combined into one clean file.
Key Points
Never modify your raw data. Always make a copy before making any changes.
Keep track of all of the steps you take to clean your data in a plain text file.
Organise your data according to tidy data principles.
Record metadata in a separate plain text file (such as README.txt) in your project root folder or folder with data.