Introducing the Shell
Overview
Teaching: 5 min
Exercises: 0 minQuestions
What is a command shell and why would I use one?
Objectives
Explain what the shell is and how it relates to graphical interfaces.
Explain when and why command-line interfaces should be used instead of graphical interfaces.
The Bash shell a text-based program that interactively allows you to run other programs.
You’ll be familiar with the graphical way of dealing with computers, like the interfaces that Windows and Macs give you - sometimes called GUIs (graphical user interfaces). You run an application, it gives you windows and buttons and menus to interact with to access its functions and achieve a result. The Bash shell also gives you a means to access the functionality provided by your computer and other programs, but it does so in a different way. It allows you to type commands into your computer to get results instead, and when the command has finished running, it prints out the results. And then the shell allows you to type in another command… And so on.
Analogies
Imagine the shell a little like working with a voice assistant like Siri or Alexa. You ask your computer questions, and your computer responds with an answer.
The shell is called the shell because it encloses the machine’s operating system - which could be Windows, Mac OS X, or Linux - giving you a wrapper-like interface to interact with it. Another, more general way, of referring to the shell is the command line, since it provides an interface into which you type commands line-by-line.
Why use it?
So why use the Bash shell?
-
Capturing a process: Being able to capture how programs are run and in what order in a Bash script - and essentially automating how we run that process - is invaluable. It’s really helpful with making your pipelines reproducible: once you’ve defined this process in a script, you can re-run it whenever you want. This is both helpful for others to achieve the same results, but also for yourself perhaps six months from now, when it would be otherwise difficult to remember exactly what you did. What you are effectively doing is building a narrative - telling a story in recorded, programmatic form - of how you generated your research results.
-
Repetition: Bash is great at repeating the same commands many times. This could be renaming a hundred files in a certain way, or something more complex, such as running a data analysis program over many input data files, or running a program to generate a chart for every one of those output data files produced by that program.
-
Availability: Bash is available on different types of machines. You can already use the Bash shell on computers like Macs and those that run Linux, where it’s already installed, but you can also install and use it on Windows.
-
Using other computational resources: if you need to use another computational resource, such as a supercomputer to run your programs even faster, they almost exclusively use the shell.
Now on the flip side, it does have a steeper learning curve generally than using graphical programs. Applications and programs also need to work on the command line to be able to take advantage of it. But knowing just a little can be very useful, and in your careers you will very likely come across quite a few programs that have command line interfaces so it’s helpful to have some experience with it.
Key Points
The shell lets you define repeatable workflows.
The shell is available on systems where graphical interfaces are not.
Files and Directories
Overview
Teaching: 10 min
Exercises: 5 minQuestions
How do I run programs using the shell?
How do I navigate my computer using the shell?
Objectives
Explain the similarities and differences between a file and a directory.
Translate an absolute path into a relative path and vice versa.
Construct absolute and relative paths that identify specific files and directories.
Use options and arguments to change the behaviour of a shell command.
Demonstrate the use of tab completion and explain its advantages.
The part of the operating system responsible for managing files and directories is called the file system. It organizes our data into files, which hold information, and directories (also called “folders”, for example, on Windows systems), which hold files or other directories.
The shell has a notion of where you currently are, and as we’ll see, works by running programs at that location. For this reason, the most fundamental skills to using the shell are navigating and browsing the file system, so let’s take a look at some important commands that let us do these things.
To start exploring them, let’s open a shell window:
$
The dollar sign is a prompt, which represents our input interface to the shell. It shows us that the shell is waiting for input; your shell may show something more elaborate.
Working out who we are and where we are
Type the command whoami,
then press the Enter key (sometimes called Return) to send the command to the shell.
The command’s output is the identity of the current user,
i.e., it shows us who the shell thinks we are (yours will be something different!):
$ whoami
nelle
So what’s happening? When we type whoami the shell:
- Finds a program called
whoami - Runs that program
- Displays that program’s output (if there is any), then
- Displays a new prompt to tell us that it’s ready for more commands
Next, let’s find out where we are in our file system by running a command called pwd
(which stands for “print working directory”).
At any moment,
our current working directory
is our current default directory.
This is the directory that the computer assumes we want to run commands in
unless we explicitly specify something else.
Here,
the computer’s response is /Users/nelle,
which is Nelle’s home directory:
$ pwd
/Users/nelle
Home directory
The home directory path will look different on different operating systems. On Linux it will look like
/home/nelle, on Git Bash on Windows it will look something like/c/Users/nelle, and on Windows itself it will be similar toC:\Users\nelle. Note that it may also look slightly different for different versions of Windows.
Alphabet Soup
If the command to find out who we are is
whoami, the command to find out where we are ought to be calledwhereami, so why is itpwdinstead? The usual answer is that in the early 1970s, when Unix - where the Bash shell originates - was first being developed, every keystroke counted: the devices of the day were slow, and backspacing on a teletype was so painful that cutting the number of keystrokes in order to cut the number of typing mistakes was actually a win for usability. The reality is that commands were added to Unix one by one, without any master plan, by people who were immersed in its jargon. The result is as inconsistent as the roolz uv Inglish speling, but we’re stuck with it now.
Real typing timesavers
Save yourself some unnecessary keypresses!
Using the up and down arrow keys allow you to cycle through your previous commands - plus, useful if you forget exactly what you typed earlier!
We can also move to the beginning of a line in the shell by typing
^A(which means Control-A) and to the end using^E. Much quicker on long lines than just using the left/right arrow keys.
How file systems are organised
To understand what a “home directory” is,
let’s have a look at how the file system as a whole is organized.
At the top is the root directory
that holds everything else.
We refer to it using a slash character / on its own;
this is the leading slash in /Users/nelle.
Let’s continue looking at Nelle’s hypothetical file system as an example. Inside the / directory are several other directories, for example:

So here we have the following directories:
bin(which is where some built-in programs are stored),data(for miscellaneous data files),Users(where users’ personal directories are located),tmp(for temporary files that don’t need to be stored long-term),
We know that our current working directory /Users/nelle is stored inside /Users
because /Users is the first part of its name.
Similarly,
we know that /Users is stored inside the root directory /
because its name begins with /.
Underneath /Users,
we find one directory for each user with an account on this machine, e.g.:
/Users/imhotep,
/Users/larry,
and ours in /Users/nelle,
which is why nelle is the last part of the directory’s name.

Path
Notice that there are two meanings for the
/character. When it appears at the front of a file or directory name, it refers to the root directory. When it appears inside a name, it’s just a separator.
Listing the contents of directories and moving around
But how can we tell what’s in directories, and how can we move around the file system?
We’re currently in our home directory, and can see what’s in it by running ls,
which stands for “listing” (the ... refers to other files and directories that have been left out for clarity):
$ ls
swc-shell-novice       Misc                   Solar.pdf
Applications           Movies                 Teaching
Desktop                Music                  ThunderbirdTemp
Development            Notes.txt              VirtualBox VMs
Documents              Pictures               bin
Downloads              Pizza.cfg              mbox
...
Of course, this listing will depend on what you have in your own home directory.
If you’re using Git Bash on Windows, you’ll find that it looks a little different, with characters such as / added to some names.
This is because Git Bash automatically tries to highlight the type of thing it is. For example, / indicates that entry is a directory.
There’s a way to also highlight this on Mac and Linux machines which we’ll see shortly!
We need to get into the repository directory swc-shell-novice, so what if we want to change our current working directory?
Before we do this,
pwd shows us that we’re in /Users/nelle.
$ pwd
/Users/nelle
We can use cd followed by a directory name to change our working directory.
cd stands for “change directory”,
which is a bit misleading:
the command doesn’t change the directory,
it changes the shell’s idea of what directory we are in.
$ cd swc-shell-novice
cd doesn’t print anything,
but if we run pwd after it, we can see that we are now in /Users/nelle/swc-shell-novice:
$ pwd
/Users/nelle/swc-shell-novice
If we run ls without arguments now,
it lists the contents of /Users/nelle/swc-shell-novice,
because that’s where we now are:
$ ls
AUTHORS			Gemfile			_config.yml		_includes		bin			files			setup.md
CITATION		LICENSE.md		_episodes		_layouts		code			index.md		shell
CODE_OF_CONDUCT.md	Makefile		_episodes_rmd		aio.md			data			reference.md		slides
CONTRIBUTING.md		README.md		_extras			assets			fig			requirements.txt
ls prints the names of the files and directories in the current directory in alphabetical order,
arranged neatly into columns (where there is space to do so).
We can make its output more comprehensible by using the flag -F,
which tells ls to add a trailing / to the names of directories:
$ ls -F
AUTHORS			Gemfile			_config.yml		_includes/		bin/			files/			setup.md
CITATION		LICENSE.md		_episodes/		_layouts/		code/			index.md		shell/
CODE_OF_CONDUCT.md	Makefile		_episodes_rmd/		aio.md			data/			reference.md		slides/
CONTRIBUTING.md		README.md		_extras/		assets/			fig/			requirements.txt
Here,
we can see that this directory contains a number of sub-directories.
The names that don’t have trailing slashes,
like reference.html, setup.md, and requirements.txt,
are plain old files.
And note that there is a space between ls and -F:
without it,
the shell thinks we’re trying to run a command called ls-F,
which doesn’t exist.
What’s In A Name?
You may have noticed that all of these files’ names are “something dot something”. This is just a convention: we can call a file
mythesisor almost anything else we want. However, most people use two-part names most of the time to help them (and their programs) tell different kinds of files apart. The second part of such a name is called the filename extension, and indicates what type of data the file holds:.txtsignals a plain text file,.htmlis an HTML file, and so on.This is just a convention, albeit an important one. Files contain bytes: it’s up to us and our programs to interpret those bytes according to the rules for PDF documents, images, and so on.
Naming a PNG image of a whale as
whale.mp3doesn’t somehow magically turn it into a recording of whalesong, though it might cause the operating system to try to open it with a music player when someone double-clicks it.
For this exercise, we need to change our working directory to swc-shell-novice, and then shell (within the swc-shell-novice directory). As we have already used cd to move into swc-shell-novice we can get to shell by using cd again:
$ cd shell
Note that we are able to add directories together by using /.
Now if we view the contents of that directory:
$ ls -F
shell-novice-data.zip tools/ test_directory/
Note that under Git Bash in Windows, the / is appended automatically.
Now let’s take a look at what’s in the directory test_directory, by running ls -F test_directory. So here, we’re giving the shell the command ls with the arguments -F and test_directory. The first argument is the -F flag we’ve seen before. The second argument — the one without a leading dash — tells ls that
we want a listing of something other than our current working directory:
$ ls -F test_directory
creatures/          molecules/          notes.txt           solar.pdf
data/               north-pacific-gyre/ pizza.cfg           writing/
The output shows us that there are some files and sub-directories. Organising things hierarchically in this way helps us keep track of our work: it’s a bit like using a filing cabinet to store things. It’s possible to put hundreds of files in our home directory, for example, just as it’s possible to pile hundreds of printed papers on our desk, but it’s a self-defeating strategy.
Notice, by the way, that we spelled the directory name test_directory, and it doesn’t have a trailing slash.
That’s added to directory names by ls when we use the -F flag to help us tell things apart.
And it doesn’t begin with a slash because it’s a relative path -
it tells ls how to find something from where we are,
rather than from the root of the file system.
Parameters vs. Arguments
According to Wikipedia, the terms argument and parameter mean slightly different things. In practice, however, most people use them interchangeably or inconsistently, so we will too.
If we run ls -F /test_directory (with a leading slash) we get a different response,
because /test_directory is an absolute path:
$ ls -F /test_directory
ls: /test_directory: No such file or directory
The leading / tells the computer to follow the path from the root of the file system,
so it always refers to exactly one directory,
no matter where we are when we run the command.
In this case, there is no data directory in the root of the file system.
Typing ls -F test_directory is a bit painful, so a handy shortcut is to type in the first few letters and press the TAB key, for example:
$ ls -F tes
Pressing TAB, the shell automatically completes the directory name:
$ ls -F test_directory/
This is known as tab completion on any matches with those first few letters. If there are more than one files or directories that match those letters, the shell will show you both — you can then enter more characters (then using TAB again) until it is able to identify the precise file you want and finish the tab completion.
Let’s change our directory to test_directory:
$ cd test_directory
We know how to go down the directory tree:
but how do we go up?
We could use an absolute path, e.g. cd /Users/nelle/swc-shell-novice/novice/shell.
but it’s almost always simpler to use cd .. to go up one level:
$ pwd
/Users/nelle/swc-shell-novice/novice/shell/test_directory
$ cd ..
.. is a special directory name meaning
“the directory containing this one”,
or more succinctly,
the parent of the current directory.
$ pwd
/Users/nelle/swc-shell-novice/novice/shell/
Let’s go back into our test directory:
$ cd test_directory
The special directory .. doesn’t usually show up when we run ls.
If we want to display it, we can give ls the -a flag:
$ ls -F -a
./			creatures/		molecules/		notes.txt		solar.pdf
../			data/			north-pacific-gyre/	pizza.cfg		writing/
-a stands for “show all”;
it forces ls to show us file and directory names that begin with .,
such as .. (which, if we’re in /Users/nelle/swc-shell-novice/novice/shell/test_directory, refers to the /Users/nelle/swc-shell-novice/novice/shell directory).
As you can see,
it also displays another special directory that’s just called .,
which means “the current working directory”.
It may seem redundant to have a name for it,
but we’ll see some uses for it soon.
Special Names
The special names
.and..don’t belong tols; they are interpreted the same way by every program. For example, if we are in/Users/nelle/swc-shell-novice, the commandls ..will give us a listing of/Users/nelle, and the commandcd ..will take us back to/Users/nelleas well.How
.,..and~behave is a feature of how Bash represents your computer’s file system, not any particular program you can run in it.
Another handy feature is that we can reference our home directory with ~, e.g.:
$ ls ~/swc-shell-novice
AUTHORS			Gemfile			_config.yml		_includes		bin			files			setup.md
CITATION		LICENSE.md		_episodes		_layouts		code			index.md		shell
CODE_OF_CONDUCT.md	Makefile		_episodes_rmd		aio.md			data			reference.md		slides
CONTRIBUTING.md		README.md		_extras			assets			fig			requirements.txt
Which again shows us our repository directory.
Note that ~ only works if it is the first character in the
path: here/there/~/elsewhere is not /Users/nelle/elsewhere.
Exercises

Relative path resolution
If
pwddisplays/Users/thing, what willls ../backupdisplay?
../backup: No such file or directory2012-12-01 2013-01-08 2013-01-272012-12-01/ 2013-01-08/ 2013-01-27/original pnas_final pnas_subSolution
4 is correct.
lsshows the contents of the path you give it, and../backupmeans “Go up one level, then into a directory calledbackup”.
lsreading comprehensionIf
pwddisplays/Users/backup, and-rtellslsto display things in reverse order, what command will display:pnas-sub/ pnas-final/ original/
ls pwdls -r -Fls -r -F /Users/backup- Either #2 or #3 above, but not #1.
Solution
4 is correct. The current directory (as shown by
pwd) is/Users/backup, solswill give the same result with or without/Users/backup.Then, in order to get the output in reverse order, and with a
/after the directories, we need the-rand-Fflags.
Key Points
The file system is responsible for managing information on the disk.
Information is stored in files, which are stored in directories (folders).
Directories can also store other directories, which then form a directory tree.
cd [path]changes the current working directory.
ls [path]prints a listing of a specific file or directory;lson its own lists the current working directory.
pwdprints the user’s current working directory.
/on its own is the root directory of the whole file system.Most commands take options (flags) that begin with a
-.A relative path specifies a location starting from the current location.
An absolute path specifies a location from the root of the file system.
Directory names in a path are separated with
/on Unix, but\on Windows.
..means ‘the directory above the current one’;.on its own means ‘the current directory’.
Creating Things
Overview
Teaching: 15 min
Exercises: 5 minQuestions
How do I run programs using the shell?
How do I navigate my computer using the shell?
Objectives
Create new directories, also known as folders.
Create files within directories using an editor or by copying and renaming existing files.
Display the contents of a file using the command line.
Delete specified files and/or directories.
We now know how to explore files and directories, but how do we create them in the first place?
First, let’s check where we are:
$ pwd
/Users/nelle/swc-shell-novice/test_directory
If you’re not in this directory, use the cd command to navigate to it as covered in the last lesson, for example:
$ cd ~/swc-shell-novice/test_directory
Creating a new directory
Now let’s use ls -F to see what our test directory contains:
$ ls -F
creatures/          molecules/          notes.txt           solar.pdf
data/               north-pacific-gyre/ pizza.cfg           writing/
Let’s create a new directory called thesis using the command mkdir thesis
(which has no output):
$ mkdir thesis
As you might (or might not) guess from its name,
mkdir means “make directory”.
Since thesis is a relative path
(i.e., doesn’t have a leading slash),
the new directory is created in the current working directory:
$ ls -F
creatures/  north-pacific-gyre/  thesis/
data/       notes.txt            writing/
Desktop/    pizza.cfg
molecules/  solar.pdf
However, there’s nothing in it yet - this will show no output:
$ ls -F thesis
Creating a new text file
Now we’ll create a new file using a text editor in this new directory.
Which Editor?
When we say, “
nanois a text editor,” we really do mean “text”: it can only work with plain character data, not tables, images, or any other human-friendly media. We use it in examples because almost anyone can drive it anywhere without training, but please use something more powerful for real work.On Windows, you may wish to use Notepad++. A more powerful example is Microsoft’s VSCode. It’s a fairly standard text editor that can be installed on Windows, Mac or Linux but also has some handy features like code highlighting that make it easy to write scripts and code. Similar editors exist like Atom, a highly customisable text editor which also runs on these platforms.
Your choice of editor will depend on the size of project you’re working on, and how comfortable you are with the terminal.
Let’s first change our working directory to thesis using cd,
and then we’ll use the Nano editor to create a text file called draft.txt, and then save it in that directory.
$ cd thesis
$ nano draft.txt
We add a filename after the nano command to tell it that we want to edit (or in this case create) a file.
Now, let’s type in a few lines of text, for example:

Once we have a few words, to save this data in a new draft.txt file we then use Control-O (pressing Control and the letter O at the same time), and then press
Enter to confirm the filename.
Once our file is saved,
we can use Control-X to quit the editor and return to the shell.
nano doesn’t leave any output on the screen after it exits,
but ls now shows that we have created a file called draft.txt:
Now we’ve saved the file, we can use ls to see that there is a new file in the directory called draft.txt:
$ ls
draft.txt
We can use the shell on its own to take a look at its contents using the cat command (which we can use to print the contents of files):
$ cat draft.txt
It's not "publish or perish" any more,
it's "share and thrive".
Deleting files and directories
Now, let’s assume we didn’t actually need to create this file. We can delete it by running rm draft.txt:
$ rm draft.txt
This command removes files (rm is short for “remove”).
If we run ls again,
its output is empty once more,
which tells us that our file is gone:
$ ls
Deleting Is Forever
The Bash shell doesn’t have a trash bin that we can recover deleted files from. Instead, when we delete files, they are unhooked from the file system so that their storage space on disk can be recycled. Tools for finding and recovering deleted files do exist, but there’s no guarantee they’ll work in any particular situation, since the computer may recycle the file’s disk space right away.
But what if we want to delete a directory, perhaps one that already contains a file? Let’s re-create that file
and then move up one directory using cd ..:
$ pwd
/Users/nelle/swc-shell-novice/test_directory/thesis
$ nano draft.txt
$ ls
draft.txt
$ cd ..
$ pwd
/Users/nelle/swc-shell-novice/test_directory
If we try to remove the entire thesis directory using rm thesis,
we get an error message:
$ rm thesis
rm: cannot remove `thesis': Is a directory
On a Mac, it may look a bit different (rm: thesis: is a directory), but means the same thing.
This happens because rm only works on files, not directories.
The right command is rmdir,
which is short for “remove directory”.
It doesn’t work yet either, though,
because the directory we’re trying to remove isn’t empty (again, it may look a bit different on a Mac):
$ rmdir thesis
rmdir: failed to remove `thesis': Directory not empty
This little safety feature can save you a lot of grief,
particularly if you are a bad typist.
To really get rid of thesis we must first delete the file draft.txt:
$ rm thesis/draft.txt
The directory is now empty, so rmdir can delete it:
$ rmdir thesis
With Great Power Comes Great Responsibility
Removing the files in a directory just so that we can remove the directory quickly becomes tedious. Instead, we can use
rmwith the-rflag (which stands for “recursive”):$ rm -r thesisThis removes everything in the directory, then the directory itself. If the directory contains sub-directories,
rm -rdoes the same thing to them, and so on. It’s very handy, but can do a lot of damage if used without care.
Renaming and moving files and directories
Let’s create that directory and file one more time.
$ pwd
/Users/user/swc-shell-novice/test_directory
$ mkdir thesis
Again, put anything you like in this file (note we’re giving the thesis path to nano as well as the draft.txt filename, so we create it in that directory):
$ nano thesis/draft.txt
$ ls thesis
draft.txt
draft.txt isn’t a particularly informative name,
so let’s change the file’s name using mv,
which is short for “move”:
$ mv thesis/draft.txt thesis/quotes.txt
The first parameter tells mv what we’re “moving”,
while the second is where it’s to go.
In this case,
we’re moving thesis/draft.txt (the file draft.txt in the thesis directory) to thesis/quotes.txt (the quotes.txt again in the thesis directory),
which has the same effect as renaming the file.
Sure enough,
ls shows us that thesis now contains one file called quotes.txt:
$ ls thesis
quotes.txt
Just for the sake of inconsistency,
mv also works on directories — there is no separate mvdir command.
Let’s move quotes.txt into the current working directory.
We use mv once again,
but this time we’ll just use the name of a directory as the second parameter
to tell mv that we want to keep the filename,
but put the file somewhere new.
(This is why the command is called “move”.)
In this case,
the directory name we use is the special directory name . that we mentioned earlier.
$ mv thesis/quotes.txt .
The effect is to move the file from the directory it was in to the current working directory.
ls now shows us that thesis is empty:
$ ls thesis
Further,
ls with a filename or directory name as a parameter only lists that file or directory.
We can use this to see that quotes.txt is still in our current directory:
$ ls quotes.txt
quotes.txt
Copying files
The cp command works very much like mv,
except it copies a file instead of moving it.
We can check that it did the right thing using ls
with two paths as parameters — like most Unix commands,
ls can be given thousands of paths at once:
$ cp quotes.txt thesis/quotations.txt
$ ls quotes.txt thesis/quotations.txt
quotes.txt thesis/quotations.txt
To prove that we made a copy,
let’s delete the quotes.txt file in the current directory
and then run that same ls again (we can get to this command by pressing the up arrow twice).
$ rm quotes.txt
$ ls quotes.txt thesis/quotations.txt
ls: cannot access quotes.txt: No such file or directory
thesis/quotations.txt
This time it tells us that it can’t find quotes.txt in the current directory,
but it does find the copy in thesis that we didn’t delete.
Exercises
Renaming files
Suppose that you created a
.txtfile in your current directory to contain a list of the statistical tests you will need to do to analyze your data, and named it:statstics.txtAfter creating and saving this file you realize you misspelled the filename! You want to correct the mistake, which of the following commands could you use to do so?
cp statstics.txt statistics.txtmv statstics.txt statistics.txtmv statstics.txt .cp statstics.txt .Solution
2 is the best choice. Passing
mvorcp.as a destination moves or copies without renaming, so the spelling mistake won’t be fixed.Both 1 and 2 will leave you with a file called
statistics.txtat the end, but if you usecpit will be a copy, and you’ll still have your incorrectly-named original.
Moving and Copying
What is the output of the closing
lscommand in the sequence shown below?$ pwd/Users/jamie/data$ lsproteins.dat$ mkdir recombine $ mv proteins.dat recombine $ cp recombine/proteins.dat ../proteins-saved.dat $ ls
proteins-saved.dat recombinerecombineproteins.dat recombineproteins-saved.datSolution
The correct answer is 2. The commands showed the directory contains a single file named
proteins.dat, then created a new directory calledrecombine, moved the originalproteins.datfile into it, and finally copiedproteins.datinto the directory above the current one asproteins-saved.dat.So as it’s in the directory above the current one (
..), it won’t show up when you dolsin the current directory.
Organizing Directories and Files
Jamie is working on a project and she sees that her files aren’t very well organized:
$ ls -Fanalyzed/ fructose.dat raw/ sucrose.datThe
fructose.datandsucrose.datfiles contain output from her data analysis. What command(s) covered in this lesson does she need to run so that the commands below will produce the output shown?$ ls -Fanalyzed/ raw/$ ls analyzedfructose.dat sucrose.datSolution
lslists the contents of the current directory, whilstls analyzedlists the contents of theanalyzeddirectory.So we need to move the files
fructose.datandsucrose.datout of the current directory, and into theanalyzeddirectory, which we do withmv.$ ls -F $ mv fructose.dat analyzed/ $ mv sucrose.dat analyzed/ $ ls analyzed
Copy with Multiple Filenames
What does
cpdo when given several filenames and a directory name, as in:$ mkdir backup $ cp thesis/citations.txt thesis/quotations.txt backupSolution
It copies the files to the directory with the same name.
$ ls backupcitations.txt quotations.txtWhat does
cpdo when given three or more filenames, as in:$ ls -Fintro.txt methods.txt survey.txt$ cp intro.txt methods.txt survey.txtSolution
You should get an error and the command does nothing. When passing 3 or more arguments, the last one needs to be a directory.
However,
$ cp intro.txt methods.txtWill not fail even though both of the arguments are existing files - it will copy the contents of
intro.txtover the contents ofmethods.txt. So be careful!
Key Points
Command line text editors let you edit files in the terminal.
You can open up files with either command-line or graphical text editors.
nano [path]creates a new text file at the location[path], or edits an existing one.
cat [path]prints the contents of a file.
rmdir [path]deletes an (empty) directory.
rm [path]deletes a file,rm -r [path]deletes a directory (and contents!).
mv [old_path] [new_path]moves a file or directory from[old_path]to[new_path].
mvcan be used to rename files, e.g.mv a.txt b.txt.Using
.inmvcan move a file without renaming it, e.g.mv a/file.txt b/..
cp [original_path] [copy_path]creates a copy of a file at a new location.
Pipes and Filters
Overview
Teaching: 15 min
Exercises: 5 minQuestions
How can I combine existing commands to do new things?
Objectives
Capture a command’s output in a file using redirection.
Use redirection to have a command use a file’s contents instead of keyboard input.
Add commands together in a sequence using pipes, so output of one command becomes input of another.
Explain what usually happens if a program or pipeline isn’t given any input to process.
Explain Unix’s ‘small pieces, loosely joined’ philosophy.
Now that we know a few basic commands, we can finally look at the shell’s most powerful feature: the ease with which it lets us combine existing programs in new ways.
Joining commands together using files
One way we can use programs together is to have the output of one command captured in a file, and use that file as the input to another command.
We’ll start with a directory called data, which is in the swc-shell-novice/data
directory, one directory up from test_directory. i.e. from test_directory:
$ cd ../..
$ cd data
Doing ls shows us three files in this directory:
sc_climate_data.csv sc_climate_data_10.csv sc_climate_data_1000.csv
The data in these files is taken from a real climate science research project that is looking into woody biomass yields. The files are as follows:
- sc_climate_data.csv: the entire 20MB data set.
- sc_climate_data_1000.csv: a subset of the entire data, but only 1000 data rows.
- sc_climate_data_10.csv: a much smaller subset with only 10 rows of data.
We’ll largely be working on the 10-row version, since this allows us to more easily reason about the data in the file and the operations we’re performing on it.
Why not just use the entire 20MB data set?
Running various commands over a 20MB data set could take some time. It’s generally good practice when developing code, scripts, or just using shell commands, to use a representative subset of data that is manageable to start with, in order to make progress efficiently. Otherwise, we’ll be here all day! Once we’re confident our commands, code, scripts, etc. work the way we want, we can then test them on the entire data set.
The .csv extension indicates that these files are in Comma Separated Value
format,
a simple text format that specifies data in columns separated by commas
with lines in the file equating to rows.
Let’s run the command wc *.csv:
wcis the “word count” command, it counts the number of lines, words, and characters in files.- The
*in*.csvmatches zero or more characters, so the shell turns*.csvinto a complete list of.csvfiles:
$ wc *.csv
 1048576 1048577 21005037 sc_climate_data.csv
      11      12     487 sc_climate_data_10.csv
    1001    1002   42301 sc_climate_data_1000.csv
 1049588 1049591 21047825 total
Sometimes we need to pass multiple filenames to a single command, or find or use filenames that match a given pattern, and this is where wildcards can be really useful.
* is a wildcard that matches zero or more
characters, so *.csv matches sc_climate_data.csv, sc_climate_data_10.csv, and so on.
On the other hand, sc_climate_data_*.csv only matches sc_climate_data_10.csv and sc_climate_data_1000.csv, because the sc_climate_data_ at the front only matches those two files.
? is also a wildcard, but it only matches a single character. This
means that s?.csv matches si.csv or s5.csv, but not sc_climate_data.csv, for example.
We can use any number of wildcards at a time: for example, p*.p?*
matches anything that starts with a p and ends with .p, and is followed by at
least one more character (since the ? has to match one character, and
the final * can match any number of characters). Thus, p*.p?* would
match preferred.practice, and even p.pi (since the first * can
match no characters at all), but not quality.practice (doesn’t start
with p) or preferred.p (there isn’t at least one character after the
.p).
When the shell sees a wildcard, it expands the wildcard to create a
list of matching filenames before running the command that was
asked for. As an exception, if a wildcard expression does not match
any file, Bash will pass the expression as a parameter to the command
as it is. For example typing ls *.pdf in the data directory
(which contains only files with names ending with .csv) results in
an error message that there is no file called *.pdf.
However, generally commands like wc and ls see the lists of
file names matching these expressions, but not the wildcards
themselves. It’s the shell, not the other programs, that expands the wildcards.
Going back to wc, if we run wc -l instead of just wc,
the output shows only the number of lines per file:
$ wc -l *.csv
 1048576 sc_climate_data.csv
      11 sc_climate_data_10.csv
    1001 sc_climate_data_1000.csv
 1049588 total
We can also use -w to get only the number of words,
or -c to get only the number of characters.
Which of these files is shortest? It’s an easy question to answer when there are only three files, but what if there were 6000? Our first step toward a solution is to run the command:
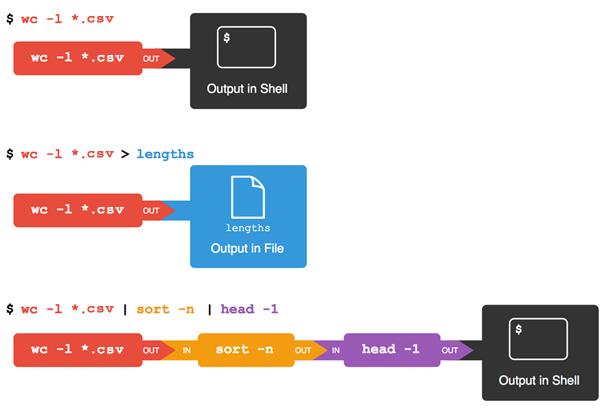
$ wc -l *.csv > lengths.txt
The greater than symbol, >, tells the shell to redirect the command’s output
to a file instead of printing it to the screen.
The shell will create the file if it doesn’t exist,
or overwrite the contents of that file if it does.
This is why there is no screen output:
everything that wc would have printed has gone into the file lengths.txt instead.
ls lengths.txt confirms that the file exists:
$ ls lengths.txt
lengths.txt
We can now send the content of lengths.txt to the screen using cat lengths.txt.
cat is able to print the contents of files one after another.
There’s only one file in this case,
so cat just shows us what it contains:
$ cat lengths.txt
 1048576 sc_climate_data.csv
      11 sc_climate_data_10.csv
    1001 sc_climate_data_1000.csv
 1049588 total
Now let’s use the sort command to sort its contents.
We will also use the -n flag to specify that the sort is
numerical instead of alphabetical.
This does not change the file;
instead, it sends the sorted result to the screen:
$ sort -n lengths.txt
      11 sc_climate_data_10.csv
    1001 sc_climate_data_1000.csv
 1048576 sc_climate_data.csv
 1049588 total
We can put the sorted list of lines in another temporary file called sorted-lengths.txt
by putting > sorted-lengths.txt after the command,
just as we used > lengths.txt to put the output of wc into lengths.txt.
Once we’ve done that,
we can run another command called head to get the first few lines in sorted-lengths.txt:
$ sort -n lengths.txt > sorted-lengths.txt
$ head -1 sorted-lengths.txt
11 sc_climate_data_10.csv
Using the parameter -1 with head tells it that
we only want the first line of the file;
-20 would get the first 20,
and so on.
Since sorted-lengths.txt contains the lengths of our files ordered from least to greatest,
the output of head must be the file with the fewest lines.
If you think this is confusing,
you’re in good company:
even once you understand what wc, sort, and head do,
all those intermediate files make it hard to follow what’s going on.
Fortunately, there’s a way to make this much simpler.
Using pipes to join commands together
We can make it easier to understand by running sort and head together:
$ sort -n lengths.txt | head -1
11 sc_climate_data_10.csv
The vertical bar between the two commands is called a pipe. It tells the shell that we want to use the output of the command on the left as the input to the command on the right. The computer might create a temporary file if it needs to, or copy data from one program to the other in memory, or something else entirely; we don’t have to know or care.
We can even use another pipe to send the output of wc directly to sort,
which then sends its output to head:
$ wc -l *.csv | sort -n | head -1
11 sc_climate_data_10.csv
This is exactly like a mathematician nesting functions like log(3x)
and saying “the log of three times x”.
In our case,
the calculation is “head of sort of line count of *.csv”.
This simple idea is why systems like Unix - and its successors like Linux - have been so successful.
Instead of creating enormous programs that try to do many different things,
Unix programmers focus on creating lots of simple tools that each do one job well,
and that work well with each other.
This programming model is called “pipes and filters”, and is based on this “small pieces, loosely joined” philosophy.
We’ve already seen pipes;
a filter is a program like wc or sort
that transforms a stream of input into a stream of output.
Almost all of the standard Unix tools can work this way:
unless told to do otherwise,
they read from standard input,
do something with what they’ve read,
and write to standard output.
The key is that any program that reads lines of text from standard input and writes lines of text to standard output can be combined with every other program that behaves this way as well. You can and should write your programs this way so that you and other people can put those programs into pipes to multiply their power.
Redirecting Input
As well as using
>to redirect a program’s output, we can use<to redirect its input, i.e., to read from a file instead of from standard input. For example, instead of writingwc sc_climate_data_10.csv, we could writewc < sc_climate_data_10.csv. In the first case,wcgets a command line parameter telling it what file to open. In the second,wcdoesn’t have any command line parameters, so it reads from standard input, but we have told the shell to send the contents ofsc_climate_data_10.csvtowc’s standard input.
If you’re interested in how pipes work in more technical detail, see the description after the exercises.
Exercises
What does
sort -ndo?If we run
sorton this file:10 2 19 22 6the output is:
10
19
2
22
6
If we run
sort -non the same input, we get this instead:2 6 10 19 22Explain why
-nhas this effect.Solution
Normally,
sortgoes character-by-character, sorting in alphabetical order. Just looking at the first character of each line,6is greater than both1and2so it goes to the end of the file.However, if we pass
sortthe-nflag, it sorts in numeric order - so if it encounters a character that’s a number, it reads the line up until it hits a non-numeric character. In this case,22is greater than6(and everything else), so it goes to the end of the file.
What does
>>mean?What is the difference between:
echo hello > testfile01.txtand:
echo hello >> testfile02.txtHint: Try executing each command twice in a row and then examining the output files.
Solution
If there isn’t a file already there with the name
testfile01.txt, both>and>>will create one.However, if there is a file, then
>will overwrite the contents of the file, whilst>>will append to the existing contents.
Piping commands together
In our current directory, we want to find the 3 files which have the least number of lines. Which command listed below would work?
wc -l * > sort -n > head -3wc -l * | sort -n | head 1-3wc -l * | head -3 | sort -nwc -l * | sort -n | head -3Solution
The correct answer is 4.
wc -l *will list the length of all files in the current directory. Piping the output tosort -ntakes the list of files, and sorts it in numeric order. Then, because the list will be sorted from lowest to highest,head -3will take the top 3 lines of the list, which will be the shortest 3.1 has the correct commands, but incorrectly tries to use
>to chain them together.>is used to send the output of a command to a file, not to another command.
Why does
uniqonly remove adjacent duplicates?The command
uniqremoves adjacent duplicated lines from its input. For example, if a filesalmon.txtcontains:coho coho steelhead coho steelhead steelheadthen
uniq salmon.txtproduces:coho steelhead coho steelheadWhy do you think
uniqonly removes adjacent duplicated lines? (Hint: think about very large data sets.) What other command could you combine with it in a pipe to remove all duplicated lines?Solution
uniqdoesn’t search through entire files for matches, as in the shell we can be working with files that are 100s of MB or even tens of GB in size, with hundreds, thousands or even more unique values. The more lines there are, likely the more unique values there are, and each line has to be compared to each unique value. The time taken would scale more or less with the square of the size of the file!Whilst there are ways to do that kind of comparison efficiently, implementing them would require making
uniqa much larger and more complicated program - so, following the Unix philosophy of small, simple programs that chain together,uniqis kept small and the work required is offloaded to another, specialist program.In this case,
sort | uniqwould work.
Pipe reading comprehension
A file called
animals.txtcontains the following data:2012-11-05,deer 2012-11-05,rabbit 2012-11-05,raccoon 2012-11-06,rabbit 2012-11-06,deer 2012-11-06,fox 2012-11-07,rabbit 2012-11-07,bearWhat text passes through each of the pipes and the final redirect in the pipeline below?
cat animals.txt | head -5 | tail -3 | sort -r > final.txtSolution
cat animals.txtoutputs the full contents of the file.head -5takes the full contents of the file, and outputs the top 5 lines:2012-11-05,deer 2012-11-05,rabbit 2012-11-05,raccoon 2012-11-06,rabbit 2012-11-06,deertail -3takes the output fromhead, and outputs the last 3 lines of that:2012-11-05,raccoon 2012-11-06,rabbit 2012-11-06,deersort -rtakes the output fromtailand sorts it in reverse order. This bit is a little trickier - whilst it puts the06lines above the05ones (because of reverse numerical order), it will put06, rabbitabove06, deeras it’s reverse alphabetical order - so the output isn’t just a reversed version of the output oftail!2012-11-06,rabbit 2012-11-06,deer 2012-11-05,raccoon- Finally,
> final.txtsends the output to a file calledfinal.txt.
For those interested in the technical details of how pipes work:
What’s happening ‘under the hood’ - pipes in more detail
Here’s what actually happens behind the scenes when we create a pipe. When a computer runs a program — any program — it creates a process in memory to hold the program’s software and its current state. Every process has an input channel called standard input. (By this point, you may be surprised that the name is so memorable, but don’t worry: most Unix programmers call it “stdin”). Every process also has a default output channel called standard output (or “stdout”).
The shell is actually just another program. Under normal circumstances, whatever we type on the keyboard is sent to the shell on its standard input, and whatever it produces on standard output is displayed on our screen. When we tell the shell to run a program, it creates a new process and temporarily sends whatever we type on our keyboard to that process’s standard input, and whatever the process sends to standard output to the screen.
Here’s what happens when we run
wc -l *.csv > lengths.txt. The shell starts by telling the computer to create a new process to run thewcprogram. Since we’ve provided some filenames as parameters,wcreads from them instead of from standard input. And since we’ve used>to redirect output to a file, the shell connects the process’s standard output to that file.If we run
wc -l *.csv | sort -ninstead, the shell creates two processes (one for each process in the pipe) so thatwcandsortrun simultaneously. The standard output ofwcis fed directly to the standard input ofsort; since there’s no redirection with>,sort’s output goes to the screen. And if we runwc -l *.csv | sort -n | head -1, we get three processes with data flowing from the files, throughwctosort, and fromsortthroughheadto the screen.
Key Points
wccounts lines, words, and characters in its inputs.
catdisplays the contents of its inputs.
sortsorts its inputs.
headdisplays the first 10 lines of its input.
taildisplays the last 10 lines of its input.
command > [file]redirects a command’s output to a file (overwriting any existing content).
command >> [file]appends a command’s output to a file.
[first] | [second]is a pipeline: the output of the first command is used as the input to the second.The best way to use the shell is to use pipes to combine simple single-purpose programs (filters).
Shell Scripts
Overview
Teaching: 15 min
Exercises: 5 minQuestions
How can I save and re-use commands?
Objectives
Write a shell script that runs a command or series of commands for a fixed set of files.
Run a shell script from the command line.
Write a shell script that operates on a set of files defined by the user on the command line.
Create pipelines that include user-written shell scripts.
We are finally ready to see what makes the shell such a powerful programming environment. We are going to take the commands we repeat frequently and save them in files so that we can re-run all those operations again later by typing a single command. For historical reasons, a bunch of commands saved in a file is usually called a shell script, but make no mistake: these are actually small programs.
Our first shell script
Let’s start by going back to data and putting some commands into a new file called middle.sh using an editor like nano:
$ cd ~/swc-shell-novice/data
$ nano middle.sh
So why the .sh extension to the filename? Adding .sh is the convention to show that this is a Bash shell script.
Enter the following line into our new file:
head -15 sc_climate_data_1000.csv | tail -5
Then save it and exit nano (using Control-O to save it and then Control-X to exit nano).
This pipe selects lines 11-15 of the file sc_climate_data_1000.csv. It selects the first 15
lines of that file using head, then passes that to tail to show us only the last 5 lines - hence lines 11-15.
Remember, we are not running it as a command just yet:
we are putting the commands in a file.
Once we have saved the file,
we can ask the shell to execute the commands it contains.
Our shell is called bash, so we run the following command:
$ bash middle.sh
299196.8188,972890.0521,48.07,61.41,0.78
324196.8188,972890.0521,48.20,-9999.00,0.72
274196.8188,968890.0521,47.86,60.94,0.83
275196.8188,968890.0521,47.86,61.27,0.83
248196.8188,961890.0521,46.22,58.98,1.43
Sure enough, our script’s output is exactly what we would get if we ran that pipeline directly.
Text vs. Whatever
We usually call programs like Microsoft Word or LibreOffice Writer “text editors”, but we need to be a bit more careful when it comes to programming. By default, Microsoft Word uses
.docxfiles to store not only text, but also formatting information about fonts, headings, and so on. This extra information isn’t stored as characters, and doesn’t mean anything to tools likehead: they expect input files to contain nothing but the letters, digits, and punctuation on a standard computer keyboard. When editing programs, therefore, you must either use a plain text editor, or be careful to save files as plain text.
Enabling our script to run on any file
What if we want to select lines from an arbitrary file?
We could edit middle.sh each time to change the filename,
but that would probably take longer than just retyping the command.
Instead,
let’s edit middle.sh and replace sc_climate_data_1000.csv with a special variable called $1:
$ nano middle.sh
head -15 "$1" | tail -5
Inside a shell script,
$1 means the first filename (or other argument) passed to the script on the command line.
We can now run our script like this:
$ bash middle.sh sc_climate_data_1000.csv
299196.8188,972890.0521,48.07,61.41,0.78
324196.8188,972890.0521,48.20,-9999.00,0.72
274196.8188,968890.0521,47.86,60.94,0.83
275196.8188,968890.0521,47.86,61.27,0.83
248196.8188,961890.0521,46.22,58.98,1.43
or on a different file like this (our full data set!):
$ bash middle.sh sc_climate_data.csv
299196.8188,972890.0521,48.07,61.41,0.78
324196.8188,972890.0521,48.20,-9999.00,0.72
274196.8188,968890.0521,47.86,60.94,0.83
275196.8188,968890.0521,47.86,61.27,0.83
248196.8188,961890.0521,46.22,58.98,1.43
Note the output is the same, since our full data set contains the same first 1000 lines as sc_climate_data_1000.csv.
Double-Quotes Around Arguments
We put the
$1inside of double-quotes in case the filename happens to contain any spaces. The shell uses whitespace to separate arguments, so we have to be careful when using arguments that might have whitespace in them. If we left out these quotes, and$1expanded to a filename likeclimate data.csv, the command in the script would effectively be:head -15 climate data.csv | tail -5This would call
headon two separate files,climateanddata.csv, which is probably not what we intended.
Adding more arguments to our script
However, if we want to adjust the range of lines to extract, we still need to edit middle.sh each time.
Less than ideal!
Let’s fix that by using the special variables $2 and $3. These represent the second and third arguments passed on the command line:
$ nano middle.sh
head "$2" "$1" | tail "$3"
So now we can pass the head and tail line range arguments to our script:
$ bash middle.sh sc_climate_data_1000.csv -20 -5
252196.8188,961890.0521,46.22,60.94,1.43
152196.8188,960890.0521,48.81,-9999.00,1.08
148196.8188,959890.0521,48.81,59.43,1.08
325196.8188,957890.0521,48.20,61.36,0.72
326196.8188,957890.0521,47.44,61.36,0.80
This does work,
but it may take the next person who reads middle.sh a moment to figure out what it does.
We can improve our script by adding some comments at the top:
$ cat middle.sh
# Select lines from the middle of a file.
# Usage: middle.sh filename -end_line -num_lines
head "$2" "$1" | tail "$3"
In Bash, a comment starts with a # character and runs to the end of the line.
The computer ignores comments,
but they’re invaluable for helping people understand and use scripts.
A line or two of documentation like this make it much easier for other people (including your future self) to re-use your work. The only caveat is that each time you modify the script, you should check that its comments are still accurate: an explanation that sends the reader in the wrong direction is worse than none at all.
Processing multiple files
What if we want to process many files in a single pipeline?
For example, if we want to sort our .csv files by length, we would type:
$ wc -l *.csv | sort -n
This is because wc -l lists the number of lines in the files
(recall that wc stands for ‘word count’, adding the -l flag means ‘count lines’ instead)
and sort -n sorts things numerically.
We could put this in a file,
but then it would only ever sort a list of .csv files in the current directory.
If we want to be able to get a sorted list of other kinds of files,
we need a way to get all those names into the script.
We can’t use $1, $2, and so on
because we don’t know how many files there are.
Instead, we use the special variable $@,
which means,
“All of the command-line parameters to the shell script.”
We also should put $@ inside double-quotes
to handle the case of parameters containing spaces
("$@" is equivalent to "$1" "$2" …)
Here’s an example. Edit a new file called sort.sh:
$ nano sorted.sh
And in that file enter:
wc -l "$@" | sort -n
When we run it with some wildcarded file arguments:
$ bash sorted.sh *.csv ../shell/test_directory/creatures/*.dat
We have the following output:
      11 sc_climate_data_10.csv
     155 ../shell/test_directory/creatures/minotaur.dat
     163 ../shell/test_directory/creatures/basilisk.dat
     163 ../shell/test_directory/creatures/unicorn.dat
    1001 sc_climate_data_1000.csv
 1048576 sc_climate_data.csv
 1050069 total
Why Isn’t It Doing Anything?
What happens if a script is supposed to process a bunch of files, but we don’t give it any filenames? For example, what if we type:
$ bash sorted.shbut don’t say
*.dat(or anything else)? In this case,$@expands to nothing at all, so the pipeline inside the script is effectively:wc -l | sort -nSince it doesn’t have any filenames,
wcassumes it is supposed to process standard input, so it just sits there and waits for us to give it some data interactively. From the outside, though, all we see is it sitting there: the script doesn’t appear to do anything.If you find yourself in this situation pressing
Control-Cwill stop the command from taking input and return you to the command line prompt.
Again, we should explain what we are trying to do here using a comment, for example:
# List given files sorted by number of lines
wc -l "$@" | sort -n
What did I type to get that to work?
Here’s something that can be useful as an aid to memory. Suppose we have just run a series of commands that did something useful. For example, that created a graph we’d like to use in a paper. We’d like to be able to re-create the graph later if we need to, so we want to save the commands in a file. Instead of typing them in again (and potentially getting them wrong) we can do this:
$ history | tail -4 > redo-figure-3.shThe file
redo-figure-3.shnow contains:297 bash goostats -r NENE01729B.txt stats-NENE01729B.txt 298 bash goodiff stats-NENE01729B.txt /data/validated/01729.txt > 01729-differences.txt 299 cut -d ',' -f 2-3 01729-differences.txt > 01729-time-series.txt 300 ygraph --format scatter --color bw --borders none 01729-time-series.txt figure-3.pngAfter a moment’s work in an editor to remove the historical reference number for each command (e.g. 297, 298), we have a completely accurate record of how we created that figure.
In practice, most people develop shell scripts by running commands at the shell prompt a few times to make sure they’re doing the right thing, then saving them in a file for re-use. This style of work allows people to recycle what they discover about their data and their workflow with one call to
historyand a bit of editing to clean up the output and save it as a shell script.
Exercises
Variables in shell scripts
In the
test_directory/moleculesdirectory, you have a shell script calledscript.shcontaining the following commands:head $2 $1 tail -n $3 $1Note that here, we use the explicit
-nflag to pass the number of lines totailthat we want to extract, since we’re passing in multiple.pdbfiles. Otherwise,tailcan give us an error about incorrect options on certain machines if we don’t.While you are in the molecules directory, you type the following command:
bash script.sh '*.pdb' -1 -1Which of the following outputs would you expect to see?
- All of the lines between the first and the last lines of each file ending in
*.pdbin the molecules directory- The first and the last line of each file ending in
*.pdbin the molecules directory- The first and the last line of each file in the molecules directory
- An error because of the quotes around
*.pdbSolution
The answer is 2. The quotes around the wildcard
'*.pdb'mean it isn’t expanded when we call the script - but it will get expanded inside the script. There, it gets expanded to match every file in the directory that ends in*.pdb, and effectively the script calls:head -1 *.pdb tail -n -1 *.pdb*This prints out the first line (
head -1) of each.pdbfile, and then the last line of each.pdbfile.If we’d called the script as:
bash script.sh *.pdb -1 -1Then it wouldn’t work as the wildcard would’ve expanded before the script started and we’d have effectively run it as:
bash script cubane.pdb ethane.pdb methane.pdb octane.pdb pentane.pdb propane.pdb -1 -1This would have caused an error, as we expect the second and third arguments to be numbers for
headandtail!
Script reading comprehension
Joel’s
datadirectory contains three files:fructose.dat,glucose.dat, andsucrose.dat. Explain what a script calledexample.shwould do when run asbash example.sh *.datif it contained the following lines:# Script 1 echo *.*# Script 2 for filename in $1 $2 $3 do cat $filename done# Script 3 echo $@.datSolution
Script 1 doesn’t use any arguments - so it ignores our
*.daton the command line. The*.*wildcard matches anything in the current directory with a.in the file (or folder!) name, so it expands to a list of all files in the directory, includingexample.sh. Then it passes that list toecho, which prints them out.example.sh fructose.dat glucose.dat sucrose.datScript 2 makes use of our arguments. The wildcard
*.datmatches any file that ends in.dat, so expands tofructose.dat glucose.dat sucrose.datthen passes them to the script. The script then takes the first 3 arguments (using$1 $2 $3) and usescatto print the contents of the file. However, if there are less than 3 files in the directory with the.datsuffix, they’ll be ignored. If there are less than 3, there’ll be an error!Script 3 uses all our arguments - the
$@variable gets expanded into the full list of arguments,fructose.dat glucose.dat sucrose.dat.echothen prints out that list… with.datadded to the end of it:fructose.dat glucose.dat sucrose.dat.datThis probably isn’t quite what we were hoping for!
Key Points
Save commands in files (usually called shell scripts) for re-use.
bash [filename]runs the commands saved in a file.
$@refers to all of a shell script’s command-line arguments.
$1,$2, etc., refer to the first command-line argument, the second command-line argument, etc.Place variables in quotes if the values might have spaces in them.
Letting users decide what files to process is more flexible and more consistent with built-in Unix commands.
Loops
Overview
Teaching: 15 min
Exercises: 5 minQuestions
How can I perform the same actions on many different files?
Objectives
Write a loop that applies one or more commands separately to each file in a set of files.
Trace the values taken on by a loop variable during execution of the loop.
Explain the difference between a variable’s name and its value.
Demonstrate how to see what commands have recently been executed.
Wildcards and tab completion are two ways to reduce typing as well as typing mistakes. Another is to tell the shell to do something over and over again, which could save us considerable time, depending on how many times we need the shell to do this thing.
Couldn’t we just…
Suppose we have several hundred genome data files named basilisk.dat, minotaur.dat, unicorn.dat, and so on.
In this example,
we’ll use the test_directory/creatures directory which only has three example files,
but the principles can be applied to many many more files at once.
Let’s first go to the creatures directory (using tab completion to enter the full directory will save considerable
typing here!):
$ cd ~/swc-shell-novice/shell/test_directory/creatures
$ ls
basilisk.dat minotaur.dat unicorn.dat
We would like to modify these files, but also save a version of the original files and rename them
as original-basilisk.dat, original-minotaur.dat, original-unicorn.dat.
We can’t use the following (don’t type this, it’s just for illustrative purposes):
$ mv *.dat original-*.dat
Because as we learnt previously, with wildcards that would expand to:
$ mv basilisk.dat minotaur.dat unicorn.dat original-*.dat
This wouldn’t back up our files, instead we would get an error. If on a Mac or Linux it would look like:
mv: target `original-*.dat' is not a directory
Or if on Windows using Git Bash, we would see:
usage: mv [-f | -i | -n] [-v] source target
       mv [-f | -i | -n] [-v] source ... directory
Even though the error is different, the cause is the same.
It arises when mv receives more than two inputs. When this happens, it
expects the last input to be a directory where it can move all the files it was passed.
Since there is no directory named original-*.dat in the creatures directory we get an
error.
Using a loop to do something multiple times
Instead, we can use a loop to do some operation once for each thing in a list. Here’s a simple example that displays the first three lines of each file in turn.
Let’s create a new shell script using nano called top.sh that uses a loop.
$ nano top.sh
In that file enter the following:
for filename in basilisk.dat minotaur.dat unicorn.dat
do
    head -3 $filename
done
After saving it by using Control-O and Control-X, run the script:
$ bash top.sh
COMMON NAME: basilisk
CLASSIFICATION: basiliscus vulgaris
UPDATED: 1745-05-02
COMMON NAME: minotaur
CLASSIFICATION: minotaurus maximus
UPDATED: 1764-09-12
COMMON NAME: unicorn
CLASSIFICATION: equus monoceros
UPDATED: 1738-11-24
So what’s happening, and how does the loop work?
When the shell sees the keyword for,
it knows it is supposed to repeat a command (or group of commands) once for each thing in a list.
In this case, the list is the three filenames.
Each time through the loop,
the name of the thing currently being operated on is assigned to
the variable called filename.
What is a variable?
Variables are used to store information that we want to refer to later, and are a fundamental concept in general programming. Think of a variable as a container with a name that we put something inside. So for example, if we want to store the number 5, we could write that down and put it in the container named ‘count’. And it doesn’t have to be a number - as in our loop example with the variable ‘filename’ it can also hold a collection of characters, in this case a filename. We give the containers names since we could use many variables within a single script or program and we need to be able to reference them all.
When we need it later, we extract that value from the container by referencing that container’s name ‘count’. We can also change what’s in the container, essentially changing the value of the variable. From that point on, when we extract the value from the variable, it will be the new value.
Inside the loop,
we get the variable’s value by putting $ in front of it:
$filename is basilisk.dat the first time through the loop,
minotaur.dat the second, unicorn.dat the third,
and so on.
By using the dollar sign we are telling the shell interpreter to treat
filename as a variable name and substitute its value on its place,
but not as some text or external command. When using variables it is also
possible to put the names into curly braces to clearly delimit the variable
name: $filename is equivalent to ${filename}, but is different from
${file}name. You may find this notation in other people’s programs.
Finally,
the command that’s actually being run is our old friend head,
so this loop prints out the first three lines of each data file in turn.
Why the extra spaces?
Note the use of spaces for indentation before the
headcommand. This line is part of the body of the loop (the part that gets executed many times) and whilst extra spaces don’t affect how the script runs, it is considered best practice to use indentation to highlight the loop body. In general programming, indentation is very important. Without indentation in code blocks such as these, code becomes much harder to read.
Dos and don’ts of variable naming
We have called the variable in this loop filename
in order to make its purpose clearer to human readers.
The shell itself doesn’t care what the variable is called;
if we wrote this loop as:
for x in basilisk.dat minotaur.dat unicorn.dat
do
    head -3 $x
done
or:
for temperature in basilisk.dat minotaur.dat unicorn.dat
do
    head -3 $temperature
done
it would work exactly the same way.
Don’t do this.
Programs are only useful if people can understand them,
so meaningless names like x, or misleading names like temperature,
increase the odds that the program won’t do what its readers think it does.
Looping over arbitrary numbers of files
Let’s assume there are many more of these .dat files. How would we
run a loop over them all?
Here’s a slightly more complicated loop to try next.
Change our top.sh script to the following:
for filename in *.dat
do
    echo $filename
    head -100 $filename | tail -20
done
Save this file and exit nano.
The shell starts by expanding *.dat to create the list of files it will process,
since with the * wildcard, this pattern will match anything that ends with .dat.
The loop body
then executes two commands for each of those files.
The first, echo, just prints its command-line parameters to standard output.
For example:
$ echo hello there
prints:
hello there
In this case,
since the shell expands $filename to be the name of a file,
echo $filename just prints the name of the file.
Note that we can’t write this as:
for filename in *.dat
do
    $filename
    head -100 $filename | tail -20
done
because then the first time through the loop,
when $filename expanded to basilisk.dat, the shell would try to run basilisk.dat as a program.
Finally,
the head and tail combination selects lines 81-100 from whatever file is being processed.
Run this revised script now:
$ bash top.sh
And you should see (the ... indicates more gene sequences that appear in the output, but are omitted for clarity):
basilisk.dat
CGGTACCGAA
AAGGGTCGCG
CAAGTGTTCC
CGGGACAATA
GTTCTGCTAA
...
minotaur.dat
TAGGTTATAA
GGCACAACCG
CTTCACTGTA
GAGGTGTACA
AGGATCCGTT
...
unicorn.dat
CGGTACCGAA
AAGGGTCGCG
CAAGTGTTCC
CGGGACAATA
GTTCTGCTAA
...
Spaces in filenames
Filename expansion in loops is another reason you should not use spaces in filenames. Suppose our data files are named:
basilisk.dat
red dragon.dat
unicorn.dat
If we try to process them using:
for filename in *.dat
do
    head -100 $filename | tail -20
done
then the shell will expand
*.datto create:basilisk.dat red dragon.dat unicorn.datWith older versions of Bash, or most other shells,
filenamewill then be assigned the following values in turn:basilisk.dat red dragon.dat unicorn.datThat’s a problem:
headcan’t read files calledredanddragon.datbecause they don’t exist, and won’t be asked to read the filered dragon.dat.We can make our script a little bit more robust by quoting our use of the variable:
for filename in *.dat
do
    head -100 "$filename" | tail -20
done
but it’s simpler just to avoid using spaces (or other special characters) in filenames.
File renaming revisited
Going back to our original file renaming problem, using what we’ve learnt
we can solve it using the following loop.
In a new script called rename.sh enter the following:
for filename in *.dat
do
    mv $filename original-$filename
done
This loop runs the mv command once for each filename.
The first time,
when $filename expands to basilisk.dat,
the shell executes:
mv basilisk.dat original-basilisk.dat
The second time, the command is:
mv minotaur.dat original-minotaur.dat
The third time, the command is:
mv unicorn.dat original-unicorn.dat
Note that once you’ve run this command once, running it again has an interesting effect that we
likely don’t intend - the .dat files we end up with are:
original-original-basilisk.dat original-original-unicorn.dat
original-original-minotaur.dat
This is because the .dat files picked up by for filename in *.dat will now match on original-basilisk.dat,
original-unicorn.dat, and original-minotaur.dat, and each of these files is then renamed with yet another
original- prefix added to it. This is another example of why you should always ensure you have a backup of
files before you operate on them!
Measure Twice, Run Once
A loop is a way to do many things at once — or to make many mistakes at once if it does the wrong thing. One way to check what a loop would do is to echo the commands it would run instead of actually running them. For example, we could write our file renaming loop like this:
for filename in *.dat
do
    echo mv $filename original-$filename
done
Instead of running
mv, this loop runsecho, which prints out:mv basilisk.dat original-basilisk.dat mv unicorn.dat original-unicorn.datwithout actually running those commands. We can then use up-arrow to redisplay the loop, back-arrow to get to the word
echo, delete it, and then press “enter” to run the loop with the actualmvcommands. This isn’t foolproof, but it’s a handy way to see what’s going to happen when you’re still learning how loops work.
Exercises
Variables in Loops
Suppose that
lsinitially displays:fructose.dat glucose.dat sucrose.datWhat is the output of:
for datafile in *.dat
do
    ls *.dat
done
Now, what is the output of:
for datafile in *.dat
do
	ls $datafile
done
Why do these two loops give you different outputs?
Solution
The first loop will give the output:
fructose.dat    glucose.dat   sucrose.dat
fructose.dat    glucose.dat   sucrose.dat
fructose.dat    glucose.dat   sucrose.dat
This is because, whilst it runs once for each file containing
.dat, it doesn’t use the loop variable, it prints out the entire output ofls. The second version will instead print out each datafile on a seperate line (asls [file]will print the file if it exists).
Saving to a File in a Loop - Part One
In the same directory, what is the effect of this loop?
for sugar in *.dat
do
    echo $sugar
    cat $sugar > xylose.dat
done
- Prints
fructose.dat,glucose.dat, andsucrose.dat, and the text fromsucrose.datwill be saved to a file calledxylose.dat.- Prints
fructose.dat,glucose.dat, andsucrose.dat, and the text from all three files would be concatenated and saved to a file calledxylose.dat.- Prints
fructose.dat,glucose.dat,sucrose.dat, andxylose.dat, and the text fromsucrose.datwill be saved to a file calledxylose.dat.- None of the above.
Solution
- Correct.
- Incorrect, since we’re using the
>redirect operator, which will overwrite any previous contents ofxylose.dat.- Incorrect, since the file
xylose.datwould not have existed when*.datwould have been expanded.- Incorrect.
Saving to a File in a Loop - Part Two
In another directory, where
lsreturns:fructose.dat glucose.dat sucrose.dat maltose.txtWhat would be the output of the following loop?
for datafile in *.dat
do
    cat $datafile >> sugar.dat
done
- All of the text from
fructose.dat,glucose.datandsucrose.datwould be concatenated and saved to a file calledsugar.dat.- The text from
sucrose.datwill be saved to a file calledsugar.dat.- All of the text from
fructose.dat,glucose.dat,sucrose.datandmaltose.txtwould be concatenated and saved to a file calledsugar.dat.- All of the text from
fructose.dat,glucose.datandsucrose.datwould be printed to the screen and saved to a file calledsugar.datSolution
- Correct.
- Incorrect, since we’re looping through each of the other
.datfiles (fructose.datandglucose.dat) whose contents would also be included.- Incorrect, since
maltose.txthas a.txtextension and not a.datextension, so won’t match on*.datand won’t be included in the loop.- Incorrect, since the
>>operator redirects all output to thesugar.datfile, so we won’t see any screen output.
Doing a Dry Run
Suppose we want to preview the commands the following loop will execute without actually running those commands:
for file in *.dat
do
  analyze $file > analyzed-$file
done
What is the difference between the the two loops below, and which one would we want to run?
# Version 1
for file in *.dat
do
  echo analyze $file > analyzed-$file
done
# Version 2 for file in *.dat do echo "analyze $file > analyzed-$file" doneSolution
Version 2 is the one that successfully acts as a dry run. In version 1, since the
>file redirect is not within quotes, the script will create three filesanalyzed-basilisk.dat,analyzed-minotaur.dat, andanalyzed-unicorn.datwhich is not what we want.
Key Points
A
forloop repeats commands once for every thing in a list.Every
forloop needs a variable to refer to the thing it is currently operating on.Use
$nameto expand a variable (i.e., get its value).${name}can also be used.Do not use spaces, quotes, or wildcard characters such as ‘*’ or ‘?’ in filenames, as it complicates variable expansion.
Give files consistent names that are easy to match with wildcard patterns to make it easy to select them for looping.
Use the up-arrow key to scroll up through previous commands to edit and repeat them.
Use Ctrl+R to search through the previously entered commands.
Use
historyto display recent commands, and![number]to repeat a command by number.
Finding Things
Overview
Teaching: 15 min
Exercises: 5 minQuestions
How can I find files?
How can I find things in files?
Objectives
Use
grepto select lines from text files that match simple patterns.Use
findto find files and directories whose names match simple patterns.Use the output of one command as the command-line argument(s) to another command.
Explain what is meant by ‘text’ and ‘binary’ files, and why many common tools don’t handle the latter well.
Finding files that contain text
You can guess someone’s computer literacy by how they talk about search: most people use “Google” as a verb, while Bash programmers use “grep”. The word is a contraction of “global/regular expression/print”, a common sequence of operations in early Unix text editors. It is also the name of a very useful command-line program.
grep finds and prints lines in files that match a pattern.
For our examples,
we will use a file that contains three haikus taken from a
1998 competition in Salon magazine. For this set of examples
we’re going to be working in the writing subdirectory:
$ cd ~/swc-shell-novice/shell/test_directory/writing
$ ls
data haiku.txt old thesis tools
Let’s have a look at the haiku.txt file:
$ cat haiku.txt
The Tao that is seen
Is not the true Tao, until
You bring fresh toner.

With searching comes loss
and the presence of absence:
"My Thesis" not found.

Yesterday it worked
Today it is not working
Software is like that.
Forever, or Five Years
We haven’t linked to the original haikus because they don’t appear to be on Salon’s site any longer. As Jeff Rothenberg said, “Digital information lasts forever — or five years, whichever comes first.”
Let’s find lines that contain the word “not”:
$ grep not haiku.txt
Is not the true Tao, until
"My Thesis" not found
Today it is not working
Here, not is the pattern we’re searching for.
It’s pretty simple:
every alphanumeric character matches against itself.
After the pattern comes the name or names of the files we’re searching in.
The output is the three lines in the file that contain the letters “not”.
Let’s try a different pattern: “day”.
$ grep day haiku.txt
Yesterday it worked
Today it is not working
This time,
two lines that include the letters “day” are outputted.
However, these letters are contained within larger words.
To restrict matches to lines containing the word “day” on its own,
we can give grep with the -w flag.
This will limit matches to word boundaries.
$ grep -w day haiku.txt
In this case, there aren’t any, so grep’s output is empty. Sometimes we don’t
want to search for a single word, but a phrase. This is also easy to do with
grep by putting the phrase in quotes.
$ grep -w "is not" haiku.txt
Today it is not working
We’ve now seen that you don’t have to have quotes around single words, but it is useful to use quotes when searching for multiple words. It also helps to make it easier to distinguish between the search term or phrase and the file being searched. We will use quotes in the remaining examples.
Another useful option is -n, which numbers the lines that match:
$ grep -n "it" haiku.txt
5:With searching comes loss
9:Yesterday it worked
10:Today it is not working
Here, we can see that lines 5, 9, and 10 contain the letters “it”.
We can combine options (i.e. flags) as we do with other Bash commands.
For example, let’s find the lines that contain the word “the”. We can combine
the option -w to find the lines that contain the word “the” and -n to number the lines that match:
$ grep -n -w "the" haiku.txt
2:Is not the true Tao, until
6:and the presence of absence:
Now we want to use the option -i to make our search case-insensitive:
$ grep -n -w -i "the" haiku.txt
1:The Tao that is seen
2:Is not the true Tao, until
6:and the presence of absence:
Now, we want to use the option -v to invert our search, i.e., we want to output
the lines that do not contain the word “the”.
$ grep -n -w -v "the" haiku.txt
1:The Tao that is seen
3:You bring fresh toner.
4:
5:With searching comes loss
7:"My Thesis" not found.
8:
9:Yesterday it worked
10:Today it is not working
11:Software is like that.
Another powerful feature is that grep can search multiple files. For example we can find files that
contain the complete word “saw” in all files within the data directory:
$ grep -w saw data/*
data/two.txt:handsome! And his sisters are charming women. I never in my life saw
data/two.txt:heard much; but he saw only the father. The ladies were somewhat more
data/two.txt:heard much; but he saw only the father. The ladies were somewhat more
Note that since grep is reporting on searches from multiple files, it prefixes each found line
with the file in which the match was found.
Or, we can find where “format” occurs in all files including those in every subdirectory. We use the -R
argument to specify that we want to search recursively into every subdirectory:
$ grep -R format *
data/two.txt:little information, and uncertain temper. When she was discontented,
tools/format:This is the format of the file
This is where grep becomes really useful. If we had thousands of research data files we needed
to quickly search for a particular word or data point, grep is invaluable.
Wildcards
grep’s real power doesn’t come from its options, though; it comes from the fact that search patterns can also include wildcards. (The technical name for these is regular expressions, which is what the “re” in “grep” stands for.) Regular expressions are both complex and powerful; if you want to do complex searches, please look at the lesson on our website. As a taster, we can find lines that have an ‘o’ in the second position like this:$ grep -E '^.o' haiku.txt You bring fresh toner. Today it is not working Software is like that.We use the
-Eflag and put the pattern in quotes to prevent the shell from trying to interpret it. (If the pattern contained a ‘*’, for example, the shell would try to expand it before runninggrep.) The ‘\^’ in the pattern anchors the match to the start of the line. The ‘.’ matches a single character (just like ‘?’ in the shell), while the ‘o’ matches an actual ‘o’.
Finding files themselves
While grep finds lines in files,
the find command finds files themselves.
Again,
it has a lot of options;
to show how the simplest ones work, we’ll use the directory tree shown below.

Nelle’s writing directory contains one file called haiku.txt and four subdirectories:
thesis (which is sadly empty),
data (which contains two files one.txt and two.txt),
a tools directory that contains the programs format and stats,
and an empty subdirectory called old.
For our first command,
let’s run find . -type d.
As always,
the . on its own means the current working directory,
which is where we want our search to start;
-type d means “things that are directories”.
Sure enough,
find’s output is the names of the five directories in our little tree
(including .):
$ find . -type d
./
./data
./thesis
./tools
./tools/old
When using find, note that he order the results are shown in may differ depending on whether you’re using
Windows or a Mac.
If we change -type d to -type f,
we get a listing of all the files instead:
$ find . -type f
./haiku.txt
./tools/stats
./tools/old/oldtool
./tools/format
./thesis/empty-draft.md
./data/one.txt
./data/two.txt
find automatically goes into subdirectories,
their subdirectories,
and so on to find everything that matches the pattern we’ve given it.
If we don’t want it to,
we can use -maxdepth to restrict the depth of search:
$ find . -maxdepth 1 -type f
./haiku.txt
The opposite of -maxdepth is -mindepth,
which tells find to only report things that are at or below a certain depth.
-mindepth 2 therefore finds all the files that are two or more levels below us:
$ find . -mindepth 2 -type f
./data/one.txt
./data/two.txt
./old/.gitkeep
./thesis/empty-draft.md
./tools/format
./tools/old/oldtool
./tools/stats
Now let’s try matching by name:
$ find . -name *.txt
./haiku.txt
We expected it to find all the text files,
but it only prints out ./haiku.txt.
The problem is that the shell expands wildcard characters like * before commands run.
Since *.txt in the current directory expands to haiku.txt,
the command we actually ran was:
$ find . -name haiku.txt
find did what we asked; we just asked for the wrong thing.
To get what we want,
let’s do what we did with grep:
put *.txt in single quotes to prevent the shell from expanding the * wildcard.
This way,
find actually gets the pattern *.txt, not the expanded filename haiku.txt:
$ find . -name '*.txt'
./data/one.txt
./data/two.txt
./haiku.txt
Listing vs. Finding
lsandfindcan be made to do similar things given the right options, but under normal circumstances,lslists everything it can, whilefindsearches for things with certain properties and shows them.
Another way to combine command-line tools
As we said earlier,
the command line’s power lies in combining tools.
We’ve seen how to do that with pipes;
let’s look at another technique.
As we just saw,
find . -name '*.txt' gives us a list of all text files in or below the current directory.
How can we combine that with wc -l to count the lines in all those files?
The simplest way is to put the find command inside $():
$ wc -l $(find . -name '*.txt')
    70 ./data/one.txt
   300 ./data/two.txt
    11 ./haiku.txt
  381 total
When the shell executes this command,
the first thing it does is run whatever is inside the $().
It then replaces the $() expression with that command’s output.
Since the output of find is the three filenames ./data/one.txt, ./data/two.txt, and ./haiku.txt,
the shell constructs the command:
$ wc -l ./data/one.txt ./data/two.txt ./haiku.txt
which is what we wanted.
This expansion is exactly what the shell does when it expands wildcards like * and ?,
but lets us use any command we want as our own “wildcard”.
It’s very common to use find and grep together.
The first finds files that match a pattern;
the second looks for lines inside those files that match another pattern.
Here, for example, we can find PDB files that contain iron atoms
by looking for the string “FE” in all the .pdb files above the current directory:
$ grep "FE" $(find .. -name '*.pdb')
../data/pdb/heme.pdb:ATOM 25 FE 1 -0.924 0.535 -0.518
Binary Files
We have focused exclusively on finding things in text files. What if your data is stored as images, in databases, or in some other format? One option would be to extend tools like
grepto handle those formats. This hasn’t happened, and probably won’t, because there are too many formats to support.The second option is to convert the data to text, or extract the text-ish bits from the data. This is probably the most common approach, since it only requires people to build one tool per data format (to extract information). On the one hand, it makes simple things easy to do. On the negative side, complex things are usually impossible. For example, it’s easy enough to write a program that will extract X and Y dimensions from image files for
grepto play with, but how would you write something to find values in a spreadsheet whose cells contained formulas?The third choice is to recognize that the shell and text processing have their limits, and to use a programming language such as Python instead. When the time comes to do this, don’t be too hard on the shell: many modern programming languages, Python included, have borrowed a lot of ideas from it, and imitation is also the sincerest form of praise.
The Bash shell is older than most of the people who use it. It has survived so long because it is one of the most productive programming environments ever created. Its syntax may be cryptic, but people who have mastered it can experiment with different commands interactively, then use what they have learned to automate their work. Graphical user interfaces may be better at experimentation, but the shell is usually much better at automation. And as Alfred North Whitehead wrote in 1911, “Civilization advances by extending the number of important operations which we can perform without thinking about them.”
Exercises
Using grep
The Tao that is seen
Is not the true Tao, until
You bring fresh toner.

With searching comes loss
and the presence of absence:
"My Thesis" not found.

Yesterday it worked
Today it is not working
Software is like that.
From the above text, contained in the file
haiku.txt, which command would result in the following output:and the presence of absence:
grep "of" haiku.txtgrep -E "of" haiku.txtgrep -w "of" haiku.txtgrep -i "of" haiku.txtSolution
- Incorrect, since it will find lines that contain
ofincluding those that are not a complete word, including “Software is like that.”- Incorrect,
-E(which enables extended regular expressions ingrep), won’t change the behaviour since the given pattern is not a regular expression. So the results will be the same as 1.- Correct, since we have supplied
-wto indicate that we are looking for a complete word, hence only “and the presence of absence:” is found.- Incorrect.
-iindicates we wish to do a case insensitive search which isn’t required. The results are the same as 1.
findpipeline reading comprehensionWrite a short explanatory comment for the following shell script:
find . -name '*.dat' | wc -l | sort -nSolution
Find all files (in this directory and all subdirectories) that have a filename that ends in
.dat, count the number of files found, and sort the result. Note that thesorthere is unnecessary, since it is only sorting one number.
Matching
ose.datbut nottemp{}The
-vflag togrepinverts pattern matching, so that only lines which do not match the pattern are printed. Given that, which of the following commands will find all files in/datawhose names end inose.dat(e.g.,sucrose.datormaltose.dat), but do not contain the wordtemp?
find /data -name '*.dat' | grep ose | grep -v temp
find /data -name ose.dat | grep -v temp
grep -v "temp" $(find /data -name '*ose.dat')None of the above.
Solution
- Incorrect, since the first
grepwill find all filenames that containosewherever it may occur, and also because the use ofgrepas a following pipe command will only match on filenames output fromfindand not their contents.- Incorrect, since it will only find those files than match
ose.datexactly, and also because the use ofgrepas a following pipe command will only match on filenames output fromfindand not their contents.- Correct answer. It first executes the
findcommand to find those files matching the ‘*ose.dat’ pattern, which will match on exactly those that end inose.dat, and thengrepwill search those files for “temp” and only report those that don’t contain it, since it’s using the-vflag to invert the results.- Incorrect.
Key Points
findfinds files with specific properties that match patterns.
grepselects lines in files that match patterns.
--helpis an option supported by many bash commands, and programs that can be run from within Bash, to display more information on how to use these commands or programs.
man [command]displays the manual page for a given command.
$([command])inserts a command’s output in place.
Additional Exercises
Overview
Teaching: 0 min
Exercises: 20 minQuestions
How can I build a data-processing pipeline?
Objectives
Construct a pipeline that takes input files and generates output.
How to separate input and output data files.
Use
dateto determine today’s date in a particular format.Use
cutto extract particular fields from a comma-separate value (CSV) data file.Extend an existing pipeline with an additional data processing stage.
Working with dates
Using the date command we’re able to retrieve today’s date and time in any format we want. For example:
$ date +“%d-%m-%y”
The argument after the command indicates the format we’d like - %d will be replaced with the day of the month, %m the month, and %y the year. So this will output today’s date in the form day, month and year, separated by hyphens, e.g. 16-11-20. We can capture this date output in a Bash variable using $(), for example in the shell:
$ today_date=$(date +“%d-%m-%y”)
Copying files with new filenames
Write a script in the
swc-shell-novice/directory that goes through each.csvfile in thedatadirectory (that resides in theswc-shell-novice/directory) and creates a copy of that file with today’s date at the start of the filename, e.g.16-11-20-sc_climate_data.csv.Hints:
- With the input data files we’re going to use held in the data directory, create a new directory which will be used to hold your output files. When writing scripts or programs that generate output from input, it is a good idea to separate where you keep your input and output files. This allows you to more easily distinguish between the two, makes it easier to understand, and retains your original input which is invaluable if your script has a fault and corrupts your input data. It also means that if you add an additional processing step that will work on the output data and generate new output, you can logically extend this by adding a new script and a new directory to hold that new output, and so on.
- You can use
basenamefollowed by a path to extract only the filename from a path, e.g.basename test_directory/notes.txtproducesnotes.txt.Solution
If we assume the output directory is named
copied:today_date=$(date +"%d-%m-%y") for file in data/*.csv do base_file=$(basename $file) cp $file copied/$today_date-$base_file done
Extracting columns from CSV
A really handy command to know when working with comma-separated value (CSV) data is the cut command. You can use the cut command to extract a specific column from CSV data, e.g.:
$ echo “1,2,3,4” | cut -d”,” -f 3
Will output 3.
The -d argument specifies, within quotes, the delimiter that separates the columns on each line, whilst the -f argument indicates the column (or columns) you wish to extract.
Filtering our output
Let’s extend our pipeline to extract a specific column of data from each of our newly copied files.
Create a new script that takes each new file we created in the earlier exercise and creates a new file (again, in another separate output directory), which contains only the data held in the
Max_temp_jul_Fcolumn.Solution
The
Max_temp_jul_Fcolumn is the fourth column in each data file If we assume the input directory is namedcopiedand the output directory is namedfiltered:for file in copied/*.csv do base_file=$(basename $file) cat $file | cut -d"," -f 4 > filtered/$base_file done
Key Points
dateprints the current date in a specified format.Scripts can save the output of a command to a variable using
$(command)
basenameremoves directories from a path to a file, leaving only the name
cutlets you select specific columns from files, with-d','letting you select the column separator, and-fletting you select the columns you want.