Release Management
Overview
Teaching: 20 min
Exercises: 0 minQuestions
How can I manage the release of my code?
Objectives
Explain how to create stable releases for software
Explain how to generate a DOI for your software
Explain software licenses, and how to apply them
Whilst managing the development of software is essential to produce good code, managing the distribution and release of the software is essential to produce impact. If your code can’t easily be found, used or worked on by collaborators, then the impact of your development work will be dramatically limited. Fortunately, repository hosting sites like GitHub and GitLab offer a wide range of tools to help.
Releases
It is vitally important to cite your software. Software represents a huge expenditure of research time and energy, that is often invisible due to lack of citation. Many large software projects that underpin whole research communities are run by volunteers, because with no citations the work of the developers behind them is invisible to funders and institutions.
However, when software is cited, it’s often done poorly, creating a barrier to reproducibility. Often, as a software project evolves, the needs change- input files are expanded to take extra data, or output files are rearranged. Techniques are refined, and bugs are fixed. The end result of this is that frequently research done with older versions of the code cannot be reproduced with newer versions. Just referencing your software in your paper is equivalent to referencing a methods section that’s constantly being rewritten.
Fortunately, git commits provide you with a snapshot of the state of your software at a single point in time. We can avoid these problems by specifying which commit we used for a paper. Actual commit IDs, though, are a bit clunky to work with and commit messages are normally more focused on specific code changes than the scientific state of the code. Fortunately, GitHub and GitLab make it easy to create releases. A release is just a label for a specific version of the code.
If we create a new release when we arrive on the final version of the code we’re using in a paper, we can cite that specific version of the code- and anyone who wants to reproduce our work can easily get access to the version we used. We should make releases whenever we have a version of the code that’s stable and reliable enough we would be happy to share it with others.
Releases fit into the feature-branch workflow we discussed earlier. In this you have two key branches, master and development. You create branches off your development branch to work on new features, then when they’re relatively stable, you merge them back into the development branch. Then, after you’re happy the development branch is stable and reliable, you merge it back to the master branch. It’s those commits to the master branch that can become your releases.
To GitHub
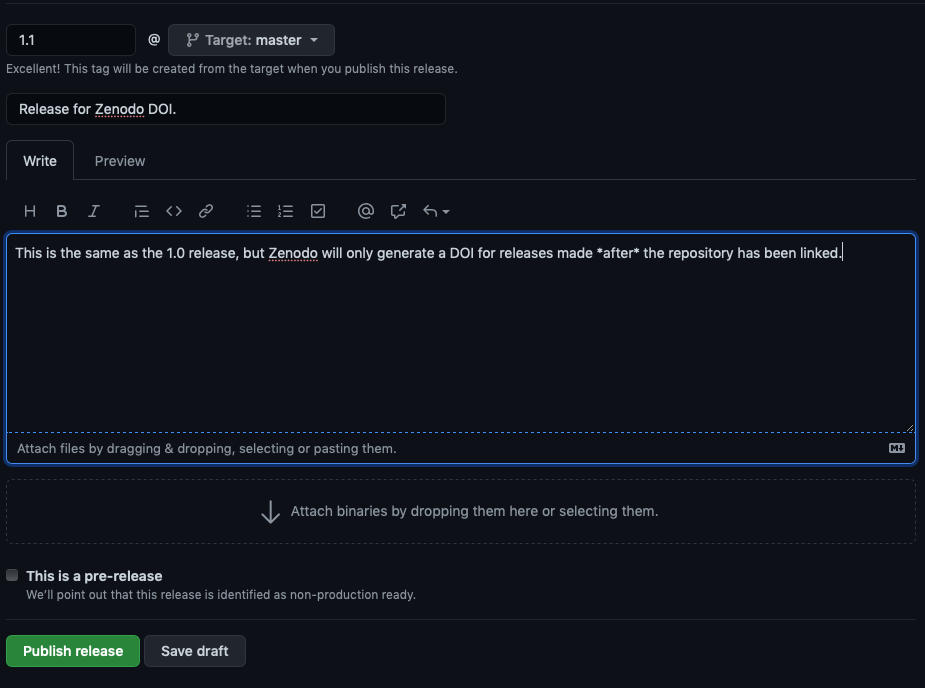
If you go back to your climate-analysis repository homepage, you can use the Create a new release link. We just need to give the release a name, description, and a tag.
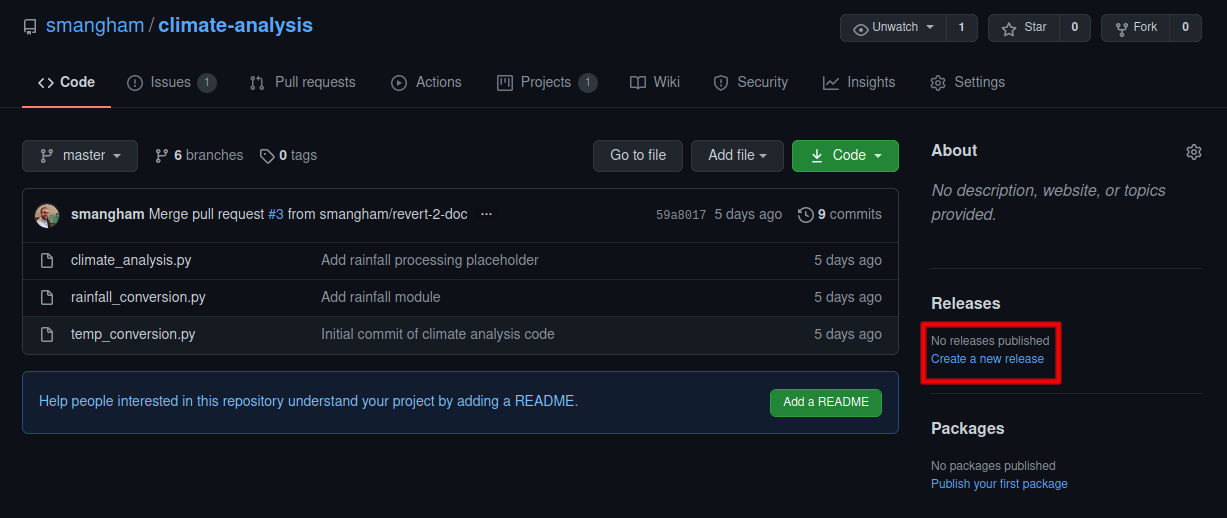
Make sure you select to create a release on the master branch. You can do releases of your development branch for internal use, but you should always make sure your code is stable enough to go on your master branch before you cite it.
Whilst the name is often descriptive or a project-specific codename, the tag is usually a sequence of numbers. There are a range of strategies for tagging releases, but the most common is to tag a release in the format of v1.0.0. Then:
- If you fix some bugs and perform a release, increment the last number, e.g.
v1.0.0tov1.0.1. - If you add some new functionality in a backwards-compatible way, then increment the second-to-last number and reset the last number, e.g.
v1.0.1tov1.1.0. - If you change your code so much it’s no longer backwards compatible (for example, your input files require a new variable so it can no longer run older ones), then increment the first number and reset the others, e.g.
v1.1.0tov2.0.0.
This lets your collaborators know when they can safely update without breaking their ongoing work!
Limitations of releases
If our code has dependencies like Python modules, we need to make sure that we include information on the specific versions of the dependencies too when creating a release. Python is well set-up to deal with this, as it can use
pip freezeto produce arequirements.txtfile with the current version of all the modules you’re using.For more complicated dependencies, there are a range of approaches. The simplest is to list the versions of your dependencies in your
README.md. Depending on the software licences of your code and its dependencies, you may be able to package them in your repository.For low-level codes, you’ll also need to list the compiler versions and architectures used. High-performance codes can be very dependent on compiler and library versions, so simply listing “GCC and OpenMPI” can cause a lot of pain. Instead, use the output of calling the compilers with the
-vor--versionflag to make sure you’re getting the correct information, e.g.gcc version 9.3.0.Bear in mind, though, that you will need to keep this information up to date if your dependencies change. ‘Stale’ documentation can be almost as bad as no documentation.
Issuing DOIs
Releases make it easy for others to reference a specific version of your code. However, if you want to track those citations, and to add the work to your academic profile on sites like ORCID, you’ll want a digital object identifier (DOI) for your release. Many Universities have internal systems for issuing DOIs for software, managed by libraries or research output administrative teams. Alternatively, Zenodo allows you to upload datasets, presentations or other files to get a cached version with a specific DOI, and automatically links the DOIs to your ORCID account.
Zenodo has great integration with GitHub, allowing you to automatically generate a DOI for any new releases on a repository. GitHub provide a very clear guide on how to do this: Citable code. Note, however, that Zenodo can only issue DOIs for publicly-visible repositories. This can be a problem if you need to keep your code private due to industrial collaborations.
Zenodo offers a ‘sandbox’, where you can test the process for creating a new DOI (as creating a DOI on their proper website is irreversible!).
We’ll use the sandbox at sandbox.zenodo.orgto create a DOI for our climate-analysis repository by registering it via Zenodo’s GitHub link and creating a new release on GitHub.
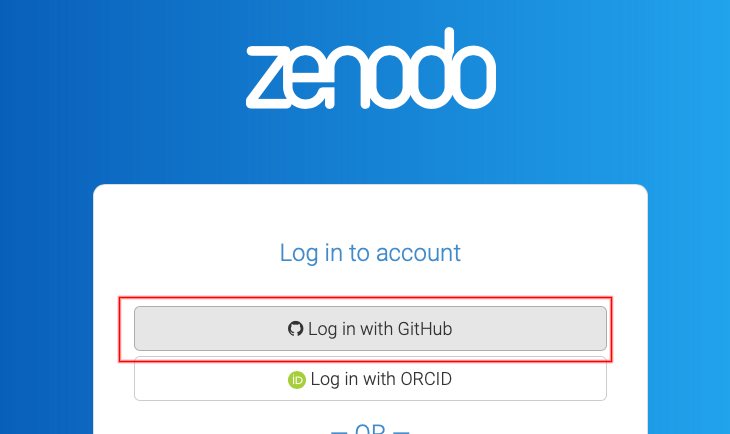
First, making sure we’re on sandbox.zenodo.org, we need to sign up using our GitHub account - using Log in or Sign up, and and selecting GitHub.
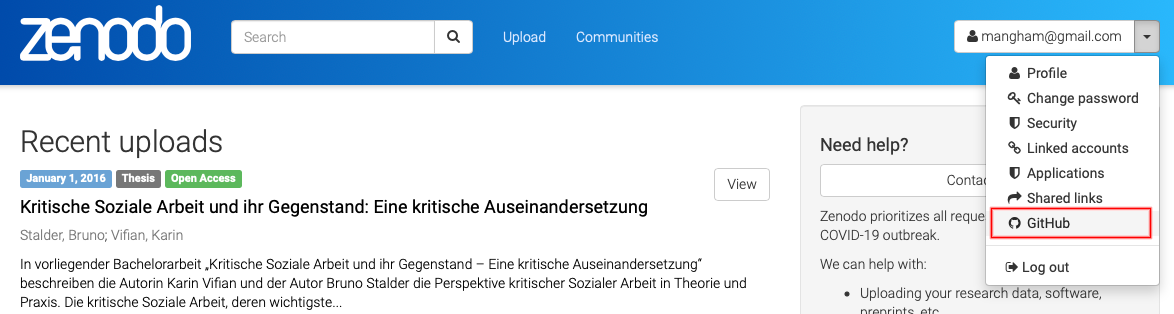
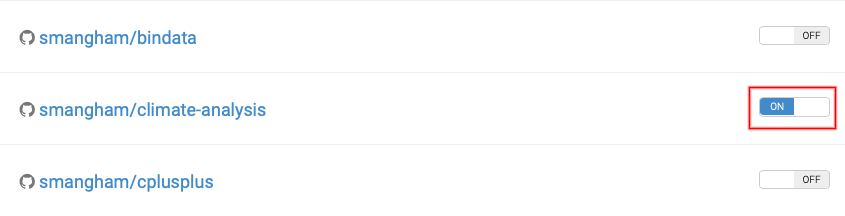
Once you’ve logged in, selecting GitHub from the drop-down menu
opens a list of your repositories, and we can toggle them to ‘on’ to begin tracking releases on them.
Zenodo won’t retroactively generate DOIs for releases, so we need to head back to GitHub, and create a new release, then go back to Zenodo and click on our repository to see the status of our upload.
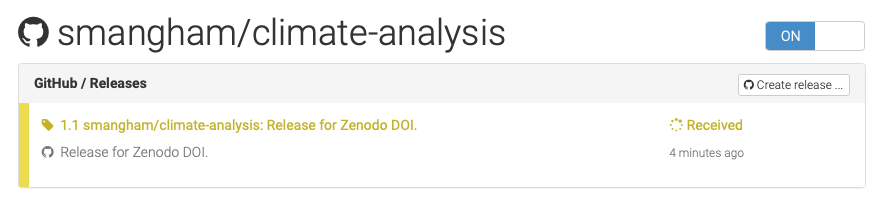
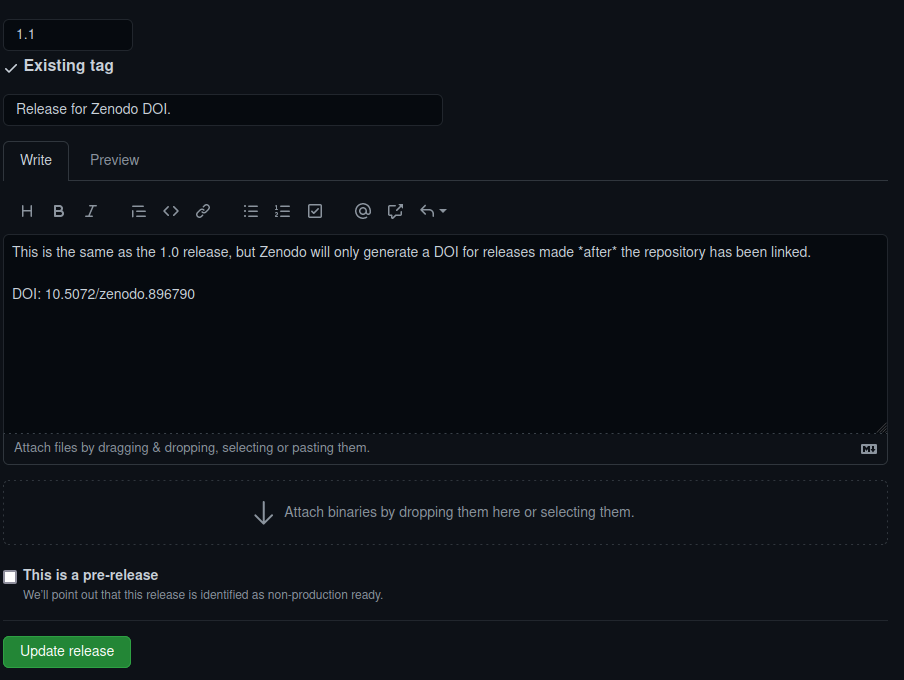
Depending on how busy Zenodo is, this can take anything from minutes to hours to process. Once it’s done, though, you get a DOI, which we can then edit into the message for our release.

Chickens and Eggs
There’s one slightly annoying quirk with using Zenodo to generate DOIs; you only get the DOI after creating the Release for a commit.
This means you can’t put the DOI for a commit in the
README.mdor aCITATION.cfffile for that commit. Unfortunately, there’s not really a good way around this! A work-in-progress project called Zenodraft is aiming to provide a solution by pre-reserving DOIs, and Zenodo say they are looking into the issue further.
Citation Files
You’ll have noticed the Zenodo upload gives you a template CITATION.cff file.
This is a handy way of letting people who use your code know how you’d like to be cited.
There’s more detail on these files here,
but one of the most important features is the ability to add your ORCID,
to easily link you to your code in a way that’s not dependent upon your university email address.
You can also request users cite multiple DOIs - for example, the DOI of a commit, and one of a
release paper.
GitHub now also supports CITATION.cff files. A repo with one will have a button informing users of
how to cite it, and providing a pre-made BibTex citation.
Adding a CITATION.cff
Using the template from Zenodo, add a
CITATION.cfffile to your repository, then push it to GitHub.Solution
Contents of
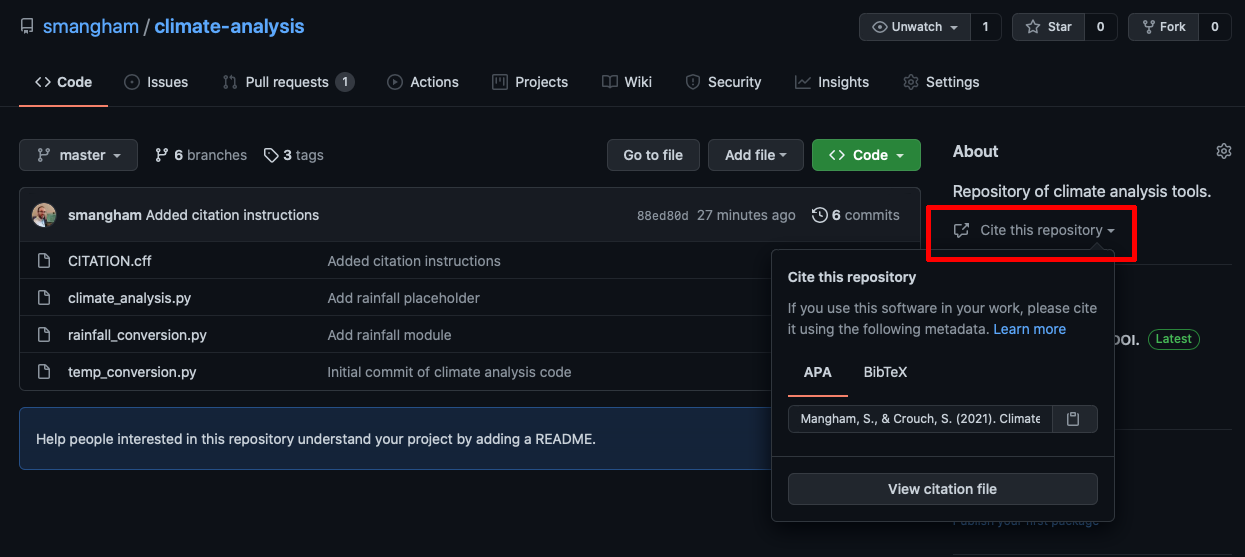
CITATION.cff:cff-version: 1.1.0 message: "If you use this software, please cite it as below." authors: - family-names: Mangham given-names: Sam orcid: https://orcid.org/0000-0001-7511-5652 - family-names: Crouch given-names: Steven orcid: https://orcid.org/0000-0001-8985-6814 title: Climate Analysis Code version: 1.1 doi: 10.5072/zenodo.896790 date-released: 2021-08-26git add CITATION.cff git commit -m "Added citation instructions"[master 88ed80d] Added citation instructions 1 file changed, 13 insertions(+) create mode 100644 CITATION.cffgit pushEnumerating objects: 4, done. Counting objects: 100% (4/4), done. Delta compression using up to 4 threads Compressing objects: 100% (3/3), done. Writing objects: 100% (3/3), 510 bytes | 510.00 KiB/s, done. Total 3 (delta 1), reused 0 (delta 0), pack-reused 0 remote: Resolving deltas: 100% (1/1), completed with 1 local object. To github.com:smangham/climate-analysis.git d596ad4..88ed80d master -> masterNow, when we check on GitHub, there’s a button that provides a BibTex (or APA) format citation for your code.
Software licensing
Software licensing can be a whole topic in itself, so we’ll just summarise here. Your institution’s Intellectual Property (IP) team will be able to offer specific guidance that fits the way your institution thinks about software.
In IP law, software is considered a creative work of literature, so any code you write automatically has copyright protection applied. This copyright will usually belong to the institution that employs you, but this may be different for PhD students. If you need to check, this should be included in your employment / studentship contract or talk to your university’s IP team.
Since software is automatically under copyright, without a license no one may:
- copy it
- distribute it
- modify it
- extend it
- use it (unclear - this has not been properly tested in court yet)
Fundamentally there are two kinds of license, Open Source licenses and Proprietary licenses, which serve slightly different purposes.
Proprietary licenses are designed to pass on limited rights to end users, and are most suitable if you want to commercialise your software. They tend to be customised to suit the requirements of the software and the institution to which it belongs - again your institutions IP team will be able to help here.
Open Source licenses are designed more to protect the rights of end users - they specifically grant permission to make modifications and redistribute the software to others. The website Choose A License provides recommendations and a simple summary of some of the most common open source licenses.
Within the open source licenses, there are two categories, copyleft and permissive. The permissive licenses such as MIT and the multiple variants of the BSD license are designed to give maximum freedom to the end users of software. These licenses allow the end user to do almost anything with the source code.
The copyleft licences in the GPL still give a lot of freedom to the end users, but any code that they write based on GPLed code must also be licensed under the same license. This gives the developer assurance that anyone building on their code is also contributing back to the community. It’s actually a little more complicated than this, and the variants all have slightly different conditions and applicability, but this is the core of the license.
Which of these types of license you prefer is up to you and those you develop code with. If you want more information, or help choosing a license, the Choose An Open-Source License (linked here) site can help.
Key Points
Releases are stable versions of the code.
Zenodo can automatically generate DOIs for releases.
Software licenses can restrict what others can do with your code.